background image

11

Complete on-screen setup and start streaming

Follow the on-screen setup instructions. To activate your streaming player, you will need to 

use your computer or smart phone to link to a Roku account.


roku.com/link

Video

tutorials 

Add

channels

Wireless

help

Mobile

app

Need more help
getting started?

go.roku.com/rss

Getting the most
out of your Roku 
streaming player.

go.roku.com/usingroku

 USB1

 USB1

HDMI2

HDMI1

AV

VGA

KEYSTONE

H

D

M

I3

U

S

B

2

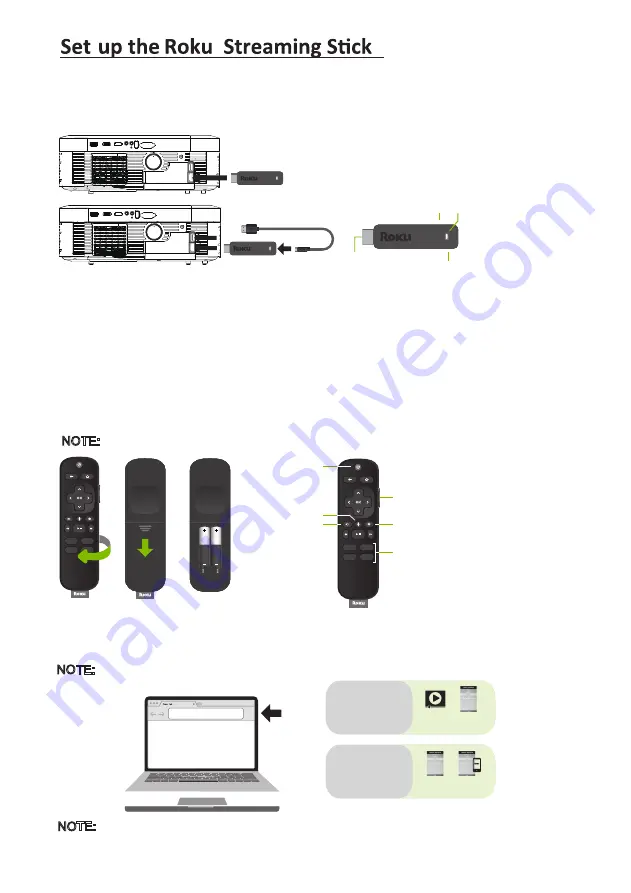
Power and

status light

USB power

Reset

HDMI®

connector

supplied USB cable

Roku Streaming Stick

®

NOTE: Roku does not charge for activation support – beware of scams.

STEP 4 :

Volume

Channel
shortcuts

Options

 Power

 Instant replay

Voice button

Make your new RCA Full HD Projector smart!

Stream almost anything across thousands of free or paid streaming channels
including hit movies, popular shows, live TV, news, sports and more.

The Roku  Streaming Stick  may be pre-installed in select models.

 USB1

 USB1

HDMI2

HDMI1

AV

VGA

KEYSTONE

H

D

M

I3

U

S

B

2

®

®

NOTE: 

®

®

STEP 1:

 Install the Roku   Streaming Stick 

Plug your streaming player into the HDMI    3 port on your projector.

STEP 2:

 Connect to power

For the best streaming experience, use the included USB power cable to connect the streaming 

player to the USB port on your projector. Power on the projector and select the HDMI 3 input. 

STEP 3: 

Pair your Roku    remote

On the back side of the remote, slide open the battery cover. Insert included batteries placing 

the negative (-) ends in first. Your remote should pair with your streaming player automatically. 

For help pairing your remote, visit go.roku.com/remotehelp.

®

®

®

Be sure to always remove any connected devices when moving or transporting

 the projector.

NOTE: 

NOTE: To operate your Roku   Streaming Stick   , you must use the included Roku   remote.

®

®

®

Содержание RPJ138

Страница 1: ...尺寸 210 145MM 80克书纸 黑白印刷 ...

Страница 2: ...rnational Ltd ROKU STREAMING STICK and the ROKU logo are the trademarks or registered trademarks of Roku Inc Ideal for dark viewing environments for optimal performance Please note Projector brightness is measured in ANSI lumens Your viewing environment is the deciding factor on how many lumens your projector needs Includes Roku Streaming Stick ...

Страница 3: ...storms or when unused for long periods 12 Refer all servicing to qualified service personnel Servicing is required when the apparatus has been damaged in any way such as power supply cord or plug is damaged liquid has been spilled or objects have fallen into the apparatus the apparatus has been exposed to rain or moisture does not operate normally or has been dropped 13 Use only with a cart stand t...

Страница 4: ...nit not expressly approved by the party responsible for compliance could void the user s authority to operate the equipment 6 WARNING Use of this unit near fluorescent lighting may cause interference regarding use of the remote If the unit is displaying erratic behavior move away from any fluorescent lighting as it may be the cause 7 WARNING Shock hazard Do Not Open 8 Caution and marking informati...

Страница 5: ...llation If this equipment does cause harmful interference to radio or television reception which can be determined by turning the equipment off and on the user is encouraged to try to correct the interference by one or more of the following measures Reorient or relocate the receiving antenna Increase the separation between the equipment and receiver Connect the equipment into an outlet on a circui...

Страница 6: ... Remote P8 Install Remove Battery Of Remote P8 Controls of Projector P9 Install Power Adapter P10 Main Operation P10 Connect HDMI show the Image On Projector Screen P12 Connect AV Show The Image On Projector Screen P12 Connect VGA Show The Image On Projector Screen P13 Connect Audio Output Aux Out Line Out Earphones P13 Install USB Device P14 Using USB Playback P14 4 Using Projector Menu 1 0 P15 U...

Страница 7: ...f the screen NOTE A projector mount is required to install the projector in a ceiling Rear Table Select this location with the projector placed near the floor behind the screen NOTE That a special rear projection screen is required Rear Ceiling Select this location with the projector suspended upside down from the ceiling behind the screen NOTE A projector mount is required to install the projecto...

Страница 8: ...nd follow the instructions that come with the mount Before installing the projector in the ceiling please check to make sure the ceiling structure can support the weight of the projector and the mount If in doubt please ask the advice from an installation professorial NOTE Projector mount and screw s not included 6 CEILING HANGER FIXED HANGER HOLES Square Rectangle SCREEN Remove four screws on bot...

Страница 9: ...he screen edges may be less sharp than the screen center Keystone image is created when the projector beam is projected to the screen in an angle Keystone correction will restore the distorted image to a rectangular or square shape 7 SCREEN PROJECTOR VERTICAL DIMENSION VERTICAL DIMENSION SCREEN PROJECTOR VERTICAL DIMENSION SCREEN PROJECTOR Adjust this knob ANGLE ADJ knob to fine tune the display an...

Страница 10: ...as sunshine fire Be sure that the batteries are installed polarity correctly Do not mix old and new batteries Only same or equivalent type batteries as recommend are to be used Do not dispose of batteries in fire battery may explode or leak Do not try to recharge a battery 8 MUTE AAA UM4 AAA UM4 BATTERY DOOR OK FLIP NAVIGATOR BUTTONS RETURN HOME MENU VOLUME POWER ON OK FLIP VOLUME Tip The Roku Str...

Страница 11: ...1 AV VGA KEYSTONE 2 3 4567 8 9 10 11 12 13 15 16 17 14 1 Lens and Focus Adj Knob 2 USB port 1 Media player 3 HDMI port 1 4 HDMI port 2 5 AV Jack 6 Earphone jack 7 IR Window Rear side 8 VGA port 11 Trapezoidal Adj Knob 12 OK 17 IR Window Front side ...

Страница 12: ...rojector menu Press the buttons to select screen item of projector menu EXIT Press the button to exit the projector menu VOL VOL Press the buttons to select correct sound Press the button to play pause the connect USB Press the button to enter home menu Press to muting the audio sound of your projector Press again to resume 10 OK OK Press the button to rotate mirror the projector screen FLIP USB1 ...

Страница 13: ...aid streaming channels including hit movies popular shows live TV news sports and more The Roku Streaming Stick may be pre installed in select models USB1 USB1 HDMI2 HDMI1 AV VGA KEYSTONE HDMI3 USB2 NOTE STEP 1 Install the Roku Streaming Stick Plug your streaming player into the HDMI 3 port on your projector STEP 2 Connect to power For the best streaming experience use the included USB power cable...

Страница 14: ...NEL WHITE AUDIO RIGHT CHANNEL RED CABLE NOT INCLUDE USB1 USB1 HDMI2 HDMI1 AV VGA KEYSTONE HDMI CABLE CABLE NOT INCLUDE In rare cases if the projector s speaker has no sound when playing a DVD movie in a player connecting to the HDMI input please check the player s digital audio settings and make sure it is set to Auto mode or PCM mode HDMI HD signal input this interface can be input with HD player...

Страница 15: ...e to connect follow below figure 3 After connect and turn on both units Your projector sound from external device now 4 After using turn off both unit Connect VGA Follow below picture to connect HDMI cable to the device 1 Turn off the unit before connect VGA cable 2 Press the button to turn off power of your projector before connection light GREEN 4 the VGA device will be displayed on the projecto...

Страница 16: ...USB device into USB port GREEN 4 OK to play the video file on the U disk NOTE FIRST 14 Install USB Device Follow below picture to install USB Turn off the unit before install USB CABLE NOT INCLUDE Station Amplifier Audio cable USB1 USB1 HDMI2 HDMI1 AV VGA KEYSTONE USB1 USB1 HDMI2 HDMI1 AV VGA KEYSTONE movie icon ...

Страница 17: ... playback press the screen show on lower figure 1 2 Use the button to select icon and press Figure 1 Sub Menu on Music screen 3 When music playback press the screen show on lower figure 2 4 Use the button to select icon and press Figure 2 Sub Menu on Movie screen 5 When movie playback press the screen show on lower figure 3 6 Use the button to select icon and press Figure 3 Pause Next Prev Stop Re PL...

Страница 18: ...K PRESS OK Balance 0 Auto Volume Off Surround Sound Off SoundModeStandard OK Color temper temperature Customer define Parameter red 0 100 blue 0 100 green 0 100 Aspect Ratio 4 3 The signal in a 4 3 aspect ratio projection image 16 9 The signal in a 16 9 aspect ratio projection image Use to select different picture effect to Soft Standard Vivid User Use or to select Contrast Brightness Color Sharpn...

Страница 19: ... Nederlands Chinese Franais Deutech Slovenina Slovak Espanol Italiano Norsk Portugues Magyar Srpski Esky Polski Svenska Dansk Romnete Suomi OSD Language English Restore Factory Default Panel Rotate 0 Info OSD Language Restore Factory Default USE TO SELECT USE TO SELECT PRESS OK PRESS OK USE TO SELECT OK OK button to select different Use to select rotate 0 rotate 1 rotate 2 rotate 3 to set screen a...

Страница 20: ... Off Timer Off On Timer Off Sleep Timer Off USE TO SELECT USE TO SELECT USE TO SELECT USE TO SELECT PRESS OK PRESS OK USE TO SELECT PRESS OK PRESS OK Auto Sleep Never Clock Off Timer Off Sleep Timer Off On Timer Off PRESS OK Auto Sleep Never OK Specifications Light Source Type LED Brightness Output White light output ANSI 215 lm White Brightness output ANSI 159 lm Display Native Resolution 1920 10...

Страница 21: ...ctor 2 Check the lens cover has been removed 3 Check the cables are securely attached and installed as per the User Manual 4 The image source may not be set correctly Press the Source button on the Control Panel or the Remote to select the correct setting 5 Check in the Menu section under Video input signal to make sure that has been set correctly Before resorting the maintenance service please ki...

Страница 22: ...obtenir assistance et information appelez 1 800 968 9853 Curtis International Ltd 7045 BECKETT DRIVE UNIT 15 MISSISSAUGA ON L5S 2A3 www curtisint com Roku Streaming Stick will not power on You cannot see the video from your Roku Streaming Stick on your projector The Roku Streaming Stick needs to be properly connected to power in order to function For optimal performance use the included USB cable ...

Страница 23: ...d maintenance Please turn off the projector and disconnect the power line before cleaning Do not use detergents or solvents After cleaning before the projector resumes operation please make sure that there is no shielding around the projector and ensure the smooth ventilation After cleaning for a short time still appear overheating hint or found that there is damage to the filter please replace th...

Страница 24: ...22 ...

Отзывы: