background image

17

18

3.1.  Initial Installation

The first time the unit is turned on or anytime the system is restored to 

the defaulted settings, the Initial Installation wizard will be displayed on the 
screen. 

Conect the antenna cable to the RF connector at the connections panel 

and  follow  the  steps  displayed  on  the  screen  to  set  up  the  system  basic 
settings (Language, Cable, etc.) and start an auto search of TV channels.

Turn on the TV by pressing the 

POWER

 button on TV 

or  on  the  remote  control,  press 

SOURCE

  and  use  the 

direction  buttons 

  / 

  to  select  the  desired  source 

depending  on  the  equipment  you  have  connected  (AV, 
HDMI, PC) or choose TV to enter these mode.

Use 

MTS

 button to select the audio language broadcasting, 

CC

 button  to 

show or hide subtitles on screen and 

FAV

 button to see a list of your favorite 

channels.

3.2.  Audio/Video Source Selection

3.3.  DTV Mode Operations

3. Initial Setup

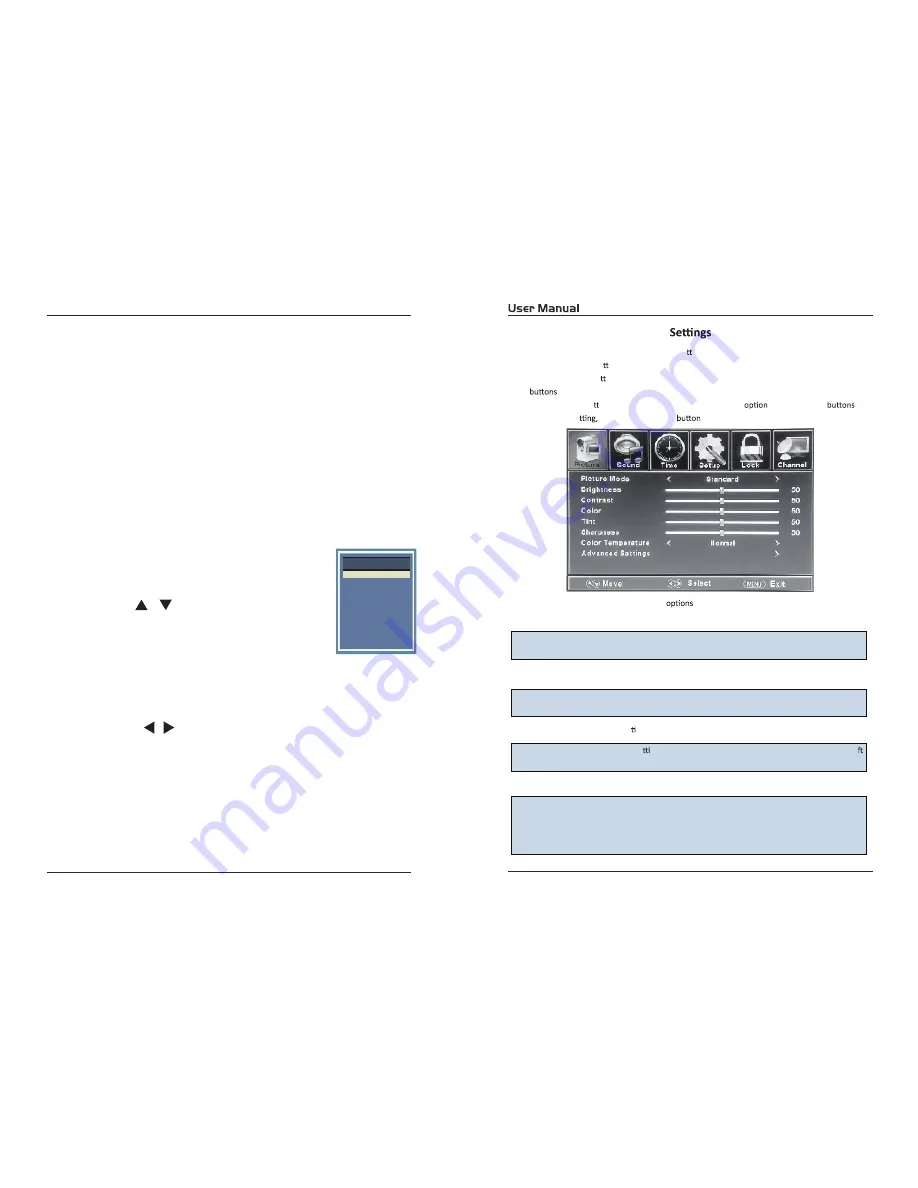
Customizing the PICTURE 


4. SETTINGS

4.1.

Select TV source for example. (Press SOURCE bu on to select TV mode) 
1.


Press the POWER bu on to turn the LED TV on. 

2.


Press the MENU bu on on the remote control to display the Main menu, and use the 

/


 to select the PICTURE. 

3.


Use  the 

/

  bu ons  to  highlight  an  individual  PICTURE 

,  use  the 

/


  to 

change the se

 and press the MENU 

 to exit the menu. 

 The PICTURE menu includes the following 

Picture Mode 

Contrast 

Control  the  difference  between  the  brightness  and  darkest  regions  of  the


picture. 

Brightness 

Control the overall brightness of the picture. 

Color 

Control the color. 

Tint 

Controls the  nt. 

Sharpness 

In

1)ASPECT RATIO This feature changes the various aspects of the TV’s video.
(Aspects include wide, zoom, cinema, normal).
2)NOISE REDUCTION This feature reduces general pixilation by blurring them.
3)DYNAMIC CONTRAST This feature allows the TV to automatically adjust the
contrast of the TV depending on the picture you are viewing.

crease  this  se ng  to  see  crisp  edges  in  the  picture;  decrease  it  for  so  

edges. 

Color

Advanced 

Settings

 Temp. 

Cycles among color modes: Normal, 

Cool.


Warm,


Cycle among picture display modes: Standard, Dynamic, Soft, user.


Use 

CH+

 or 

CH-

 buttons to tune the desired channel, or enter the channel 

number directly using the numeric keypad. Press 

OK

 to display on screen the 

list of TV (press the 

 / 

 buttons to sort by group and show only the DTV,

the analog TV channels, etc.).

TV

AV

YPbPr

HDMI1
HDMI2

HDMI4

HDMI3

PC

Source Select

Содержание RLED4843-UHD

Страница 1: ...RLED4843 UHD 48...

Страница 2: ...l Installation 3 3 DTV Mode Operations SETTINGS PC Mode Initial Setup 4 1 Customizing the PICTURE Settings 4 2 Customizing the SOUND Settings 4 3 Customizing theTIME Settings 4 4 Customizing the SETUP...

Страница 3: ......

Страница 4: ......

Страница 5: ...0mm mounting kit designde for flat panel TVs not supplied Mount this unit according to the instructions included in the monting kit Length of screw should not exceed 11mm NOTE Remove the base stand be...

Страница 6: ...AUDIO OUT Output Audio L R left right 1 USB For Service HDMI1 VIDEO Y R L AUDIO Pb Pr COAXIAL Headphone HDMI2 HDMI3 VGA RF PC AUDIO AUDIO OUT USB For Service 5V 0 5A AC 100 120V 60Hz...

Страница 7: ...source 14 HDMI Press to switch to HDMI signal 15 TV Press to switch to TV signal source 16 AV Press to switch to AV signal source 19 11 17 8 6 directly source directly directly directly 24 25 27 26 28...

Страница 8: ...adaptor HDMI2 HDMI3 VGA RF PC AUDIO AUDIO OUT USB For Service 5V 0 5A HDMI1 VIDEO Y R L AUDIO Pb Pr COAXIAL Headphone AC 100 120V 60Hz HDMI1 VIDEO Y R L AUDIO Pb Pr COAXIAL Headphone AC 100 120V 60Hz...

Страница 9: ...Coaxial output HDMI2 HDMI3 VGA RF PC AUDIO AUDIO OUT USB For Service 5V 0 5A HDMI2 HDMI3 VGA RF PC AUDIO AUDIO OUT USB For Service 5V 0 5A HDMI1 VIDEO Y R L AUDIO Pb Pr COAXIAL Headphone AC 100 120V...

Страница 10: ...ntrol to display the Main menu and use the to select the PICTURE 3 Use the bu ons to highlight an individual PICTURE use the to change the se and press the MENU to exit the menu The PICTURE menu inclu...

Страница 11: ...ng else please use make sure AUTO CLOCK is turned o ow you to set up the sleep among 5min 10min 15min 30min 60min 90min 120min 180min 240min and o Time Zone Allow you to set up the sleep among Paci c...

Страница 12: ...Allow you to use the bu ons to adjust the V Posi on Clock Allow you to prolong the image Phase Allow you to adjust the de Auto Select Auto and press the bu on the unit will automa adjust all items to...

Страница 13: ...d Use the bu on to select the Change Password item then press the bu on to enter into the following menu Input the new 4 digital password and input it again to con rm System Lock Allow you to turn on...

Страница 14: ...ance Suggested May contain material not suited for younger viewers PG 13 Contains content that may not be appropriate for viewers under the age of 13 R Restricted Contains adult content no one under 1...

Страница 15: ...ma cally The receivable channels will be stored automa cally When searching channels press MENU to stop Favorite Channel list Allow you t add these channels which you desired as the favorite channels...

Страница 16: ...t up informa on will apply in almost all cases 1 First click on Control Panel on the Windows start menu 2 When the control panel window appears click on Appearance and Themes and a display dialog box...

Страница 17: ...TV TV TV 6...

Страница 18: ...and RLED4843 UHD Optical 300 5000 1 8 5ms 3840x2160 120W AC 100 120V 60Hz USB For service 7 7...

Страница 19: ...MANUEL UTILISATEUR TV Ecran large num rique TV LED 48 RLED4843 UHD...

Страница 20: ...n un PC 2 8 Branchement du casque 3 Configuration initiale 3 1 Installation initiale 3 2 S lection de la source Audio vid o 3 3 Fonctionnement du mode TNT 4 Param tres 4 1 Personnalisation des param t...

Страница 21: ...outes les consignes de s curit et de fonctionnement doivent tre lues avant que le produit est exploit 2 CONSERVEZ LES INSTRUCTIONS Les instructions de s curit et de fonctionnement doivent tre conserv...

Страница 22: ...statique L article 810 du National Electrical Code ANSI NFPA 70 fournit des renseignements l gard du m t et la structure de support de la mise a terre correcte le du fil conducteur une unit de d charg...

Страница 23: ...tion de cet appareil demandez au technicien d effectuer les contr les de s curit pour d terminer que le produit est en bon tat de fonctionnement 22 Mur ou au plafond Le produit doit tre mont au mur ou...

Страница 24: ...de 9 Indicateur LED indicateur d tat Marche vert Veille Rouge Manuel utilisateur 1 3 2 Panneau de connexion 3 RF connexion de l antenne 5 VGA entr e vid o PC 6 HDMI 1 Port h te USB 4 AUDIO PC Connecte...

Страница 25: ...ivent pas tre expos s une chaleur excessive comme le soleil le feu etc Code T l commande Universel 20DF T l commande Universel non inclus 1 3 3 T l commande 6 SOMMEIL Minuterie Auto OFF OP RATIONS DE...

Страница 26: ...la figure Connectez votre lecteur vid o d codeur DVD ou similaire avec un c ble RCA de la sortie vid o YUV de l appareil l entr e vid o de votre t l viseur par le c ble comme indiqu dans la figure A l...

Страница 27: ...rtie casque de votre t l viseur pour couter l audio de l unit travers vos couteurs st r o Lorsque vous branchez un casque l appareil les principaux couteurs seront r duits au silence Connectez votre l...

Страница 28: ...ouleur Contr le l intensit des couleurs Teinte Contr le la teint Acuit Augmenter ce param tre pour voir la nettet des contours dans l image la diminuer pour les bords mous Temperature de couleur Bascu...

Страница 29: ...POWER pour allumer le t l viseur LED 2 Appuyez sur le bouton MENU de la t l commande pour afficher le menu principal et utiliser les touches pour s lectionner la minuterie 3 Utilisez les touches pour...

Страница 30: ...de vos pr f rences personnelles entr e le signal PC d abord puis appuyez sur le bouton SOURCE pour s lectionner le mode PC appuyez sur la touche pour confirmer Position H Position V Horloge Phase Auto...

Страница 31: ...er le mot de passe puis appuyez sur la touche pour entrer dans le menu ci dessous Entr e mot de passe 4 chiffres 1 Appuyez sur le bouton POWER pour allumer le t l viseur LED 2 Appuyez sur le bouton ME...

Страница 32: ...RT Vous permet de r tablir le r glage RRT d usine TV Utilisez le bouton pour faire afficher l l ment TV puis appuyez sur le bouton pour entrer dans le menu ci dessous Utilisez les touches pour s lecti...

Страница 33: ...e favori Permet d afficher ou de masquer les canaux Utilisez les touches pour faire afficher l l ment Afficher Masquer puis appuyez sur la touche pour entrer dans le menu ci dessous Cette fonctionnali...

Страница 34: ...nneau de commande appara t cliquez sur Apparence et th mes et une bo te de dialogue appara tra 3 Lorsque la fen tre du panneau de commande appara t cliquez sur Affichage et une bo te de dialogue appar...

Страница 35: ...e de faire fonctionner cet appareil L influence ext rieure tel que la foudre l lectricit statique etc qui est peut perturber le fonctionnement normal de cet appareil Appuyez sur le bouton pour teindre...

Страница 36: ...00 120V 60Hz Connectivit Entr e Vid o Composite Entr e Vid o Composant YPbPr Entr e vid o PC VGA Entr e audio PC Entr e HDMI Entr e antenne RF Sortie audio Casque Sortie audio num rique Optical Interf...

Отзывы: