background image

Press 

 / 

 button to select among Sound Mode/Treble / Bass / Balance /MTS/ Audio 

Language /Digital Audio Output/Surround Sound/AVL.

Press ENTER / 

 to enter.

Press 

 / 

 button to adjust.

Press MENU again or back to parent menu.

Sound Mode

Select a sound mode to achieve ideal sound.

Press 

 / 

 button to select(Standard/User/Movie/Sports/Music).

Note:The bass,treble and balance are only available in User mode,you can adjust as

 you like.
Standard                        Produces a balanced sound in all environments.

User                               Select to customize audio settings.

Movie                             Enhances treble and bass for a rich sound experience.

Sports                            Enhances vocals for TV audio.

Music                             Preserves the original sound.Good for musical programs.

Treble

Adjust the treble effect.Increases or decreases high-pitched sounds.

Press 

 / 

 button to adjust.

Bass

Adjust the bass effect.Increases or decreases lower-pitched sounds.

Press

 / 

 button to adjust.

Balance

Adjust the balance between left and right speakers to adapt to your 

listening position.

Press 

 / 

 button to adjust.

MTS

Configures the multi-track sound. It is only available in TV.

Press 

 / 

button to select(Mono/Stereo/SAP).

Mono              Sets the sound to mono.

Stereo            Sets the sound to stereo when stereo is not available,

                       the sound is automatically switched to mono.

SAP                Sets the sound to the second audio program.

Audio Language

Select the language supported by the chosen digital channel. It is available Only in TV.

Press 

 / 

 button to select(English / French / Spanish).

22

Содержание RLDEDV3255-A-B

Страница 1: ... two dogs Nipper and Chipper logo are registered trademarks or trademarks of RCA Trademark Management and are used under license by Curtis International Ltd Any other product service company trade or product name and logo referenced herein are neither endorsed nor sponsored by RCA Trademark Management or its affiliates ...

Страница 2: ......

Страница 3: ... Setup 16 SELECT INPUT SOURCE 18 Setup Wizard 16 Lock Menu 27 Main Menu Operation 19 Picture Menu 19 Time Menu 23 Channel Menu 31 PC Menu 32 DVD OPERATION 34 Remote Control 10 Install the Batteries 12 RF Antenna Connection 12 CONNECTING TO EXTERNAL DEVICES 12 Connecting via Composite Video 13 Connecting via Component Video 13 Connecting via HDIMI 14 Connecting to a PC 15 Connecting Headphones 15 C...

Страница 4: ...2 ...

Страница 5: ...3 ...

Страница 6: ...4 ...

Страница 7: ...5 ...

Страница 8: ...6 ...

Страница 9: ...e instructions included in the monting kit Length of screw should not exceed 10 mm NOTE Remove the base stand before mounting the unit on the wall Four mounting holes size M6 screw 200mm 100mm Panel side Screws 2 Screws 2 4 15BBH 4 15BBH 7 1 Match the TV unit into the stand then hold the TV stand revolve and lock the tv unit tightly as the arrowhead point 2 Fix the screws into the TV stand after i...

Страница 10: ...modes 3 Eject Eject disc 4 SOURCE Audio Video input source selection 5 MENU Open settings menu 6 VOL Decrease volume 7 VOL Increase volume 8 CH Previous channel 9 CH Next channel 10 IR RECEIVER Receives infrared signals from the remote control 11 INDICATOR LED Status indicator 8 General View Front and Back ...

Страница 11: ...IO IN L R Stereo audio input 9 OPTICAL PC AUDIO Connect it to the audio output terminal of the PC 3 HEADPHONES 10 5 HDMI 4 VGA PC Video input 6 YPbPr Connect to the YPbPr video output terminal of the DVD 7 VIDEO Video input HDMI1 VIDEO Y Pb Pr L R AUDIO Headphone OPTICAL Service Port 5V 0 5A RF VGA PC AUDIO HDMI2 HDMI3 9 Connection pannel ...

Страница 12: ...AV ADD ERASE FAV S MODE P MODE ASPECT FREEZE MTS OK CC D MENU AUDIO GOTO SUB TITLE MENU INFO EPG EXIT REPEAT MUTE POWER SOURCE D SETUP 10 Remote Control 1 4 5 8 15 12 14 7 11 3 6 9 10 17 19 21 13 2 16 18 20 23 25 22 24 27 29 26 28 ...

Страница 13: ...e needs the support of disk or flie 16 FREEZE Freeze the image 15 MTS In the TV condition press this button to select the stereo mode AUDIO Switch the audio channel when DVD or multimedia playing 17 CH LIST Show the list of channels TIME SHIFT In DTV mode press TS button to start the delay function press the button to start playing delay program press the button to terminate the delay functions Ne...

Страница 14: ...the remote control 1 Open the battery cover 2 Insert two size AAA batteries Place the batteries with their terminals corresponding to the and indications in the battery compartment 3 Replace the cover Service Port 5V 0 5A RF VGA PC AUDIO HDMI2 HDMI3 12 CONNECTING TO EXTERNAL DEVICES RF Antenna Connection ...

Страница 15: ...HDMI1 VIDEO Y Pb Pr L R AUDIO Headphone OPTICAL HDMI1 VIDEO Y Pb Pr L R AUDIO Headphone OPTICAL 13 Connecting via Composite Video Connecting via Component Video NOT INCLUDED NOT INCLUDED ...

Страница 16: ...1 VIDEO Y Pb Pr L R AUDIO Headphone OPTICAL HDMI1 VIDEO Y Pb Pr L R AUDIO Headphone OPTICAL Service Port 5V 0 5A RF VGA PC AUDIO HDMI2 HDMI3 14 Connect to digital Audio Amplifier Connecting via HDIMI NOT INCLUDED NOT INCLUDED ...

Страница 17: ...Service Port 5V 0 5A RF VGA PC AUDIO HDMI2 HDMI3 HDMI1 VIDEO Y Pb Pr L R AUDIO Headphone OPTICAL 15 Connecting to a PC Connecting Headphones NOT INCLUDED NOT INCLUDED ...

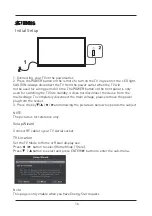
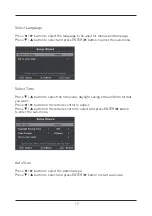
Страница 18: ...t does not disconnect the device from the main voltage To completely disconnect the main voltage please remove the power plug from the socket 3 Press the key and following the picture as bellow to operate the subject NOTE The picture is for reference only Setup Wizard Connect RF cable to your TV Aerial socket TV Location Set the TV Mode to Home or Retail display use Press button to select Home Mod...

Страница 19: ...enu Select Time Press button to select the time zone daylight saving time and time format you want Press button on the remote control to adjust Press button on the remote control to select and press ENTER button to enter the sub menu Auto Scan Press button to select the antenna type Press button to select and press ENTER button to start auto scan 17 ...

Страница 20: ...Press ENTER button to enter the input source Press EXIT button to quit Main Menu Press MENU to display the main menu or return to the previous menu or close the main menu Press to highlight the desired menu icon and press ENTER to select If no buttons are pressed the menu will close automatically after about 10 seconds 18 ...

Страница 21: ...ss MENU again or back to parent menu Picture Mode Adjust picture mode to change picture appearance Press button to select Standard Dynamic Soft User Power Saving Note The brightness contrast color tint and sharpness are only available in User mode you can adjust as you like Standard Produces a highly defined image in a normally lit room Dynamic Produces a highly defined image in a brightly lit roo...

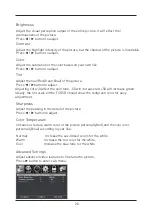
Страница 22: ...ness Adjust the peaking in the detail of the picture Press button to adjust Color Temperature Increase or reduce warm color of the picture personally red and the cool color personally blue according to your like Normal Increase the sex linked colors for the white Warm Increase the red color for the white Cool Increase the blue tone for the white Advanced Settings Adjust advanced video features to ...

Страница 23: ...tions to reduce video noise Off Select to turn off video noise detection Low Detect and reduce low video noise Middle Detect and reduce moderate video noise High Detect and reduce enhanced video noise Dynamic Contrast Automatically adjust picture detail and brightness Press button to select Off On HDMI Mode Only available in HDMI input Press button to select Auto Video Graphic Sound Menu Press MEN...

Страница 24: ...c Preserves the original sound Good for musical programs Treble Adjust the treble effect Increases or decreases high pitched sounds Press button to adjust Bass Adjust the bass effect Increases or decreases lower pitched sounds Press button to adjust Balance Adjust the balance between left and right speakers to adapt to your listening position Press button to adjust MTS Configures the multi track s...

Страница 25: ... Set the auto volume control Press button to select On Off Time Menu Press MENU to enter the main menu Press button to select Press ENTER to enter Press MENU again to exit or back to parent menu Press button to select among Sleep Timer Time Zone Daylight Saving Time Time Format Auto Clock Clock Press ENTER to enter Press button to adjust Press MENU again or back to parent menu Sleep Timer Set a ti...

Страница 26: ...lock Use to synchronize the display automatically Press button to select On Off Setup Menu Press MENU to enter the main menu Press button to select Press ENTER to enter Press MENU again to exit or back to parent menu Press button to select among Menu Language Transparent OSD Timeout Closed Caption Over Scan Input Label Other settings Restore Default Setup Wizard CEC Voice guidance Video Descriptio...

Страница 27: ...display menu Press button to select 0 25 50 75 100 OSD Time out Adjust the duration of the OSD on screen display menu Press button to select 5 Sec 15Sec 30Sec 45Sec 60Sec Closed Caption Adjust Closed Captioning settings Only available under TV and AV source Press ENTER button to enter Over Scan Press button to select On Off Input Labels Create labels for the devices connected to your TV Press ENTE...

Страница 28: ...ff When you turn the Audio Only on and exit the OSD menu the panel will be dark and then press any key to exit the Audio Only status Press button to select On Off Restore Default Change power on options or reset TV to factory default Press ENTER button to enter Setup Wizard Set the first time installation Press ENTER button to enter For detail please refer to page 16 17 26 ...

Страница 29: ...nels AVL This item uses for reducing the difference between channel and program s volume automatically This function reduces the fluctuation of the sound Lock Menu Press MENU to enter the main menu Press button to select Press ENTER to enter Press MENU again to exit or back to parent menu Press ENTER button to enter 27 Voice guidance Set the anto voice guidance control Text To Speech Press button ...

Страница 30: ...elect among Change Password Key Lock System Lock Input Block US Rating Canada Rating RRT Setting Reset RRT Press ENTER to enter Press button to adjust Press MENU again or back to parent menu Enter your 4 digital password Default password is 0000 and if forget what you set please call the service center Change Password Enter a new 4 digital password then re enter it to confirm Press button to enter...

Страница 31: ...g table for digital channels The item is available only When current stream has downloadable rating data Reset RRT Reset the RRT to default The item is available only When current stream has downloadable rating data US Rating For the United States the rating setting basically include the following options TV MPAA The TV rating compose of two aspects age based and content based Age Define TV Y Gene...

Страница 32: ...propriate for children under 13 NC 17 Restricted Children under 17 require accompanying parent or adult guardian Off No one 17 and under admitted X Adult audience only Canada Rating For Canada the rating setting include the following options Canada English Canada French Canada English These ratings are for programs which are using English rating system Canada French The ratings are for programs wh...

Страница 33: ...nnel List Show Hide Channel Number Channel Label Press ENTER to enter Press button to adjust Press MENU again or back to parent menu Air Cable Select signal type Press button to select Air Cable Auto Scan Automatically search for channels Press ENTER button to enter Favorites Add channels to create a favorite list Press button to enter Channel List Display your program list Press button to enter 3...

Страница 34: ...ber Show the channel number Press button to adjust select 5 1 5 2 6 0 Channel Label Create labels for channels up to 7 characters Press button to adjust PC Menu Press INPUT to select PC source Press MENU to enter the main menu Press button to select Setup menu Press to select PC Settings 32 ...

Страница 35: ...osition of the picture Press button to adjust Phase Adjust the horizontal interfering lines Press button to adjust Auto Adjust to the screen automatically to the optimal position of the picture Press button to enter Notes 1 PICTURE menu and description are the same as that for TV mode 2 MTS and Audio Language in SOUND menu are invalid 3 TIME menu and description are the same as that for TV mode 4 ...

Страница 36: ...enter Press the button to set the OSD language as desired Screen Saver If Screen Saver is selected press the button to enter Press the button to turn it On or Off Last Memory If Last Memory is selected press the button to enter Press the button to turn it On or Off Audio Setup Page Downmix If Downmix Setup is selected press the button to enter Press the button to set the Downmix Setup Select Downm...

Страница 37: ...ress the button to enter Press the button to select the desired level then press the OK button The Password window will appear on the screen Enter the four digit password by pressing the numeric buttons default password is 0000 then press the OK button to confirm the selection and exit Password If Password is selected press the button to enter then press the OK button The sub setting menu will app...

Страница 38: ...ISC DISPLAYED POOR PICTURE OR SOUND Ensure you have set the player s AUDIO settings correctly Ensure the disc is not scratched or stained Ensure you have put the disc in the slot Ensure the disc is not upside down the silver data side should be facing towards you when viewed from the front of the TV Ensure the disc is not distorted stained or scratched Ensure the disc is not warped damaged or defo...

Страница 39: ...tor plug for secure connection and any damage Antenna cable type is not correct Check antenna cable type VHF UHF Direction or position of antenna is incorrect Adjust the direction or position of antenna Signal is weak Attempt to use signal amplifier TV image is better but has noise Antenna cable connector is loose cable is damaged Check the antenna cable connector plug for secure connection and an...

Страница 40: ...0 120V 60Hz Connectivity Composite Video Input Component Video Input HDMl input x 3 RF Antenna Input Headphones Output OPTICAL Output Data Interface USB Supported System Files FAT32 and FAT16 Remote Control Signal Type Infrared Control Distance 8 meters Control Angle 30 Horizontal Power Supply AAA 1 5V x 2 PC Video Input VGA PC Audio Input 38 ...

Страница 41: ...go de deux chiens Nipper et Chipper sont des marques déposées ou des marques déposées de marque RCA Gestion et sont utilisés sous licence par Curtis International Ltd Tout autre produit service entreprise commerce ou produit nom et le logo mentionnés aux présentes ne sont ni approuvés ni sponsorisés par Gestion de marque RCA ou de ses filiales ...

Страница 42: ......

Страница 43: ...NEZ LA SOURCE D ENTRÉE 18 Assistant de configuration 16 Menu de verrouillage 27 Fonctionnement du Menu Principal 19 Menu Image 19 Menu de l heure 23 Menu Canal 31 Menu PC 32 FONCTIONNEMENT DU DVD 34 Télécommande 10 Installe les piles 12 Raccordement d antenne RF 12 CONNEXION AUX DISPOSITIFS EXTERNES 12 Connexion via Composite Vidéo 13 Connexion via Component Vidéo 13 Connexion via HDMI 14 Connexio...

Страница 44: ...SSEMENT POUR REDUIRE LE RISQUE D INCENDIE OU DE CHOC ÉLECTRIQUE NE PAS EXPOSER CET APPAREIL À LA PLUIE OU DANS L EAU L éclair avec une pointe de flèche dans un triangle équilatéral est destiné à alerter l utilisateur de la présence de tension dangereuse non isolée qui peuvent être d une ampleur suffisante pour constituer un risque d électrocution pour les gens Le point d exclamation dans un triang...

Страница 45: ...ale avant le nettoyage Ne pas utiliser de nettoyants liquides ou en aérosol Utilisez un chiffon humide pour nettoyer 6 CORDON Ne pas utiliser d accessoires non recommandés par le fabricant du produit car ils peuvent être dangereux 7 EAU ET HUMIDITÉ Ne pas utiliser ce produit près de l eau par exemple près d une baignoire un lavabo un évier ou un bac à linge dans une cave humide ou près d une pisci...

Страница 46: ... large que l autre Cette fiche n entre pas dans la prise électrique qu une seule façon C est à cause de sécurité si vous n arrivez pas à insérer complètement la fiche dans la prise essayez d inverser la prise Si la fiche n entre toujours pas bien demandez à votre électricien pour remplacer la prise obsolète Ne supprimez jamais la sécurité de la fiche polarisée 12 PROTECTION DU CORDON D ALIMENTATIO...

Страница 47: ...es rallonges ou les prises multiples car cela peut entraîner un risque d incendie ou de choc électrique 17 INSTRODUCTION D OBJET ET DE LIQUIDE N insérez jamais d objet dans ce produit à travers les ouvertures car ils pourraient toucher des points de tension dangereux ou court circuit qui pourrait entraîner un incendie ou d électrocution Ne renversez jamais de liquide d aucune sorte sur le produit ...

Страница 48: ... cela indique le besoin de service 20 PIÈCES DE RECHANGE Lorsque des pièces de rechange sont nécessaires assurez vous que le technicien a utilisé des pièces de rechange spécifiées par le fabricant ou de mêmes caractéristiques que la pièce originale Des substitutions non autorisées peuvent causer un incendie un choc électrique ou d autres dangers 21 CONTRÔLE DE SÉCURITÉ À la fin de tout service ou ...

Страница 49: ... incluses dans le kit de montage Longueur de vis ne doit pas dépasser 12mm NOTA Retirez le support de base avant de monter l appareil sur le mur Four mounting holes size M6 screw 200mm 100mm Screws 2 Screws 2 4 15BBH 4 15BBH 7 1 Correspondre à l unité de télévision dans le stand et verrouiller l unité TV puis maintenez le stand TV en suivant la pointe de la flèche 2 Fixer les vis dans le stand TV ...

Страница 50: ...ume VOL 5 VOL Augmenter le volume 6 CH Chaîne précédente 7 CH Chaine Suivante 8 RECEPTEUR IRInfrarouge Reçoit les signaux infrarouges de la télécommande 9 Indicateur LED indicateur d état Marche vert Veille Rouge 10 RECEPTEUR IRInfrarouge Reçoit les signaux infrarouges de la télécommande 11 Indicateur LED indicateur d état Marche vert V eille Rouge 8 Vue générale Avant et arrière ...

Страница 51: ... 2 8 AUDIO IN L R Entrée audio stéréo 9 OPTICAL AUDIO PC Connectez le au terminal de sortie audio du PC 3 Casque 10 5 HDMI 5 VGA entrée vidéo PC 6 YPbPr Connectez le au terminal de sortie YPbPr vidéo du DVD 7 Vidéo Entrée vidéo 9 Panneau de connexion HDMI1 VIDEO Y Pb Pr L R AUDIO Headphone OPTICAL Service Port 5V 0 5A RF VGA PC AUDIO HDMI2 HDMI3 ...

Страница 52: ...FAV ADD ERASE FAV S MODE P MODE ASPECT FREEZE MTS OK CC D MENU AUDIO GOTO SUB TITLE MENU INFO EPG EXIT REPEAT MUTE POWER SOURCE D SETUP 10 Télécommande 1 4 5 8 15 12 14 7 11 3 6 9 10 17 19 21 13 2 16 18 20 23 25 22 24 27 29 26 28 ...

Страница 53: ...ur cette touche pour sélectionner le mode stéréo AUDIO Changer le canal audio lorsque le DVD ou le multimédia est ne lecture 17 CH LIST Afficher la liste des canaux TIME SHIFT En mode DTV appuyez sur la touche TS pour démarrer la fonction de retard appuyez sur le bouton pour commencer la lecture du programme de retard appuyez sur le bouton pour terminer la fonction de retard Fichier ou chapitre su...

Страница 54: ...rie 2 Insérez deux piles AAA Placez les piles avec leurs bornes correspondant aux indications et dans le compartiment à piles 3 Replacez le couvercle 12 CONNEXION AUX DISPOSITIFS EXTERNES Raccordement d antenne RF Connectez l antenne comme indiqué dans la figure de recevoir le signal TV analogique ou numérique TNT Service Port 5V 0 5A RF VGA PC AUDIO HDMI2 HDMI3 ...

Страница 55: ...tie AV audio vidéo de votre équipement vidéo à l entrée vidéo et audio à votre téléviseur par le câble comme indiqué dans la figure Connectez votre lecteur vidéo décodeur DVD ou similaire avec un câble RCA de la sortie vidéo YUV de l appareil à l entrée vidéo de votre téléviseur par le câble comme indiqué dans la figure A l aide de cette entrée vous pouvez obtenir la vidéo HD Utilisez un deuxième ...

Страница 56: ... numérique optique de votre téléviseur à un système HIFI pour améliorer l expérience sonore Connectez votre lecteur vidéo décodeur DVD ou similaire avec le câble HDMI à partir de la sortie HDMI correspondants de votre équipement vidéo à l entrée HDMI de votre téléviseur comme indiqué dans la figure Ce câble transferts vidéo et audio HD Service Port 5V 0 5A RF VGA PC AUDIO HDMI2 HDMI3 NON INCLUS NO...

Страница 57: ...r à l entrée audio de votre PC à la télévision Utilisez la sortie casque de votre téléviseur pour écouter l audio de l unité à travers vos écouteurs stéréo Lorsque vous branchez un casque à l appareil les principaux écouteurs seront réduits au silence Service Port 5V 0 5A RF VGA PC AUDIO HDMI2 HDMI3 HDMI1 VIDEO Y Pb Pr L R AUDIO Headphone OPTICAL NON INCLUS NON INCLUS ...

Страница 58: ...érique de la tension principale Pour débrancher complètement la tension principale retirez la fiche d alimentation de la prise 3 Appuyez sur la touche et en suivant l image ci dessous pour utiliser l appareil REMARQUE L image est à titre de référence seulement Assistant de configuration Connectez le câble RF à votre prise TVAntenne Emplacement de la télévision Réglez le mode TV au mode de Maison o...

Страница 59: ...la touche pour sélectionner le fuseau horaire l heure d été et le format d heure souhaité Appuyez sur la touche sur la télécommande pour régler Appuyez sur la touche sur la télécommande pour sélectionner et appuyez sur la touche ENTRER pour accéder au sous menu Scan automatique Appuyez sur la touche pour sélectionner le type d antenne Appuyez sur la touche pour sélectionner et appuyez sur la touch...

Страница 60: ...uche ENTRER pour entrer la source d entrée Appuyez sur le bouton EXIT pour quitter Menu Principal Appuyez sur MENU pour afficher le menu principal ou revenir au menu précédent ou fermer le menu principal Appuyez sur pour mettre en surbrillance l icône de menu souhaitée puis appuyez sur ENTRER pour sélectionner Si aucun bouton n est appuyé le menu se ferme automatiquement après environ 10 secondes ...

Страница 61: ... menu principal Mode d image Réglez le mode d image pour changer l apparence de l image Appuyez sur la touche pour sélectionner Standard Dynamique Doux Utilisateur Economie d énergie Remarque La luminosité le contraste la couleur la teinte et la netteté ne sont disponibles qu en mode Utilisateur vous pouvez régler comme vous le souhaitez Standard Produit une image très définie dans une salle norma...

Страница 62: ... détail de l image Appuyez sur la touche pour régler Température de couleur Augmentez ou réduisez la couleur chaude de l image personnelle rouge et la couleur fraîche personnellement bleu selon votre besoin Normal Augmenter les couleurs liées au sexe pour le blanc Chaud Augmenter la couleur rouge pour le blanc Cool Augmentez la tonalité bleue pour le blanc Réglages avancés Ajustez les fonctions vi...

Страница 63: ...idéo Arrêt Désactiver la détection du bruit du vidéo Faible Détecter et réduire les faibles bruitages vidéo Moyen Détecter et réduiser le bruit modéré du vidéo Fort Détecter et réduire les bruits vidéo améliorés Contraste dynamique Ajustez automatiquement les détails et la luminosité de l image Appuyez sur la touche pour sélectionner Off On Mode HDMI Disponible uniquement avec l entrée HDMI Appuye...

Страница 64: ...éliorer les sons pour l audio de la télévision Musique Préserver le son original Bon pour les programmes musicaux Tripler Ajustez l effet triple Augmente ou diminue les sons aigus Appuyez sur la touche pour régler Basse Ajustez l effet des graves Augmente ou diminue les sons inférieurs Appuyez sur la touche pour régler Équilibre Réglez l équilibre entre les haut parleurs gauche et droit pour s ada...

Страница 65: ...ur la touche pour sélectionner Marche Arrêt Menu de l heure Appuyez sur MENU pour accéder au menu principal appuyez sur la touche pour sélectionner Appuyez sur ENTRER pour entrer Appuyez à nouveau sur MENU pour quitter ou revenir au menu principal Appuyez sur la touche pour sélectionner parmi Minuterie de sommeil Fuseau horaire Heure d été Format d heure Horloge Horloge automatique Appuyez sur ENT...

Страница 66: ...atiquement Appuyez sur la touche pour sélectionner Marche Arrêt Menu des paramètres Appuyez sur MENU pour accéder au menu principal appuyez sur la touche pour sélectionner Appuyez sur ENTRER pour entrer Appuyez à nouveau sur MENU pour quitter ou revenir au menu principal Appuyez sur la touche pour sélectionner parmi Menu Language Transparent Interruption OSD Sous titres Surbalayage Etiquette d ent...

Страница 67: ...nner 0 25 50 75 100 Interruption OSD Réglez la durée du menu OSD Affichage à l écran Appuyez sur la touche pour sélectionner 5 Sec 15Sec 30Sec 45Sec 60Sec Sous titres Ajustez les paramètres de sous titrage Disponible uniquement sous la source TV et AV Appuyez sur la touche ENTRER pour entrer Surbalayage Appuyez sur la touche pour sélectionner Marche Arrêt Étiquettes d entrée Créez des étiquettes p...

Страница 68: ...nu OSD le panneau sera sombre puis appuyez sur n importe quelle to uche pour quitter le statut d Audio Seulemen Appuyer sur la touche pour sélectionner Marche Arrêt Restaurer par défaut Changez les options d alimentation ou réinitialisez le téléviseur à l usine par défaut Appuyez sur ENTRER pour entrer Assistant Configuration Définissez la première installation Appuyez sur la touche ENTER pour ent...

Страница 69: ...uement la différence entre le volume du canal et le volume du programme Cette fonction réduit la fluctuation du son Menu de verrouillage Appuyez sur MENU pour accéder au menu principal appuyez sur la touche pour sélectionner Appuyez sur ENTRER pour entrer Appuyez à nouveau sur MENU pour quitter ou revenir au menu principal Appuyez sur la touche ENTER pour entrer 27 Réglez le contrôle de guidage vo...

Страница 70: ...se Touche de verrouillage Système de verrouillage Bloc d entrée Notation EU Notation Canada Réglage RRT Réinitialiser RRT Appuyez sur ENTRER pour entrer Appuyez sur la touche pour régler Appuyez à nouveau sur MENU ou revenez au menu principal Entrez votre mot de passe 4 chiffre numérique Le mot de passe par défaut est 0000 et si vous oubliez ce que vous avez défini appelez le centre de service Cha...

Страница 71: ...nt V Chip avancée pour les canaux numériques L élément est disponible uniquement lorsque le flux actuel contient des données de classement téléchargeables Réinitialiser RRT Réinitialisez le RRT par défaut L élément est disponible uniquement lorsque le flux actuel contient des données de classement téléchargeables Notation EU Pour les États Unis le paramètre de notation comprend essentiellement les...

Страница 72: ...nfants de moins de 13 ans NC 17 Restreint Les enfants de moins de 17 ans doivent être accompagnés d un parent ou d un tuteur adulte Off 17 et moins admis X Un public adulte seulement Notation canadienne Pour le Canada le paramètre de notation inclut les options suivantes Canada anglais Canada Français Canada Anglais Cette notation s applique aux programmes qui utilisent le système de notation d an...

Страница 73: ...rcher automatiquement les canaux Appuyez sur la touche ENTRER pour entrer Favoris Ajoutez des chaînes pour créer une liste de favoris Appuyez sur la touche pour entrer Liste des canaux Affichez votre liste de programmes Appuyez sur la touche pour entrer 31 Appuyez sur la touche pour choisir entre Air Câble Balayage Auto Favori Liste des Canaux Afficher Masquer Numéro du canal Etiquette du canal Ap...

Страница 74: ...touche pour régler sélectionnez 5 1 5 2 6 0 Etiquette du canal Créez des étiquettes pour les canaux jusqu à 7 caractères Appuyez sur la touche pour régler Menu PC Appuyez sur ENTREE pour sélectionner la source du PC Appuyez sur MENU pour accéder au menu principal appuyez sur la touche pour sélectionner le menu de Configuration Appuyez sur pour sélectionner Paramètres PC 32 ...

Страница 75: ...a touche pour régler Phase Ajustez les lignes interférentes horizontales Appuyez sur la touche pour régler Auto Réglez l écran automatiquement sur la position optimale de l image Appuyez sur la touche pour entrer Remarques 1 Le menu IMAGE et la description sont les mêmes que pour le mode TV 2 Le MTS et la langue audio dans le menu SON ne sont pas valides 3 Le menu TEMPS et la description sont les ...

Страница 76: ...pour définir la langue OSD comme vous le souhaitez Économiseur d écran SiÉconomiseur d écran est sélectionné appuyez sur la touche pour entrer Appuyez sur a touche pour l allumer ou l éteindre Mémoire dernière Si la Mémoire dernière est sélectionnée appuyez sur la touche pour entrer Appuyez sur a touche pour l allumer ou l éteindre Audio Setup Page Downmix Si le Réglage Downmix est sélectionné app...

Страница 77: ...z sur la touche pour sélectionner le niveau souhaité puis appuyez sur le bouton OK L icône du mot de passe apparaîtra à l écran Entrez le mot de passe à quatre chiffres en appuyant sur les touches numériques le mot de passe par défaut est 8888 puis appuyez sur le bouton OK pour confirmer la sélection et la sortie Mot de passe Si le mot de passe est sélectionné appuyez sur la touche pour entrer pui...

Страница 78: ... DISC AFFICHÉ PIMAGE OU SON FAIBLE Assurez vous d avoir réglé correctement Les paramètres du lecteur AUDIO Assurez vous que le disque n est pas rayé ni taché Assurez vous d avoir placé le disque dans la fente Assurez vous que le disque n est pas à l envers Le côté en argent des données devrait être tourné vers vous vu de l avant du téléviseur Assurez vous que le disque n est pas déformé taché ou r...

Страница 79: ... ou la position de l antenne Le signal est faible Essayer d utiliser un amplificateur de signal L image TV est meilleure mais a du bruit Le connecteur du câble d antenne est lâche le câble est endommagé Vérifiez la fiche du connecteur du câble de l antenne pour une connexion sécurisée et tout dommage Pas d image Pas de son La fiche d alimentation est lâche le cordon d alimentation ne se connecte p...

Страница 80: ...0V 60Hz Connectivité Entrée vidéo composite Entrée vidéo composante Entrée HDMl x 3 Entrée d antenne RF Sortie casque Sortie OPTIQUE Interface de données USB Fichiers du système supporté FAT32 et FAT16 Télécommande Type de signal Infrarouge Distance de contrôle 8 mètres Angle de contrôle 30 Horizontal Source de courant AAA 1 5V x 2 Entrée vidéo PC VGA Entrée audio PC 38 ...

Отзывы: