background image

Connections & Setup

14

Chapter 1

L

R

VIDEO

AUDIO

IN FROM ANT

IN

OUT

OUT TO TV

L

R

VCR

VIDEO OUT

5.1 CHANNEL 

AUDIO OUT

CENTER

OPTICAL

COAX.

1

2

DIGITAL

AUDIO OUT

SURROUND

FRONT
MIXED

Y

Pb

Pr

Y

Pb

Pr

R                     L

SUBWOOFER

Pb

S-VIDEO

PROG. SCAN

COMPONENT

COMPOSITE

L

R

VIDEO IN

AUDIO IN

 ANT IN

S-VIDEO

TV

AUDIO OUT

L

R

DVD 
PLAYER

S-VIDEO

SATELLITE

SIGNAL

L

R

VIDEO

IN FROM ANT

OUT

OUT TO TV

SATELLITE
RECEIVER

S-VIDEO

CABLE

OR 

OFF-AIR

SIGNAL

SATELLITE IN

1

2

3

TV

DVD

VCR

Satellite

Содержание RC6001P

Страница 1: ...DVD Player User s Manual Changing Entertainment Again RC6001P ...

Страница 2: ...nd to comply with the limits for a Class B digital device pursuant to Part 15 of the FCC rules These limits are designed to provide reasonable protection against harmful interference in a residential installation This equipment generates uses and can radiate radio frequency energy and if not installed and used in accordance with the instructions may cause harmful interference to radio communicatio...

Страница 3: ...Pro Logic Dolby Digital or DTS Receiver 10 DVD Player TV with Audio Video Input Jacks 12 DVD Player TV RF Modulator with coaxial Jack only 13 DVD Player TV VCR Satellite Receiver 14 The Jacks on the Back of the DVD Player 16 Front Panel Controls 17 Install Batteries in the Remote 18 Important Battery Information 18 Turn on the TV and DVD Player 18 How to Find Your TV s Video Input Channel 19 How t...

Страница 4: ...r Computer 41 Selecting Folders and Songs 42 Skipping Songs 42 The MP3 Display 42 Selecting a Play Mode 42 Chapter 4 The DVD Player Menu System The DVD Player Menu System 44 The Main Menu 44 The Display Menu 44 Image 44 Selecting the Video Output 46 Changing the Player Menu Language 46 The Sound Menu 47 Digital Output 47 Range 47 Selecting the Speakers 48 Surround 49 Language Options 50 Changing t...

Страница 5: ...nt Display 53 Defaults 54 Chapter 5 Other Information How to Resolve Product Performance Problems 56 Troubleshooting 56 Handling Cautions 59 Maintenance of Cabinet 59 Formation of Condensation 59 Handling Discs 59 Cleaning Discs 59 Limited Warranty 59 Accessories and Order Form 63 Index 64 Table of Contents 3 ...

Страница 6: ...This page intentionally left blank ...

Страница 7: ...t Choose Your Connection The Jacks on the Back of the DVD Player Inserting Batteries in the Remote How to Find Your TV s Video Input Channel How to Move Around the DVD Player s Menu System Set the Menu Language The Remote Control 5 5 Chapter 1 Changing Entertainment Again ...

Страница 8: ...ion Cables Properly to Avoid Audio Interference Insert each cable firmly into the designated jack If you place components above the TV route all cables down the side of the back of the TV instead of straight down the middle of the back of the TV If your antenna uses 300 ohm twin lead cables do not coil the cables Also keep the twin lead cables away from audio video cables Connection Pictures Audio...

Страница 9: ... optional TV DVD VCR Satellite page 14 15 DVD VCR Satellite Cables Needed to Connect Components to Your TV The pictures below show the cables needed for the connections represented in this book There is a detailed explanation of cables and jacks on the following page Note Audio Video cables A V cables for short are usually sold as a bundled set but the connection pictures in this book show each ca...

Страница 10: ...to connect the left and right audio cables because the S Video cable carries only the picture signal not the sound Digital Audio Out Jack and Optical Cable Excellent Audio Quality The optical cable is used to connect a Dolby Digital receiver If you own a Dolby Digital receiver that uses an optical cable type input you can use an optical cable for the best sound quality Note This DVD recorder s opt...

Страница 11: ... PR jacks use video grade cables for the Y PB and PR connections Note that it is essential to match the color coded connectors with a compatible TV If your TV doesn t have component video use the basic videoconnectionlistedabove NOTE If you use this connection you must change the Video Output in the Display menu see page 42 The default video output is S video Composite 3 Connect the antenna or cab...

Страница 12: ...atible with the Dolby Digital bitstream Such a connection can create a high level of noise that may be harmful to your ears and could damage headphones or speakers It is important to choose the correct Digital Output setting in the DVD Player s Sound menu especially when you use the DIGITAL AUDIO OUT jack For more information see chapter 5 VIDEO OUT 5 1 CHANNEL AUDIO OUT CENTER OPTICAL COAX 1 2 DI...

Страница 13: ...ITE jack on the back of your DVD Player and to the Video Input jack on your TV OR S Video optional If your TV has an S Video Input jack connect the S Video cable to the S VIDEO OUT jack on the back of your DVD Player and to the S Video jack on your TV If your TV doesn t have S Video use the basic video connection listed above OR Componentvideo optional not shown in illustration If your TV has comp...

Страница 14: ...nect the S Video cable to the S VIDEO OUT jack on the back of your DVD Player and to the S Video jack on your TV If your TV doesn t have S Video use the basic video connection listed above OR Componentvideo optional not shown in illustration If your TV has component video Y PB and PR jacks use video grade cables for the Y PB and PR connections Note that it is essential to match the color coded con...

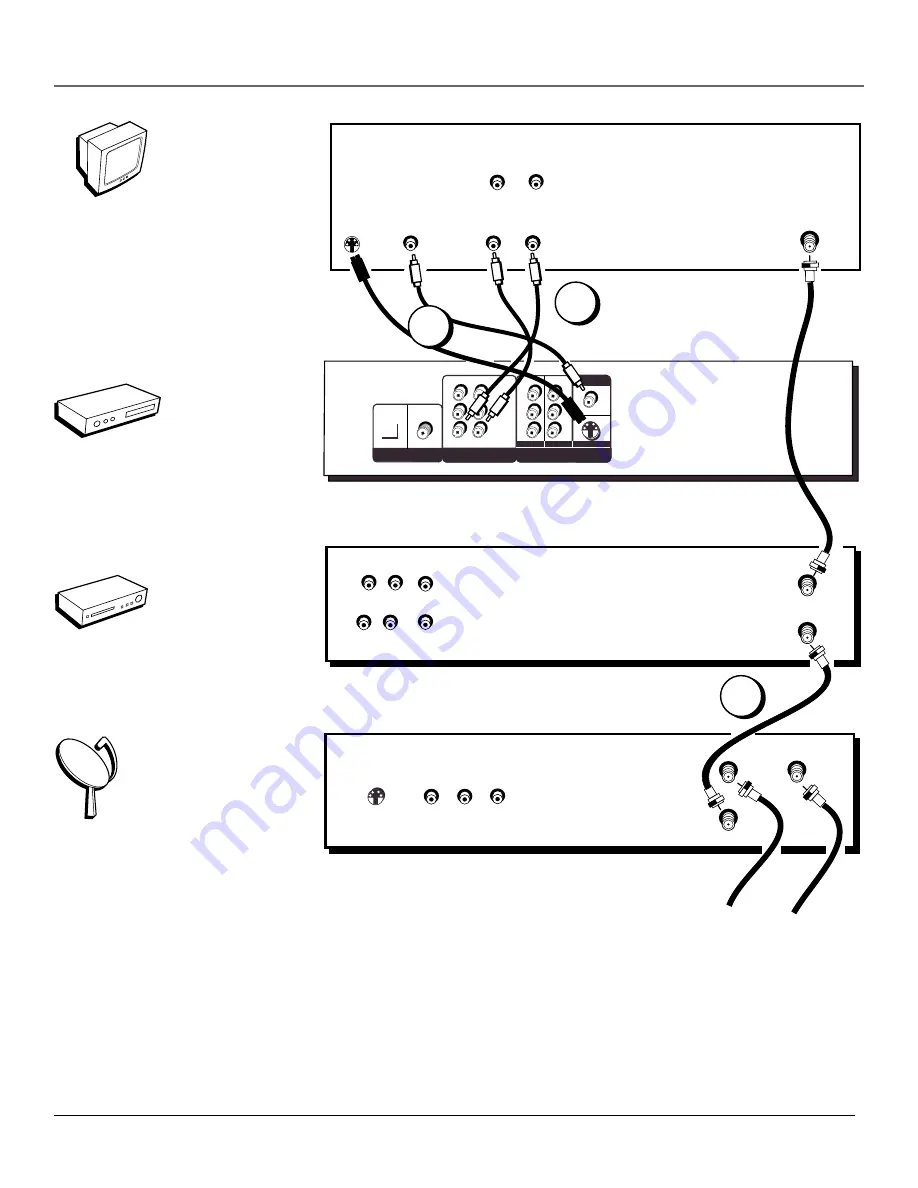
Страница 15: ...ack on the RF modulator 2 Connect the video cable yellow to the COMPOSITE jack on the back of your DVD Player to the Video input jack on the RF modulator 3 Connect the RF modulator to the back of the TV 4 Insert the AC power cord into an AC outlet Go to page 18 TV DVD VIDEO OUT 5 1 CHANNEL AUDIO OUT CENTER OPTICAL COAX 1 2 DIGITAL AUDIO OUT SURROUND FRONT MIXED Y Pb Pr Y Pb Pr R L SUBWOOFER Pb S V...

Страница 16: ...OAX 1 2 DIGITAL AUDIO OUT SURROUND FRONT MIXED Y Pb Pr Y Pb Pr R L SUBWOOFER Pb S VIDEO PROG SCAN COMPONENT COMPOSITE L R VIDEO IN AUDIO IN ANT IN S VIDEO TV AUDIO OUT L R DVD PLAYER S VIDEO SATELLITE SIGNAL L R VIDEO IN FROM ANT OUT OUT TO TV SATELLITE RECEIVER S VIDEO CABLE OR OFF AIR SIGNAL SATELLITE IN 1 2 3 TV DVD VCR Satellite ...

Страница 17: ...Player and to the S Video jack on your TV If your TV doesn t have S Video use the basic video connection listed above OR Componentvideo optional not shown in illustration If your TV has component video Y PB and PR jacks use video grade cables for the Y PB and PR connections Note that it is essential to match the color coded connectors with a compatible TV If your TV doesn t have component video us...

Страница 18: ...ese three jacks This connection provides optimum quality To ensure maximum picture quality use three video grade cables for the Y PB and PR connections Note that it is essential to match the color coded connectors with a compatible TV PROGRESSIVE Y PB PR VIDEO OUT Use these jacks to connect to a TV with progressive video input jacks labeling may vary for example progressive scan jacks might be lab...

Страница 19: ...f the next title chapter or track on a disc in effect skipping the title chapter or track Shuttle Turn to the right to fastforward playback Turn to the left to reverse playback SKIP REV Allows you to move to the beginning of the preceding title chapter or track on a disc in effect skipping the title chapter or track Frontpaneldisplay Displaysinformationaboutdiscandplaybackstatus HeadphonesVolume A...

Страница 20: ...eplaced at the same time if disposed of in fire or if an attempt is made to charge a battery not intended to be recharged Discard leaky batteries immediately Leaking batteries can cause skin burns or other personal injury Point the Remote in the Right Direction When you want the remote to operate the DVD Player point the remote at the DVD Player not the TV The remote has to be pointed in the corre...

Страница 21: ...pressing a specific number see table below Go through all the channels in the channel list by pressing the channel up down buttons on the TV Some common scenarios are listed in the following table VideoInputChannelVariations Button switch Buttononthe Channel on the TV TV Remote VIDEO VID 1 00 SIGNAL LINE 90 VID 1 VID 91 VID 2 VIDEO 92 S VID S VID 93 S VIDEO INPUT VID 1 S VIDEO VID 2 SOURCE AUX How...

Страница 22: ... puts the player in standbymodewhenpowerison SUBTITLE When a disc is playing press this button to show the Subtitle display if the disc was created with subtitles AUDIO Press this button to select a different language to play a DVD disc in provided the disc was authored with multiple languages ANGLE Press this button to access various camera angles on a disc if the disc contains multiple camera an...

Страница 23: ...m screen Numberbuttons Use the number buttons to input information such as chapter numbers track numbers or to make selections on some menu screens REVERSE Press this button during playback to reverse through the disc PLAY Begins disc play FORWARD Press this button during playback to advance through the disc OPEN CLOSE Press to open and close the disc tray STOP Stops disc play PAUSE Press this but...

Страница 24: ...de list in this section 3 Point the DVD Player s remote at the TV 4 Press and hold the TV button on the remote 5 Enter the code from the Remote Control code list pp 66 6 Release the TV button and then press ON OFF to see if the TV responds to the command If it doesn t try pressing the TV button and then ON OFF again 7 If you get no response repeat these steps using the next code listed for your br...

Страница 25: ...82 1185 1208 1209 1210 1230 1231 1253 Majestic 1180 Marants 1162 Marantz 1052 1064 1162 1177 Matsui 1090 Memorex 1050 1090 1114 1179 1180 1219 1251 1050 MGA 1062 1108 1109 1117 1126 1127 1128 1153 1178 1179 Midland 1155 1214 1228 Minutz 1154 Mitsubishi 1007 1027 1061 1062 1063 1108 1110 1117 1126 1127 1128 1153 1177 1179 1180 1205 Montgomery Ward 1181 Motorola 1223 1254 MTC 1096 1100 1108 1117 119...

Страница 26: ...This page intentionally left blank ...

Страница 27: ...Coding Using Different Menus Loading and Playing a Disc Using a Disc Menu Using the On Screen Info Display Using the Marker Feature Disc Playback Features Playing Video CDs Chapter 2 Changing Entertainment Again Playing DVDs 25 ...

Страница 28: ...y appears as icons across the top of the screen when a disc is playing It can only be accessed while you are playing a disc It s turned on and off with the INFO button on the remote The DVD player menu The DVD player s menu system is accessed only when a disc isn t playing It appears automatically when the STOP button is pressed Remember that a feature will only work if the disc was programmed wit...

Страница 29: ...s playing The disc menu appears on the screen One of the options will start disc play Highlight that option and press OK The DVD Player s main menu appears on the screen Highlight the Play option and press OK When you stop playing a disc the player remembers where you stopped When you start playing the disc again the DVD Player picks up where you left off unless the disc is removed or the player i...

Страница 30: ...s press OK on the remote In the example on the left English is highlighted Press OK on the remote to play the disc with English dialog 3 Press the up and down arrows to select a language and press OK 4 Press MENU to resume playback Note Any settings you change on the disc menu only override the settings in the DVD Player s menu temporarily Default settings are the settings that you set up in the D...

Страница 31: ...ox under the icons Remember you can only access the Info Display when you re playing a disc Also the Info Display features are only available if the disc was created with that particular feature i e if you select the Subtitle icon you won t be able to change the subtitle language unless the author of the disc created the disc with subtitles The invalid symbol appears on the screen when you press a...

Страница 32: ... into chapters To select a title 1 While the disc is playing press INFO on the remote to bring up Info Display 2 If the Title icon on the Info Display isn t highlighted use the arrow buttons to highlight it 3 Use the number button s on the remote to enter the title number or press the up down arrow buttons to go to the next previous title 4 Press OK when the title you want to play appears in the t...

Страница 33: ... INFO button on the remote Notes Changing the subtitle language with the Info Display will only affect the disc currently being played When the disc is removed or the player is turned off the subtitle language will revert to the language setting specified through the DVD player main menu The subtitle language can also be changed through the DVD player menu Changing the Audio Language If the disc w...

Страница 34: ... Repeat A B Repeat lets you define a specific segment on the disc that you want to repeat For example you might like to watch the dogfight in the movie Top Gun To watch this scene over and over 1 Press INFO on the remote and select the Repeat icon from the Info Display 2 Press the up down arrow buttons until the A B Repeat option is shown in the text box underneath the icons The text box reads Rep...

Страница 35: ...r example if there are 3 different angles the icon will read 1 of 3 This means angle 1 is currently being played 3 The text box beneath the icons displays Camera Angle 1 Use the up down arrow buttons to scroll through the camera angle choices The camera angle number displayed in the text window is automatically shown 6 To make the Info Display disappear press the INFO button on the remote Play Mod...

Страница 36: ...ove until you ve programmed all the chapters you want to play 7 Press PLAY to begin programmed playback To stop Program playback press STOP twice and PLAY to resume normal playback Playing Video CDs Like DVD video discs Video CDs contain picture and sound content Video CDs VCDs are encoded in a different format VCDs don t hold as much information as DVD discs and the picture quality is not as high...

Страница 37: ...Each time you press the button the scanning speed doubles There are six speeds X2 X4 X8 X16 X32 and X64 3 Press the PLAY button to resume normal playback Note You won t hear the sound audio on DVD discs when you re using the picture scan feature Freeze Frame and Frame Advance 1 Press PAUSE when a disc is playing to freeze the picture 2 Each time you press the PAUSE button the picture advances one ...

Страница 38: ...This page intentionally left blank ...

Страница 39: ...Playing Audio CDs and MP3 Discs 37 Chapter 3 Changing Entertainment Again Section Overview Using the Info Display Selecting a Specific Track Using the Repeat Feature IntroScan Playing MP3 Discs ...

Страница 40: ...Display lets you choose various playback features This section explains how to play audio CDs in your DVD player and how to use the player s features For instructions on loading and playing your CDs see Chapter 2 To access the Info Display while the CD is playing press INFO on the remote The Info Display appears across the top of the screen Each of the playback features is represented by an icon T...

Страница 41: ...displayed in the text box 4 The selected repeat option will loop repeatedly until you turn Repeat off Repeat is turned off by completing steps 1 through 3 above and selecting the Off option A B Repeat A B Repeat lets you define a specific segment on the disc that you want to repeat 1 Press INFO on the remote and select the Repeat icon from the Info Display 2 Press the up down arrow buttons until t...

Страница 42: ...he Program playback option allows you to enter the order you want tracks to play in Program Press 0 9 and OK to program Press play to start P02 07 11 1 Press STOP to stop playback 2 Press PLAY MODE on the remote control the Play Mode options appear 3 Use the arrow buttons to highlight the Program option 4 Press OK The Program screen appears The grid on the left is where you will list the tracks in...

Страница 43: ...e are many internet sites that allow you to download MP3 files fro free and many sites that require a fee Creating an MP3 Disc on Your Computer Your DVD player handles MPEG 1 layer III audio If you encode your own MP3 files from an audio CD avoid using the features of MPEG 2 such as the 22kHz sampling frequency Be sure to make a data CD rather than an audio CD If you make an audio CD you will lose...

Страница 44: ...the MP3 screen appears 2 Press the left or right arrow button until the PLAY MODE option is highlighted 3 Use the up down arrows to scroll through the modes When the mode you want appears in the PLAY MODE box use the left or right arrow button to return to the play list 4 Use the arrow buttons to select a song or folder Press OK to begin playback PLAY MODE MP3 Menu Standard ROOT GO BACK BAMBEE ON ...

Страница 45: ...Using the DVD Player s Menu System Chapter Overview The DVD Player Menu The Main Menu The Display Menu The Sound Menu The Languages Menu The Preferences Menu 43 Chapter 5 Changing Entertainment Again ...

Страница 46: ...OK The next set of menu choices appears to the right of the menu item Display Sound Language Password Preferences Press OK to select The Main Menu The main menu contains the following submenus Display controls how the pictures looks Sound controls sound settings Language contains settings for audio menu and subtitle languages Password allows you to use a password to lock the player Preferences all...

Страница 47: ...ess the right arrow button the display choices appear on the right 3 Use the up down arrows to highlight the Image option Press the right arrow button the Image options appear on the right 4 Use the up down arrow buttons to highlight your selection Press OK to select 5 Press the left arrow button to return to the Display menu or press MENU to exit the menu system Display Sound Language Password Pr...

Страница 48: ... menu system Changing the Player Menu Language The Language option lets you choose which languages you want the DVD player menu displayed in The default language is English You can choose one of three languages for the text that appears within the on screen menu system If you change the Player Menu Language the entire player menu system will be displayed in the selected language Display Sound Lang...

Страница 49: ...ngs can be made directly via digital cable 4 Use the up down arrow buttons to highlight your selection Press OK to select 5 Press the left arrow button to return to the Sound menu or press MENU to exit the menu system Digital out off Digital out Range Speakers Surround OffRange Bitstream PCM Display Sound Language Password Preferences Set up digital out Digital out Range Speakers Surround Off 8 St...

Страница 50: ...ws to highlight the Speakers option Press the right arrow button the Speaker setup menu appears 5 Use the up down arrow buttons to select a speaker type Press the right arrow button to go to the speaker setup window 6 Use the up down arrow buttons to highlight your selection Yes if you have that speaker connected No if you don t Press OK to select 7 Press the left arrow button to return to the spe...

Страница 51: ...2 Rear 0 ft Set the Distance of the Attached Speakers Use the Distance option to set the distance of the attached speakers By setting the distance you are letting the speakers know how far the sound has to travel to reach your set listening point This allows the sound from each speaker to reach the listener at the same time Surround The Surround option can be used to simulate a six speaker listeni...

Страница 52: ...ht the Language option Press the right arrow button the language choices appear on the right 3 Use the up down arrows to highlight the Subtitles option Press the right arrow button the subtitle options appear on the right 4 Use the up down arrow buttons to select the language you want the subtitles to be played in Press OK 5 Press the left arrow button to return to the Language menu or press MENU ...

Страница 53: ...o any 4 digit number 1 If a disc is playing press STOP and MENU the menu appears 2 Use the arrow buttons to highlight the Password option Press OK The password screen appears 3 Enter the default password 9999 The highlight will move to the first digit of the New option 4 Enter a four digit number that you want to use as your new password Press OK 5 You will be prompted to enter your new password a...

Страница 54: ...disc The DVD Player must be locked password protected in order for it to enforce the settings in the Ratings menu Set to PG 13 Ratings Dimmer Defaults Ratings 1 G 2 3 PG 4 PG 13 5 6 R 7 NC 17 8 1 With the player on no disc in the tray press MENU the main menu appears 2 Use the up down arrow buttons to highlight the Preferences option Press the right arrow button the preferences appear on the right...

Страница 55: ...hlight the Dimmer option Press the right arrow button the dimmer choices appear on the right 4 Use the up down arrow buttons to highlight the option you want Press OK 5 Press the left arrow button to return to the Preferences menu or press MENU to exit the menu system Defaults Use the Default feature to reset ALL options to the factory defaults 1 With the player on no disc in the tray press MENU t...

Страница 56: ...This page intentionally left blank ...

Страница 57: ...Other Information 55 Chapter 6 Changing Entertainment Again Chapter Overview Troubleshooting Care and Maintenance Limited Warranty ...

Страница 58: ... 1 Play starts but then stops immediately The disc is dirty Clean it Condensation has formed Allow player to dry out No picture Turn your TV to its Video Input Channel see chapter 1 Turn on the TV Make sure your player is connected properly No sound or distorted sound Make sure your player is connected properly Make sure all cables are securely inserted into the appropriate jacks You may need to r...

Страница 59: ...correct setup and connection The disc might be damaged Try another disc Picture is distorted during forward and reverse scan It is normal for some distortion to appear while scanning A screen saver appears on the TV Your player is equipped with a screen saver that appears on the TV after your player has been idle for several minutes There are a few ways to make the screen saver disappear from the ...

Страница 60: ... have it in certain parts of the movie Picture is too tall and thin Change the aspect ratio using the TV Image setting in the Display menu See chapter 5 Picture is too short and wide Change the aspect ratio using the TV Image setting in the Display menu See chapter 5 Cannot copy discs to video tape You can t record DVD discs onto videocassettes because the discs are encoded with anti copy protecti...

Страница 61: ...ion of Condensation Due to sharp changes in temperature and humidity condensation may form if warm air comes in contact with any cold parts inside the player When condensation forms inside the player the player may not operate correctly If this occurs leave the player at room temperature until the inside of the player becomes dry and operational If condensation forms on a disc wipe the disc with a...

Страница 62: ...Discover MasterCard or Visa account number and expiration date to your phone representative This is for security purposes only and your account will not be charged at this time 2 We will send you a replacement unit 3 If you return the unit to us within 14 days from the date you were provided a SR number only items not covered by warranty will be charged to your account If your unit is not received...

Страница 63: ...cked with your DVD product It will make it easier to contact you should it ever be necessary The return of the card is not required for warranty coverage Limitation of Warranty THE WARRANTY STATED ABOVE IS THE ONLY WARRANTY APPLICABLE TO THIS PRODUCT ALL OTHER WARRANTIES EXPRESS OR IMPLIED INCLUDING ALL IMPLIED WARRANTIES OF MERCHANTABILITY OR FITNESS FOR A PARTICULAR PURPOSE ARE HEREBY DISCLAIMED...

Страница 64: ...This page left intentionally blank ...

Страница 65: ...e required by law to collect the appropriate sales tax for each individual state country and locality to which the merchandise is being sent Shipping and Handling Total Amount Enclosed Use VISA or MasterCard preferably Money order or check must be in U S currency only No COD or CASH 5 00 Qty Prices are subject to change without notice All accessories are subject to availability Detach Here Accesso...

Страница 66: ...scover Card ready and call the toll free number listed below Use this number only to place on order for accessory items listed on this order form 1 800 338 0376 To place your order by mail detach and mail the completed order form with credit card information money order or check in US currency made payable to Thomson multimedia Inc to the following address Video Accessories PO Box 8419 Ronks PA 17...

Страница 67: ... play 26 Display menu 44 Dolby Digital 11 Dolby Digital receiver 8 Dolby Pro Logic 11 DTS 10 DVD Limits menu rated titles 52 DVD remote button 20 F Fast motion playback 35 Frame advance 35 Freeze frame pause 35 FORWARD button 20 Front Display menu 53 Front panel controls 17 G GUIDE button 21 GO BACK button 21 H Handling cautions 59 discs 59 DVD Player 59 I Icons 29 INFO button 21 Info Display CD 3...

Страница 68: ...tton 20 S SATELLITE IN jack 8 Selecting a chapter 30 Selecting play modes 31 Slow motion playback 35 Speaker distance 49 Speaker setup 48 Stereo 49 STOP button 21 SUBTITLE button 20 Subtitle language 31 Surround 49 T Time display 30 Title 30 Troubleshooting 56 57 58 TV Aspect 45 TV buttons 20 TV codes 23 TV s Video Input Channel 19 Types of Discs the Player Can Play 18 V Video output 46 VOLUME but...

Страница 69: ......

Страница 70: ...c Trademark s Registered Marca s Registrada s Printed in P R C TOCOM 15775640 Please do not send any products to the Indianapolis address listed in this manual or on the carton This will only add delays in service for your product Thomson multimedia Inc visit us at www rca com ...

Отзывы: