background image

Date and Time Display

22

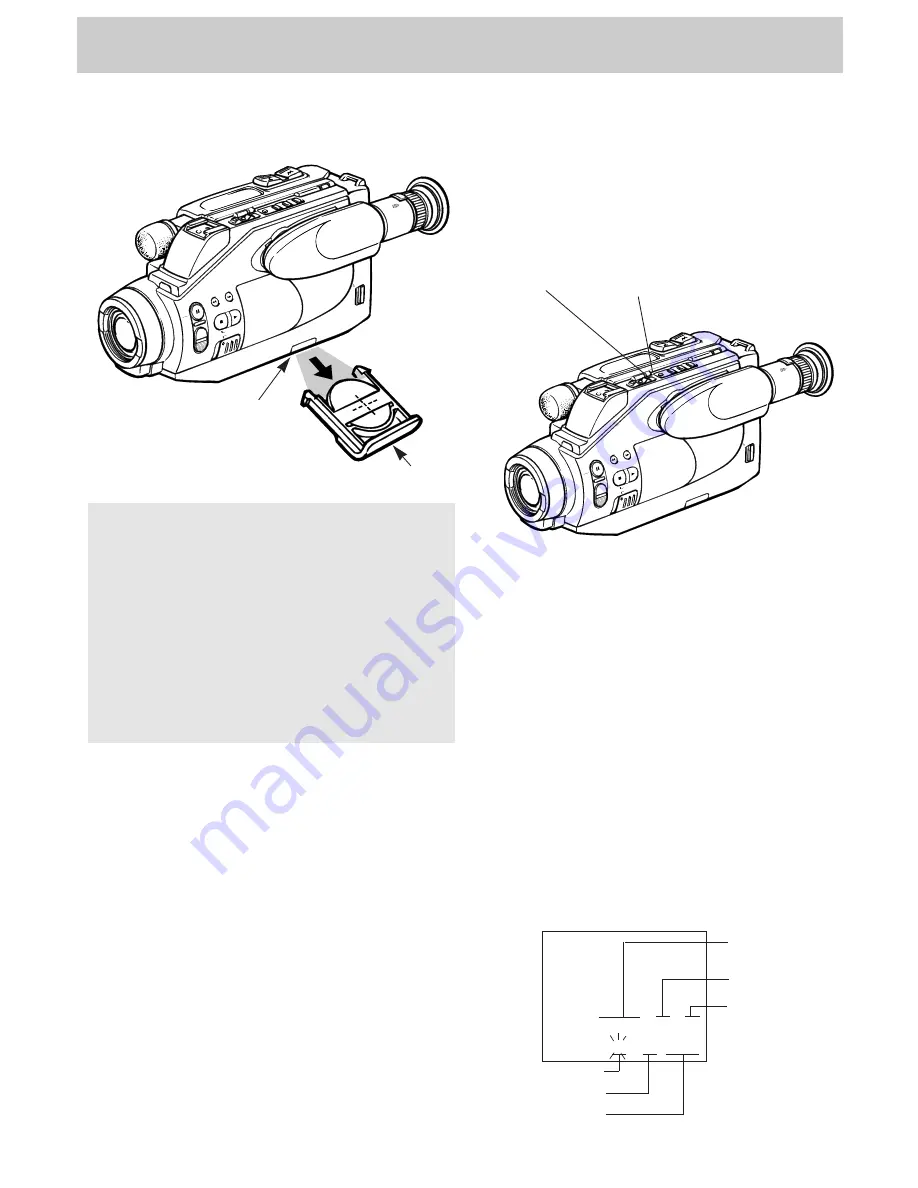
Installing the Battery for Time and Date
Display

REW

F.FWD.

BATTERY

STOP

MODE SEL.

AUTO LOCK

MANUAL FOCUS

ON
OFF

+

FOCUS

PLAY

ADJ.

DATE/TIME

RES.

MEM

COUNTER

PULL

Caution:  Lithium battery.  Must be disposed of
properly.

Never handle punctured or leaking batteries.  May
cause burns or personal injury.

Can cause death or injury if swallowed.

Keep out of the hands of children.  If swallowed,
consult a physician immediately for emergency
treatment.

Never use metallic tweezers to hold the battery, and
never short circuit the + and – sides of the battery.

1. Locate the clock battery compartment on the

bottom side of the camcorder.

2. Pull the battery tray out from the battery

compartment.

3. Insert the clock battery with the “+” terminal

facing up as illustrated above.

4. Replace the battery tray in the camcorder.

Notes: Under normal conditions, the lithium battery
should last about one year.  When the battery is expired the
date display will show “88:88”.  After the lithium battery
has been replaced, the date and time will need to be reset.  

Setting the Time and Date Display in the
Viewfinder

The time and date (or only the date) can be recorded
on your tape.  Whenever one of the displays appear in
the viewfinder, it will be recorded on the tape.  You
can choose to record only the date, both the date and
time, or neither.

AM 12:00:00

1. 1.1992

Hours and
AM 
or PM

Minutes

Seconds

Display in Viewfinder

Month

Day

Year

Battery
Compartment

Battery Tray

1. Install the clock battery as described in the

previous column.

2. Attach a power supply to the camcorder.  Press

and hold the small button on the POWER switch
while you slide it in the CAM (camera) position.
Place the ON/POWER SAVE lever in the ON
position.

3. Use a straightened paper clip or pen to press and

hold the ADJ. (adjust) button for about one
second.  The reset date (1. 1. 1992) and time
(AM 12:00:00) will appear in the viewfinder.

4. The month will be flashing.  Repeatedly press the

DATE/TIME button until the correct month
appears

REW

F.FWD.

BATTERY

STOP

MODE SEL.

AUTO LOCK

MANUAL FOCUS

ON
OFF

+

FOCUS

PLAY

ADJ.

DATE/TIME

RES.

MEM

COUNTER

PULL

ADJ. (Adjust)
Button

DATE/TIME
Button

(continued on the next page)

Содержание Pro807

Страница 1: ...ck 21 AUTO LOCK Switch 21 Tape Positioning 21 Microphone 21 Tally Light 21 Recording Features Date and Time Display 22 23 Electronic Viewfinder 23 Displays in Viewfinder 24 25 Power Zooming 25 Focusing Your Camcorder 26 Preset Program Modes 27 Time Counter with Memory Stop 28 Recording and Traveling Tips 29 Care and Maintenance 30 Playback Features Viewfinder Playback 31 Playback on TV or VCR Usin...

Страница 2: ... charger Take it to an Authorized RCA Compact Camcorder Servicenter when service or repair is required Incorrect reassembly may result in a risk of electric shock To reduce risk of electric shock unplug charger from outlet before attempting any maintenance or cleaning Be sure to save these operating instructions for future reference Product Registration Mail Your Registration Card Today A Product ...

Страница 3: ...afety features This will help avoid any potential hazard from electric shock or fire If in doubt contact qualified service personnel CAUTION RISK OF ELECTRIC SHOCK DO NOT OPEN MISE EN GARDE RISQUE DE CHOC ELECTRIQUE NE PAS OUVRIR The symbol of a lightning flash within a triangle is intended to alert the user to the presence of uninsulated dangerous voltage within the product s enclosure and which ...

Страница 4: ...r deteriorated insulation have it replaced by your service technician 7 Power Cord Protection Power supply cords should be routed so that they are not likely to be walked on or pinched by items placed upon or against them paying particular attention to cords at plugs convenience receptacles and the point where they exit from the video product 8 Ventilation Slots and openings in the video products ...

Страница 5: ...disconnect the antenna or cable system This will prevent damage to the video product due to lightning and power line surges Service 17 Servicing Do not attempt to service this video product yourself as opening or removing covers may expose you to dangerous voltage or other hazards Refer all servicing to qualified service personnel 18 Conditions Requiring Service Unplug this video product from the ...

Страница 6: ...he AV8MM long play battery The DCC05 is specially designed to convert power from a 24 volt or 12 volt battery to a 6 volt output All specifications and descriptions of accessories are subject to change without notice Rechargeable Batteries These rechargeable nickel cadmium batteries are specifically designed for long life The AV608 can power your camcorder up to one hour and the AV8MM up to two ho...

Страница 7: ...Soft Camcorder Case AC025A 59 95 Super Lightweight Tripod AC035 69 95 Gold Tipped Audio Video Cable 3 ft AH069G 5 99 Gold Tipped Audio Video Cable 5 ft AH070G 7 99 Gold Tipped Dubbing Cable 6 ft AH075G 10 99 Rechargeable Battery AV608 49 95 Rechargeable Battery AV8MM 59 95 RF Output Adapter CRF800 49 95 AC Adapter Charger CPS800 189 95 DC Car Cord Adapter Charger DCC05 169 95 DC Cable for Adapter ...

Страница 8: ... dealer is not nearby you can also follow the directions below to order by telephone or direct by mail United States Orders To place your order by phone have your Visa or MasterCard ready and call the toll free number listed below between 8AM and 8PM Eastern Standard Time Use this number only to place an order for accessory items listed on this order form 1 800 338 0376 Most times your order will ...

Страница 9: ...ld the camcorder without falling over When attaching your camcorder to a tripod be careful not to force the tripod screw into the camcorder s tripod mounting hole The tripod screw should not protrude into the camcorder more than approximately three eighth 3 8 inch Forcing the screw could damage the mounting hole on the bottom of the camcorder REW F FWD BATTE RY STO P MODESEL AUTOLOCK MANUA LFOCUS ...

Страница 10: ...or personal injury Can cause death or injury if swallowed Keep out of hands of children If swallowed consult a physician immediately for emergency treatment Camcorder Model Pro807 RF Connecting Cable Stock No 213003 AC Adapter Charger Stock No CPS800 RF Output Adapter Stock No CRF800 DC Connecting Cord Stock No DCC100 Remote Control Stock No 211026 Remote Control Batteries size AA 1 5 volt Recharg...

Страница 11: ... TIM E RES ME M CO UN TER OP EN DC OUT Jack DC IN 6 5V Jack Attach charged battery to camcorder POWER Indicator Jack To AC 100 240V 50 60 Hz DC Power Cord continued on next page 3 Remove the lens cap and attach it to the lens cap holder on the camcorder Pull on the tab on the side of the lens cap to remove it Then pull it straight rotate it down and attach it to the lens cap holder on the side of ...

Страница 12: ...ll enter the standby mode Important Note The dew indicator will appear in the electronic viewfinder when there is excessive moisture in the camcorder Remove the cassette from the camcorder and let it dry naturally First Time Operation continued 8 Insert a cassette in the camcorder 1 Slide the OPEN button and completely open the cassette compartment cover 2 Press the EJECT button to open the casset...

Страница 13: ... recording press the thumb trigger twice Any material recorded on the tape will automatically be erased if you record over it To monitor the audio being recorded attach an optional earphone to the earphone jack 12 Play back what you have recorded Press the thumb trigger to stop recording Place the POWER switch in the PLAY position Press the REW rewind button to rewind the tape Then press the PLAY ...

Страница 14: ...ock Battery Compartment page 22 Output Jacks Yellow Video DC and White Audio Located behind cover pages 32 34 PLAY Button pages 11 24 31 33 35 STOP Button pages 11 21 31 33 35 Also MODE SEL Select Button pages 24 27 AUTO LOCK Switch pages 10 12 21 27 Lens page 30 Tally Light pages 11 15 21 Microphone page 21 Power Zoom Buttons W and T page 25 Accessory Shoe Remote Control Sensor page 14 Eyepiece F...

Страница 15: ...houlder Strap Attachment Rings page 9 Hand Strap page 10 Earphone Jack pages 21 31 Lens Cap page 9 Lens Cap Holder page 9 Cassette Compartment pages 10 20 Cassette Compartment Cover pages 10 20 ON POWER SAVE Lever pages 10 11 OPEN Button page 10 20 ADJ Adjust Button pages 22 23 DATE TIME Button pages 22 23 25 EJECT Button Located under the cassette compartment cover pages 10 11 20 COUNTER RES Rese...

Страница 16: ...rotected from electrical and sound interference However the remote control must be aimed directly at the camcorder s remote control sensor There cannot be any obstructions between them The remote control should operate up to approximately 16 feet from the camcorder Replace the remote control batteries if the operation distance decreases Note The camcorder may not respond to the remote control if t...

Страница 17: ...old the SCENE SEARCH button to visually search the tape in reverse Release the button to return to record pause 4 DISPLAY Button Press the DISPLAY button when the camcorder is connected to a TV to see the viewfinder s displays on the TV screen Press the DISPLAY button again to remove them Details on connecting a TV are on pages 32 35 5 STOP Button Press this button when the camcorder s POWER switc...

Страница 18: ...the adapter charger Using the Adapter Charger to Power Your Camcorder The adapter charger attaches to the camcorder and lets you power your camcorder directly from standard household power The adapter charger operates on 100 240 volts 50 60 Hz so it can be used virtually anywhere in the world to power the camcorder or recharge the battery You may need a plug adapter in some countries Consult your ...

Страница 19: ...irection of the arrow until it locks into place 4 Press the REFRESH button to discharge the battery After a few seconds the CHARGE indicator will slowly flash The CHARGE POWER CHARGE REFRESH Caution When a battery is attached to the adapter charger do not turn them upside down The battery may fall off and be damaged or cause injury When using the battery to power the camcorder place the ON POWER S...

Страница 20: ...ged at a temperature of 41 F 95 F 5 C 35 C to prevent damage Do not operate the battery at temperatures below 14 F 10 C or above 95 F 35 C The battery may be damaged if operated at temperatures above 122 F 50 C Operation time will decrease at extremely low temperatures When the battery is used the first time the recording time will be slightly shorter than normal To receive full operation time fro...

Страница 21: ...er end into the DC IN 6 5 V jack on the back of the camcorder 3 Insert the plug on the DCC05 into the vehicle s cigarette lighter socket If the car cord is properly attached the POWER indicator on the DCC05 will light Using the Optional RCA DCC05 Car Cord Adapter Charger The optional RCA DCC05 DC car cord adapter charger allows you to power your camcorder from the cigarette lighter socket of a car...

Страница 22: ...ars behind the cassette case Recording and Playback Speeds and Times The camcorder records in standard speed SP The chart in the next column shows the maximum SP recording times for some popular 8mm cassettes The camcorder can play back tapes in standard speed SP or long play LP speed The playback speed is automatically selected by the camcorder The LP indicator appears in the electronic viewfinde...

Страница 23: ...order will automatically control the focus and other recording features When you press the thumb trigger to start recording the REC and PAUSE indicators will briefly appear twice their normal size in the viewfinder to alert you that the AUTO LOCK switch is in the AUTO LOCK position Details are on pages 26 27 Note When the AUTO LOCK switch is in the AUTO LOCK position you cannot manually control th...

Страница 24: ...m battery has been replaced the date and time will need to be reset Setting the Time and Date Display in the Viewfinder The time and date or only the date can be recorded on your tape Whenever one of the displays appear in the viewfinder it will be recorded on the tape You can choose to record only the date both the date and time or neither AM 12 00 00 1 1 1992 Hours and AM or PM Minutes Seconds D...

Страница 25: ...Pull the viewfinder out into operating position Look through the viewfinder and adjust the eyepiece focus control for your vision The eyepiece focus control does not affect the focus of the picture actually recorded by the camcorder REW F FWD BATTERY STOP MODESEL AUTOLOCK MANUALFOCUS ON OFF FOCUS PLAY ADJ DATE TIM E RES MEM COU NTER PULL Eyepiece Focus Control Electronic Viewfinder in Operating Po...

Страница 26: ... The LP indicator appears when you are playing back a tape that was recorded at the LP speed Status Displays One of the following displays will appear in the viewfinder to let you know what the camcorder is doing These displays are not recorded on the tape when they appear in the viewfinder REC appears when the camcorder is recording PAUSE flashes when the camcorder is in the record pause mode FF ...

Страница 27: ...date or date in the viewfinder The time and date display only appears when the camcorder is recording or in the record pause mode POWER switch in the CAM position This display will be recorded on the tape whenever it appears in the viewfinder Repeatedly press the DATE TIME button to remove this display from the viewfinder 88 88 appears instead of the time and date if the time and date have not bee...

Страница 28: ... to OFF the focus will reset to auto focus when power is restored Manual focus will remain selected when you place the ON POWER SAVE lever in the POWER SAVE position and then restore power by returning it to the ON position Auto Focus If you want the camcorder to focus for you automatically set the AUTO LOCK switch to the AUTO LOCK position Notes The camcorder will automatically focus on any subje...

Страница 29: ...ing on brightness 1 250 1 10 000 second depending on brightness 1 60 second 1 60 second 1 100 second Indicator None Auto Focus Area Normal Center Frame Area Only 9 feet and farther Normal 2 5 inch 78 inches Normal Normal Recording Conditions Use under normal conditions For filming sporting events football games etc Colors may change if this mode is used indoors with fluorescent lighting For captur...

Страница 30: ... time counter to M 0 00 00 3 Continue to record or play the tape When you want to return to the place you marked press the thumb trigger to stop recording or the STOP button to stop playing back the tape 4 Make sure the CAM OFF PLAY switch is in the PLAY position and then press the REW rewind button The tape will rewind to the time counter reading of M 0 00 00 Notes for Memory Stop The correspondi...

Страница 31: ...and details Local color will give travel videos lasting appeal Consider recording a familiar or landmark scene from an unfamiliar vantage point for added interest Remember to check the lighting before starting to record Include close up shots of individuals when taping family outings or group functions Make a video recording of your home and contents to store in a safe place in case of fire or the...

Страница 32: ...o swinging shaking or dropping Do not store the camcorder in temperatures below 22 F 30 C or above 149 F 65 C When the camcorder is not in use always remove the cassette and AC adapter charger or battery Retain the original carton for future storage or shipping purposes Cassette Care and Storage When you are finished with a cassette rewind it and remove it from the camcorder Label your cassettes b...

Страница 33: ...layback 4 Press the STOP button when you are finished Notes The corresponding buttons on the remote control can be used to operate the camcorder The camcorder can play back tapes recorded in SP or LP speed The LP indicator appears in the electronic viewfinder when a tape recorded at LP speed is being played Tapes recorded at SLP speed cannot be played back in this camcorder During still and search...

Страница 34: ...cated behind the door on the side of the camcorder as shown above OR 2 Back of TV VHF Antenna Coaxial RF Cable supplied CHANNEL 4CH 3CH Switch RF Output Adapter supplied Optional 300 75 Ohm Transformer such as 193983 Output Jacks Located behind door VHF Antenna OR VHF VHF IN FROM ANT REW F FWD BATTERY STOP MODESEL AUTOLOCK MANUALFOCUS ON OFF FOCUS PLAY ADJ DATE TIME RES MEM COUNTER PULL 1 3 Back o...

Страница 35: ... tune it to channel 3 or 4 B Camcorder connected to VCR that is already connected to TV Turn on VCR and tune it to channel 3 or 4 Operate the TV as you normally do to see the signal coming from the VCR Note When the camcorder is used as a camera turn the TV s volume down to prevent a high pitched squeal caused by feedback 2 Set the CHANNEL switch on the RF output adapter to the same channel you se...

Страница 36: ... and watch what the camcorder is recording or playing on the TV AUDIO IN VIDEO IN Back of Mono VCR or TV Monitor White Audio Plug Yellow Video Plug Optional Audio Video Cables such as AH069G AH070G or AH075G AUDIO IN VIDEO IN L R Y Adapter available from electronics supply store OR Back of Stereo VCR or TV Monitor 1 2 White Audio Plug 1 Yellow Video Plug 2 REW F FWD BATTERY STOP MODESEL AUTOLOCK M...

Страница 37: ... the camcorder s thumb trigger or the remote control s RECORD START STOP button to begin recording You can watch what the camcorder is seeing or recording on the TV screen Seeing the Camcorder s displays on the TV Screen When the camcorder is connected to a TV press the DISPLAY button on the remote control to see the camcorder s viewfinder displays on the TV screen Press the DISPLAY button again t...

Страница 38: ...der Try ejecting and re inserting the cassette The cassette tape may be broken try another cassette You may have reached the end of the cassette try rewinding it POWER switch must be in PLAY position Record protect tab has been closed See page 20 POWER switch must be in CAM camera position ON POWER SAVE lever must be in ON position Remove lens cap ON POWER SAVE lever must be in ON position when PO...

Страница 39: ...ontrol See page 23 Pull electronic viewfinder out to the extended operating position Date and time or date will be recorded on tape whenever they appear in the viewfinder Press DATE TIME button to remove them from viewfinder when recording Clock battery may need replacing See page 22 Date and or time may need to be set See pages 22 23 Aim remote control at remote control sensor on camcorder Remote...

Страница 40: ...gh resolution solid state CCD Imager Tripod Mount One 1 4 threaded hole Lens f1 8 8 1 6 48mm Diameter 37 mm Earphone Jack Monaural 8 ohm mini jack This digital apparatus does not exceed the class B limits for radio noise emissions from digital apparatus set out in the Radio Interference Regulations of the Canadian Department of Communications L interférence radioélectrique générée par cet appareil...

Страница 41: ...s and other accessories originally furnished with the camcorder Include in the camcorder carton 1 a copy of your sales receipt or other evidence of purchase date 2 your name and address and 3 a brief description of the problem Ship the camcorder to an Authorized RCA Compact Camcorder Servicenter Pay any charges billed to you by the Servicenter for service not covered by the warranty What your warr...

Страница 42: ...ER MEMORY Button 14 15 24 25 28 COUNTER RES Reset Button 13 24 25 28 COUNTER RESET Button 14 15 24 25 28 Date and Time Display 22 23 24 25 Date and Time Recording 23 Date and Time Setting 22 23 DATE TIME Button 13 22 23 25 DC Car Cord Optional 19 DC IN 6 5V Jack 13 16 19 DC Power Cord 8 16 Design Specifications 38 Dew Indicator 10 24 DISPLAY Button 14 15 33 35 Displays in Viewfinder 24 25 Earphone...

Страница 43: ... 24 Safeguards Important 2 3 Safety Record Protect Tab 20 Safety Instructions for AC Adapter Charger Inside Front Cover Safety Instructions Inside Front Cover Safety Precautions 1 SCENE SEARCH and Buttons 14 15 21 Setting the Time and Date 22 23 Shoulder Strap Rings 9 13 Shoulder Strap Attaching 9 Solving Problems 36 37 SP Speed 20 Special Features 21 Specifications 38 Sports Mode 27 Status Displa...

Страница 44: ...lus avec votre appareil vous pouvez en obtenir un indiquer le numéro de modèle votre nom et votre adresse en vous adressant à Thomson Électronique Grand Public du Canada Service des données techniques 6540 Tomken Rd Mississauga Ontario Canada L5T 2E9 Thomson Consumer Electronics 600 N Sherman Dr PO Box 1976 Indianapolis IN 46206 1992 Thomson Consumer Electronics Inc Trademark s Registered Marca s ...

Отзывы: