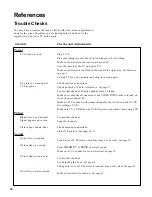
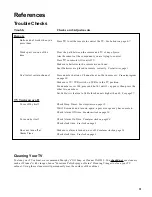
background image

22

Using Advanced Features

Naming the Channels

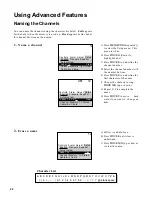
You can name the channels using the character list below.  Full appears
beside Label when the memory is used up.  Fixed appears beside Label
for channel 00--it cannot be named.

A. Press 

MENU•PROG

repeatedly

to select the Setup menu.  This
menu is white.

B. Press 

MOVE H (

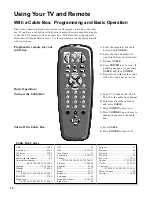
down) to

highlight Label.

C. Press 

MOVE E

to underline the

channel number.

D. Select the channel number with

the number buttons. 

E. Press 

MOVE E

to underline the

first character of the name.

F. Choose the character using

MOVE G/H (

up or down).

G. Repeat E–F to complete the

name.

H. Press 

MOVE F

to move 

back-

ward if you want to  change an
item.

A. Follow A and B above.

B. Press 

MOVE E

until clear is

underlined.

C. Press 

MOVE G/H (

up or down)

to clear the name. 

1.

Name a channel

2.

Erase a name

A   B   C   D   E   F   G   H   I   J   K   L   M   N   O   P   Q   R   S   T   U   V   W   X   Y   Z   &

’   (   )   á   +   ,   –   .   /   0   1   2   3   4   5   6   7   8   9   :   ;   <   =   >   ?   @   blank space

Character List

12

Controls  Alarm  Adjust  Setup

English Français  Español
Autoprogram

Label  12

Clear

Channel Memory: 12 Stored
Cable/Air: Cable

XET        12

Controls  Alarm  Adjust  Setup

English Français  Español
Autoprogram

Label  12 XET

Clear

Channel Memory: 13 Stored
Cable/Air: Cable

12

Controls  Alarm  Adjust  Setup

English Français  Español
Autoprogram

Label  12

Clear

Channel Memory: 13 Stored
Cable/Air: Cable

Содержание M21500

Страница 1: ...mation i Table of Contents 1 Quick Guide to Your TV2 5 Using Your Remote 6 15 Adjusting Your TV16 19 Using Advanced Features 20 27 References 28 33 IT IS IMPORTANT TO READ THIS MANUAL BEFORE OPERATING THIS UNIT FOR THE FIRST TIME C O L O R T V ...

Страница 2: ...t matches the plug of the TV For U S A Operate TV only on 120 volts 60 Hz AC power normal house power For Mexico Operate TV only on 127 volts 60 Hz AC power normal house power Average Maximum Power Consumption is 100 watts For safety reasons make sure any equipment or accessories connected to this product bears the UL listing mark or the CSA certification mark If in doubt contact qualified service...

Страница 3: ...____________________ 16 Picture Settings ________________________________________________________ 17 Color Tint Brightness Sharpness Autocolor Picture Reset Sound Settings ____________________________________________________ 18 19 Stereo Expanded Stereo SAP Tone Speakers Using Advanced Features Placing Channels in Memory Autoprogram ____________ 20 Adding and Deleting Channels in Memory __________...

Страница 4: ...or more details see the page numbers listed 3 Put Batteries in the Remote A Pull off the cover of the battery compartment B Place the four AAA batteries as shown matching the and end of each battery in the compartment C Replace the cover CONNECTIONS GUIDE Use This Book First To Find Your Hook up Turn To Page 1 THIS GUIDE SHOWS HOW TO HOOK UP YOUR TV AND OTHER COMPONENTS Plug the cord into the outl...

Страница 5: ...all the channels and returns to original channel 6 Set the Time 5 Place all available channels in memory AutoProgram Details for adding and deleting channels are on page 21 Press TV on the remote OR Press POWER on the TV 4 Turn on the TV VCR 2 LD AUDIO 7 8 9 4 5 6 1 2 3 0 ANT A B INPUT RESET CLEAR MOVE POWER VCR DSS CABLE TV DISPLAY SKIP MUTE PREV CH REW PLAY FF REC STOP PAUSE M E N U P R O G V O ...

Страница 6: ... Basic Tour of the Remote 4 Turns the TV on Sets the remote to control the TV Operates TV when remote is set to control the TV Operates the TV and advanced features TV Power Button Volume and Channel Controls Details are on page 6 Basic information about your remote is shown below This will give you a general idea of how your remote works For more details see pages 6 15 Controls components such as...

Страница 7: ... screen menu system is shown below Details on using the remote buttons are on pages 6 7 Many menu items are explained in detail in Using the Advanced Features starting on page 20 Moving through the Menus Controls Alarm Adjust Setup English Français Español Autoprogram Label Clear Channel Memory 13 Stored Cable Air Cable Controls Alarm Adjust Setup English Français Español Autoprogram Label Clear C...

Страница 8: ...ges 8 15 REW Rewind Rewinds a tape or laserdisc Searches backward while tape or laserdisc is playing PLAY Plays tape or laserdisc FF Fast Forward Fast forwards a tape or laserdisc Searches forward while tape or laserdisc is playing REC Record Starts recording onto tape STOP Stops tape or laserdisc PAUSE Pauses tape or laserdisc DISPLAY Shows displays on the screen Clears menus from the screen SKIP...

Страница 9: ... press the other two numbers INPUT Switches between the TV channels and Video 00 ANT A B Antenna Used as TV VCR button when remote is set to control the VCR CLEAR Clears menus and displays from the screen Clears items from VCR timer programs and VCR s clock MENU PROG Program Shows menus on the screen and moves from menu to menu Sets VCR clock and programs timer on VCR RESET Returns the picture adj...

Страница 10: ...VCR Codes Aiwa 15 Akai 03 22 23 Audio Dynamics 14 16 Broksonic 10 Canon 08 Capehart 01 Citizen 09 Craig 07 12 Curtis Mathes 00 08 15 Daewoo 13 dbx 14 16 Dimensia 00 Dynatech 15 Emerson 09 10 13 15 20 23 24 34 41 Fisher 02 12 18 19 43 Funai 15 GE 00 07 08 32 37 Goldstar 09 14 Harman Kardon 14 Hitachi 05 15 35 36 Instant Replay 08 JCL 08 JCPenney 02 05 07 08 14 16 30 35 JVC 02 14 16 30 Kenwood 02 14...

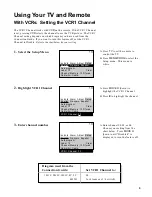
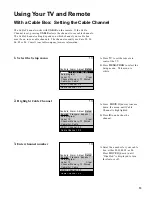
Страница 11: ...s E to highlight the channel A Enter channel 00 03 or 04 Choose your setting from the chart below Press MOVE H down until Disabled is displayed to turn the feature off 1 Select the Setup Menu 2 Highlight VCR1 Channel 3 Enter channel number 13 Controls Alarm Adjust Setup English Français Español Autoprogram Label 13 Clear Channel Memory 13 Stored Cable Air Cable 13 Controls Alarm Adjust Setup Engli...

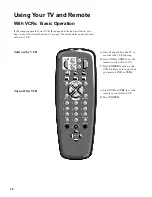
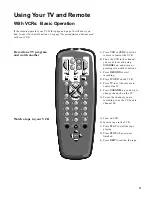
Страница 12: ...POWER to turn on the VCR if it did not turn on when you pressed VCR or VCR2 If the remote operates your VCR this page and the next will show you how to use it for basic functions See page 7 for more details on buttons used with your VCR 7 8 9 4 5 6 1 2 3 0 ANT A B INPUT RESET CLEAR MOVE DISPLAY SKIP MUTE PREV CH REW PLAY FF REC STOP PAUSE M E N U P R O G VCR 2 LD AUDIO POWER VCR DSS CABLE TV V O L...

Страница 13: ...l you are recording tune the TV back to channel 00 A Turn on VCR B Insert a tape in the VCR C Press PLAY to start the tape playing D Press STOP when you are finished E Press REW to rewind the tape Watch a tape in your VCR If the remote operates your VCR this page and page 10 will show you how to use it for basic functions See page 7 for more details on buttons used with your VCR VCR 2 LD AUDIO 7 8...

Страница 14: ... C Press POWER to turn it on D Press CHANNEL up or down to change channels on the cable box A Press CABLE B Press POWER to turn it off Basic Operation Turn on the Cable Box Turn off the Cable Box VCR 2 LD AUDIO 7 8 9 4 5 6 1 2 3 0 ANT A B INPUT RESET CLEAR MOVE POWER VCR DSS CABLE TV DISPLAY SKIP MUTE PREV CH REW PLAY FF REC STOP PAUSE M E N U P R O G V O L CHAN V O L CHAN ABC 22 46 Anvision 07 08...

Страница 15: ... until Cable Channel is highlighted B Press E to underline the channel A Enter the number for your cable box either 02 03 04 05 or 06 Press MOVE H down until Disabled is displayed to turn this feature off 1 Select the Setup menu 2 Highlight Cable Channel 3 Enter channel number VCR 1 Channel 00 Cable Channel 02 13 Controls Alarm Adjust Setup English Français Español Autoprogram Label 13 Clear Chann...

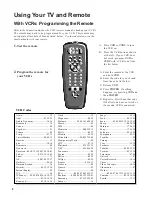
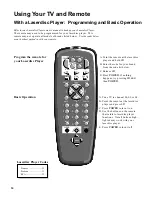
Страница 16: ...rn it on D Use the buttons on the remote that relate to laserdisc player functions Not all buttons high lighted may work with your laserdisc player E Press POWER to turn it off Program the remote for your Laserdisc Player A Point the remote at the laserdisc player and hold LD B Enter the code for your brand from the code list below C Release LD D Press POWER If nothing happens try pressing LD and ...

Страница 17: ...ns highlighted may work with your equipment D Turn the audio equipment off using the audio component s power off button VCR 2 LD AUDIO 7 8 9 4 5 6 1 2 3 0 ANT A B INPUT RESET CLEAR MOVE POWER VCR DSS CABLE TV DISPLAY SKIP MUTE PREV CH REW PLAY FF REC STOP PAUSE M E N U P R O G V O L CHAN V O L CHAN RCA Dimensia AM FM 03 CD 07 Tape 06 Phono 05 Aux 04 Audio Codes Refer to the Connection Book or your...

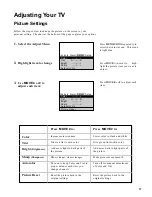
Страница 18: ...s menu This menu is yellow Press MOVE H down to highlight Picture Press MOVE E right to lighten the picture OR Press MOVE F left to darken the picture 2 Highlight Picture 3 Use MOVE E and F to adjust the Picture Controls Alarm Adjust Setup Sleep Timer Closed Captioning Off Picture I Stereo On SAP Off Controls Alarm Adjust Setup Sleep Timer Closed Captioning Off Picture I Stereo On SAP Off Picture ...

Страница 19: ...color Picture Reset Press MOVE E to Increase color richness Give red tint to skin color Add more light to dark parts of the picture Show cleaner clearer images Turn on to keep Color and Tint in proper balance each time you change channels Reset the picture back to the original settings Press MOVE F to Lower color to black and white Give green tint to skin color Add more dark to light parts of the ...

Страница 20: ...reproduced in mono Off Sound is reproduced in Stereo Expanded Stereo or Mono whichever is selected in the Stereo Menu Item Low Low pitched sounds are louder Expanded Expanded stereo adds greater width and dimension to stereo broadcasts creating a more spacious stereo sound effect On Sound is automatically reproduced in stereo or mono whichever the TV station is broadcasting On Sound is reproduced ...

Страница 21: ...ghlight speakers 3 Turn Speakers on or off Cable Channel 03 Speakers Off Off No sound comes from the TV On The sound comes from the TV s internal speakers Speakers Speakers On Controls Alarm Adjust Setup English Français Español Autoprogram Label 13 Clear Channel Memory 13 Stored Cable Air Cable Controls Alarm Adjust Setup English Français Español Autoprogram Label 13 Clear Channel Memory 13 Store...

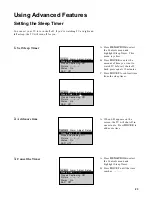
Страница 22: ... next page A Hook up an antenna cable or components before you begin these steps or you will not be able to add channels into memory B Press MENU PROG repeatedly to select the Setup Menu and highlight Autoprogram This menu is white C Press MOVE H down to start the TV adding all active channels into memory D Wait until the TV has cycled through all the channels and returns to the original channel P...

Страница 23: ...ll see Stored on the screen when added and Erased when deleted F Repeat D and E for more channels 13 Controls Alarm Adjust Setup English Français Español Autoprogram Label 13 Clear Channel Memory 13 Stored Cable Air Cable 13 Controls Alarm Adjust Setup English Français Español Autoprogram Label 13 Clear Channel Memory 13 Erased Cable Air Cable Adding and deleting channels in memory You may want to...

Страница 24: ...p or down G Repeat E F to complete the name H Press MOVE F to move back ward if you want to change an item A Follow A and B above B Press MOVE E until clear is underlined C Press MOVE G H up or down to clear the name 1 Name a channel 2 Erase a name A B C D E F G H I J K L M N O P Q R S T U V W X Y Z á 0 1 2 3 4 5 6 7 8 9 blank space Character List 12 Controls Alarm Adjust Setup English Français Es...

Страница 25: ...etup Sleep Timer 0 01 Closed Captioning Off Picture I Stereo On SAP Off Controls Alarm Adjust Setup Sleep Timer Closed Captioning Off Picture I Stereo On SAP Off A Press MENU PROG to select the Controls menu and highlight Sleep Timer This menu is yellow B Press MOVE E to enter the amount of time you want to watch TV before it shuts off Each press equals 15 minutes C Press MOVE F to subtract time f...

Страница 26: ... 12 34 AM 12 34 AM 13 Alarm Controls Alarm Adjust Setup Alarm On Alarm Channel 07 On Time 7 30 AM Off Time Disabled Clock 12 34 AM 12 34 AM 13 Alarm Controls Alarm Adjust Setup Alarm On Alarm Channel 07 On Time 7 30 AM Off Time Disabled Clock 12 34 AM A Press MENU PROG to select the Alarm menu and highlight Alarm This menu is green B Press MOVE E or F to select On or Off A Press MOVE H down to hig...

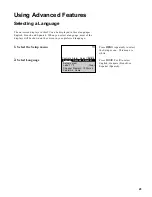
Страница 27: ...st of the displays will be shown on the screen in your preferred language 13 Controls Alarm Adjust Setup English Français Español Autoprogram Label 13 Clear Channel Memory 13 Stored Cable Air Cable 1 Select the Setup menu 2 Select Language Press MENU repeatedly to select the Setup menu This menu is white Press MOVE F or E to select English Français French or Español Spanish ...

Страница 28: ...s etc Press MENU PROG to select the Controls menu This menu is yellow Press MOVE H down to highlight Closed Captioning Press MOVE F or E to select Off CC1 or CC2 Select CC1 for full translation of the primary language in your area Select CC2 for sec ondary language translation sim plified English or whatever is being broadcast in your area 1 Select the Controls Menu 2 Highlight Closed Captioning 3...

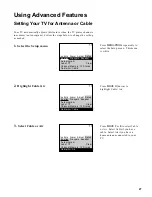
Страница 29: ...select Cable or Air Select Cable if you have cable Select Air if you have a home antenna connected to your TV 1 Select the Setup menu 2 Highlight Cable Air 3 Select Cable or Air 13 Controls Alarm Adjust Setup English Français Español Autoprogram Label 13 Clear Channel Memory 13 Stored Cable Air Cable 13 Controls Alarm Adjust Setup English Français Español Autoprogram Label 13 Clear Channel Memory ...

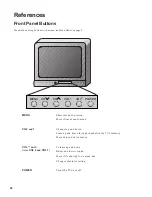
Страница 30: ...to menu Channel up and down Scans up and down through channels in the TV s memory Moves up and down menus Volume up and down Raises and lowers sound Moves left and right on a menu line Changes a features setting Turns the TV on or off For details on using buttons with menus see Menu Basics on page 5 MENU CH VOL VOL POWER CH ...

Страница 31: ...d channel 00 is selected Alarm Alarm clock is set to turn on or off Details are on page 24 Sleep Sleep Timer is set to turn off the TV Details are on page 23 Volume Sound level of the TV Unusable Signal No signal is coming in on video input channel 00 Mute There is no sound See MUTE button on page 6 Stereo The sound is being broadcast in stereo Details are on page 18 Stereo SAP is selected in the ...

Страница 32: ...O INPUT jacks is turned on if you choose channel 00 Make sure TV is tuned to the same channel as the switch on back of VCR if watching a VCR Make sure TV VCR button on VCR is in correct position when using VCR Try another channel Scan the channels Check antenna connections Adjust TV picture See pages 16 17 Turn Stereo off The stereo broadcast may not be clear See page 18 Press VOLUME or MUTE to re...

Страница 33: ...an 69 See page 27 Check Sleep Timer See sleep timer on page 23 Wait 30 seconds and turn on again a power surge may have occured Check Alarm Off time See alarm clock on page 24 Check Alarm On Time See alarm clock on page 24 Check clock time See clock on page 3 Make sure alarm is turned on or off See alarm clock on page 24 Check clock time See clock on page 3 Trouble Remote Buttons don t work when y...

Страница 34: ...TV 28 Channels Adding 21 Deleting 21 Naming 22 29 Placing in Memory 3 20 21 Checks and Adjustments 30 31 CLEAR Button 6 7 Clock 3 24 Closed Captioning 26 Codes Audio 15 Cable Box 12 Laserdisc Player 14 VCR 8 Color 17 Colors Menus 5 Commerical Skip 6 29 Button 6 Display 29 Component 35 Component Buttons 13 AUDIO CABLE LD VCR VCR2 Components Audio Equipment 15 Cable Box 12 13 Laserdisc Player 14 VCR...

Страница 35: ...annel Memory 3 20 21 Speakers 9 VCR 1 Channel 8 Sharpness 17 SKIP 6 Sleep Display 23 29 Sleep Timer 23 Sharpness 17 Sound 18 19 Speakers 19 Startup 2 3 Stereo 18 Stereo Display 29 STOP Button 7 8 11 15 T Table of Contents 1 Time Alarm 24 Clock 3 Sleep Timer 23 Time Display 29 Tint 17 Tone 18 Tour of the Remote 4 Trouble Checks 30 31 Turn on Alarm 24 Turn on TV 2 TV Buttons 4 6 28 Guide to 2 3 4 TV...

Страница 36: ... Inc Trademark s Registered Marca s Registrada s Printed in the U S A Part Number 1Q57 550 S1C EXPORTED BY Thomson Consumer Electronics Inc 600 North Sherman Drive Indianapolis IN 46201 1976 COUNTRY OF ORIGIN M21500 CANADA M27500 U S A ...

Отзывы: