

General Controls
Front View
Top View
COMPUTER
DIGITAL
USB PORT
ON/OFF
RECORD
1
LCD (Liquid Crystal Display) –
This is where the Lyra’s user interface and multimedia
content appear (go to the User’s Guide for an explanation of the items that appear on
the LCD during playback).
2
Reverse button-
When you’re playing a file, press and release to skip back to the
previous file (to scan backwards in the audio or video file that’s playing, press and hold).
3
SmartTag button (+)
–
Allows you to tag the file to be included in Favorites or Program
Play, depending on which mode you are in. (Feature currently not available. Visit http://
www.rca.com/Lyra-avdownloads for the latest software and updates).
4
Play/Pause –
Press to play. During playback, press to pause.
5
Forward button –
When you’re playing a file, press and release to skip forward to the
next file (to scan forward in the audio or video file that’s playing, press and hold).
6
SmartUntag button
(-) –
Allows you to remove the tags from Favorites or Program
Play, depending on which mode you are in. (Feature currently not available. Visit http://
www.rca.com/Lyra-avdownloads for the latest software and updates).
7
Up arrow button –
Moves highlight up.
8
Right arrow button –
If you’re viewing a folder or playlist, moves highlight forward
one level and expands the item’s contents.
9
SELECT–
When using the Lyra AV Jukebox menu, selects a highlighted item. If file
highlighted, press to display the options menu.
10
Down arrow button –
Moves highlight down.
11
Left arrow button –
If you’re viewing a folder or playlist, moves highlight back one
level and collapses the item.
Bottom View
Stand –
Pull the stand out to place the Lyra AV Jukebox upright on a surface.
VOL (Volume up and down)-
Press VOL+ to increase the volume level; press VOL- to decrease
the volume level.
CompactFlash port
–
Insert a CompactFlash memory card to copy files to your Lyra AV Jukebox.
When connected to a computer, the CompactFlash card port functions as a high-speed card reader.
RECORD
–
Displays Recording Mode options menu.
ON/OFF button and Stop icon –
Turns on your Lyra AV Jukebox. To turn off the Lyra AV Jukebox,
press and hold. When you’re playing files, stops playback.
USB port
–
Attach the small end (Type mini-B) of the mini-USB cable here. Attach the large end
(Type A) to your computer.
Note:
Your Lyra AV Jukebox has a lithium ion rechargable battery that starts charging every
time you plug in your player to an electrical outlet. It takes about 4 hours to fully charge the
battery. In order to extend the life of the battery as long as possible, make sure you fully
charge the battery.
Install Software In Your Computer
The Music Management CD that came with your Lyra AV Jukebox contains all of the necessary
software components you need to make your Lyra AV Jukebox work properly.
1.
Place the Music Management CD that came with your Lyra AV Jukebox into your computer
(the startup screen appears).
If the setup screen doesn’t appear, double click
My Computer
, double click your CD-ROM drive
icon, and double click
Install
to run the installer.
Transfer Files to Your Lyra AV Jukebox
From
Windows Explorer
or
My Computer
, transfer the files to your Lyra AV Jukebox by
highlighting the files you want to transfer, and then copy or drag them to the drive letter that
is associated with the Lyra AV Jukebox.
To transfer pre-defined audio playlists that you have created in MusicMatch Jukebox , drag
them to the
AUDIO
folder located in the drive letter associated with your Lyra AV Jukebox
from Windows Explorer.
(Continued on other side)
MusicMatch Jukebox is a trademark of MusicMatch, Inc.
ON/OFF
+
-
VOL
RECORD
C o m p a c t F l a s h
SELECT
SELECT
+
-
1
2
3
4
5
6
7
8
9
10
11
Right Side View
RESET button –
If your Lyra AV Jukebox appears to be locked up, press the RESET button (the
memory will be cleared and settings will return to the factory defaults).
CONTROLS HOLD
–
To make the buttons inactive, slide the switch to the CONTROLS HOLD
(button lock on) position (the
icon appears in the display to remind you that you’ve locked
the buttons). Slide the switch to the NORMAL position for normal operation (button lock off).
NORMAL –
To listen to music, view photos, or watch video, slide the switch to Normal mode.
TV OUT –
If you’ve connected a cable to the LINE OUT jack, slide the switch to TV OUT to
display the Lyra’s user interface and mutlimedia content on the connected video component.
Install System Applications (Windows 2000/XP)
Click
Install System Application
to install applications that will help you better manage your
Lyra AV Jukebox.
Install MusicMatch Jukebox
MusicMatch Jukebox is a music management software used to organize and manage digital
audio files and to transfer the music to your Lyra AV Jukebox.
Click
Install MusicMatch Jukebox
on the startup screen to run the MusicMatch setup program.
Wait while the installation program begins. It may take up to 20 seconds for the installer to
start. Follow the on-screen instructions to install MusicMatch Jukebox.
Note:
It is recommended to uninstall any previous installations of the MusicMatch Jukebox
software before proceeding. After the uninstall process has been completed, delete the
C:\Program Files\MusicMatch folder from Windows and where C:\Program Files is the path
where the software was installed. If you do not wish to uninstall the previous MusicMatch
Jukebox software, go to “Install MusicMatch Plug-in”.
For more information on MusicMatch Jukebox, click
Tutorials
on the CD or go to
www.musicmatch.com.
Install MusicMatch Plug-in
MusicMatch requires a plug-in for your particular device in order to transfer audio files from
your computer to your Lyra AV Jukebox through the MusicMatch Jukebox software. Click
Install MusicMatch Plug-in
on the startup screen.
Install Additional Services
Click on
Install ID3man by Auditude, Get 100 Free mp3 Tracks from eMusic, Install Moodlogic
Mix and Transfer,
or
Try Rhapsody Music services
for additional digital music services provided
by our partners.
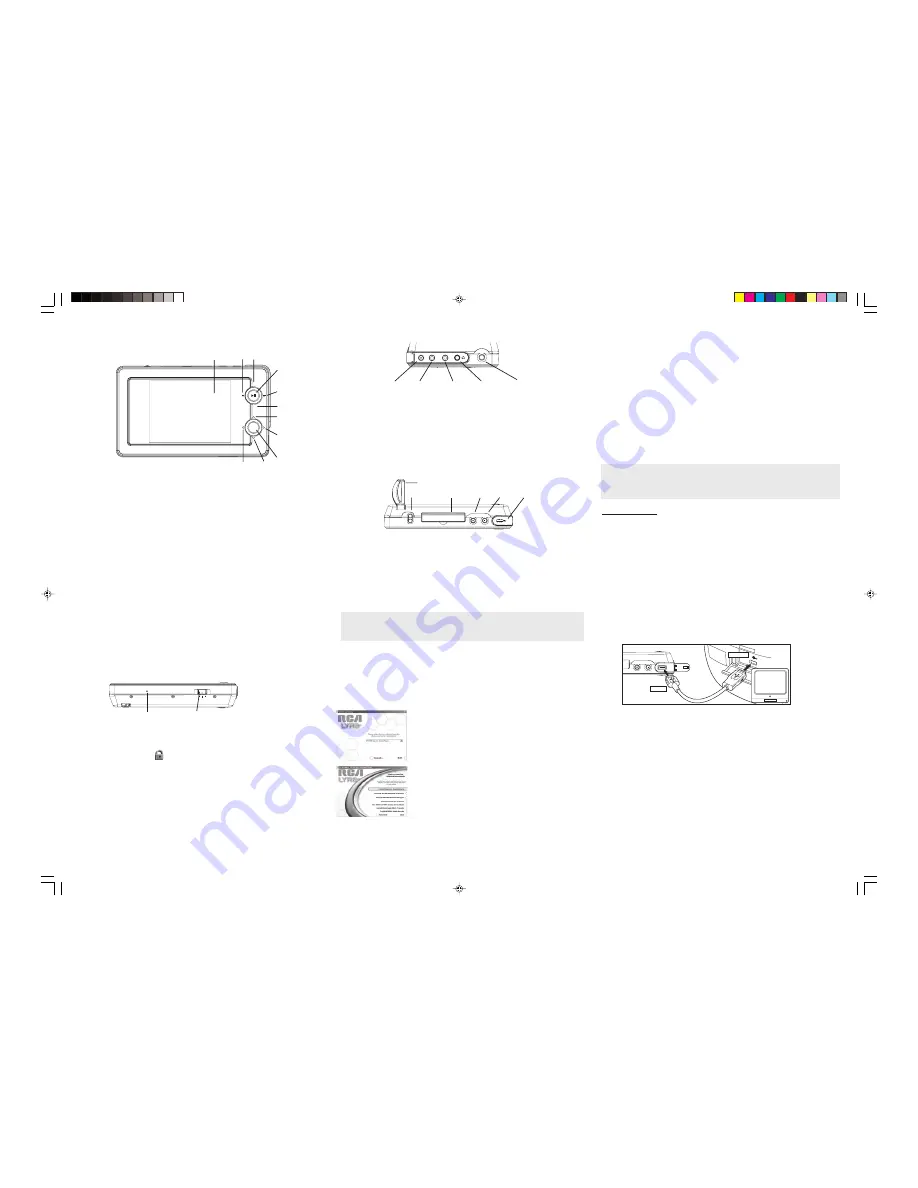
Connecting Lyra AV Jukebox to the Computer
Connect the mini-USB (small) connector to your Lyra AV Jukebox, and connect the Type-A
(large) connector to an available USB port on your computer. Turn on the unit by pressing the
ON/OFF
button. The Lyra AV Jukebox will appear as a Removal Disk drive letter.
If a CompactFlash memory card is properly inserted, an additional drive letter may be accessed
as a Removable Disk drive letter through Windows Explorer as well. The Lyra AV Jukebox
functions as a high-speed CompactFlash memory card reader as well.
RECORD
USB port
ON/OFF
Volume CompactFlash
port
Stand
2.
Select your Lyra model (RD2780 (Lyra AV Jukebox Player)) on
the setup screen and click
Install
to access installation
programs corresponding to your Lyra device.
3.
Click on the software components you’re going to install.
4.
Follow the on-screen instructions to install all necessary files.
5.
Click
Finish
to complete installation and return to the
startup screen.
Installing Software Components
Install the USB Driver/System Applications (Windows 98SE and Me
Only)
For Windows 98SE and Me systems, you need to install a USB driver before your computer can
recognize your Lyra AV Jukebox along with the Lyra applications to help you better manage
your Lyra AV Jukebox. Click
Install USB Driver/System Applications
on the set-up screen to
install the required driver and application for your Lyra AV Jukebox.
DC IN
LINE OUT
LINE IN
MENU
DC IN
LINE OUT
jack
Headphones
jack
LINE IN
jack
MENU
button
DC IN jack
–
Plug in the AC power adapter here. When you plug in the AC adapter, the battery
inside of the Lyra AV Jukebox automatically starts charging.
LINE OUT
jack –
Attach the line out cable here when you’re connecting the Lyra AV Jukebox to an
audio/video component, such as a stereo receiver or TV.
LINE IN
jack –
Attach the line in cable here when you’re connecting the Lyra AV Jukebox to an
audio/video component, such as a TV, VCR or camcorder.
Headphones jack –
Insert the headphones plug here.
MENU button –
When you’re in the menu system, a momentary press brings navigation up one
level; press and hold to return to Main Menu (InstaHome™).
TV OUT
NORMAL
CONTROLS HOLD
Reset
Mode Switch
InstaHome is a registered trademark of Thomson Inc.


