COMPOSITE INPUT
COMPONENT (1080i/720p/480p/480i)/COMPOSITE INPUTS
INPUT 1
VIDEO
L
R
INPUT 2
Y/VIDEO
P
B
P
R
L
R
S-VIDEO
INPUT 3
Y/VIDEO
P
B
P
R
L
R
S-VIDEO
CABLE INPUT
VIDEO
L
R
SUBWOOFER
L
R
AUDIO/VIDEO
OUTPUT
FIXED/VARIABLE
AUDIO OUTPUT
G-LINK
Connects to devices with
Component Video Outputs
• DVD Players
• DVD-PVRs
• DVD Recorders
• Satellite Receivers
• Cable Boxes
COMPONENT INPUTS
(Y Pb Pr)
(Excellent Connection)
Connects to devices with
Digital Audio Inputs
• A/V Receivers
DIGITAL
AUDIO
OUTPUT
(OPTICAL)
Connects to devices with
HDMI™ or DVI™ Outputs
• HD Receivers
• Satellite Receivers
• Cable Boxes
HDMI/DVI INPUT
(Best Connection)
Connects to devices
with Audio Inputs
• A/V Receivers
• Subwoofers
FIXED/VARIABLE
AUDIO OUTPUT
(Good Audio Connection)
DIGITAL AUDIO
OUTPUT (OPTICAL)
(Best Audio Connection)
AUDIO/VIDEO OUTPUT
Connects to devices with
Audio/Video Inputs
• VCRs
• Digital Video Recorders
Connects to devices with
Composite Video/ S-Video Outputs
• VCRs
• DVD Players
• Satellite Receivers
• Cable Boxes
COMPOSITE INPUTS
(Good Connection)
Connecting Your HDTV
(continued from previous page)
Setting Up Your TV
Follow these steps to set up your TV. For more detailed instructions, refer to Chapter 1 of the User’s Guide.
A. Plug in the TV.
Locate the power cord for the TV. Plug the fl at end into the power jack on the TV. Plug the other
end into the wall outlet. The Power indicator (
) on the front panel will light and blink for approximately 30
seconds and then go off during the initialization of the TV. This happens only when the TV is unplugged and
plugged back in. The TV can only be turned on after the Power indicator goes off.
ON-OFF
TV
DVD
VCR
AUX
AUDIO
SAT
SKIP
PRESETS
CC
SOUND
CLEAR
FORMAT
INFO
MENU
GUIDE
MUTE
MUTE
GO
BACK
GO
BACK
VOL
VOL
CH
INPUT
INPUT
0
0
2
2
5
5
1
1
4
4
7
7
8
8
3
3
6
6
9
9
PLAY
PLAY
FORWARD
FORWARD
REVERSE
REVERSE
STOP
STOP
PAUSE
PAUSE
RECORD
RECORD
FREEZE
i
learning
LIGHT
CAB
/
ANT•CAB
CC
CC
CC
M
M
IN
IN
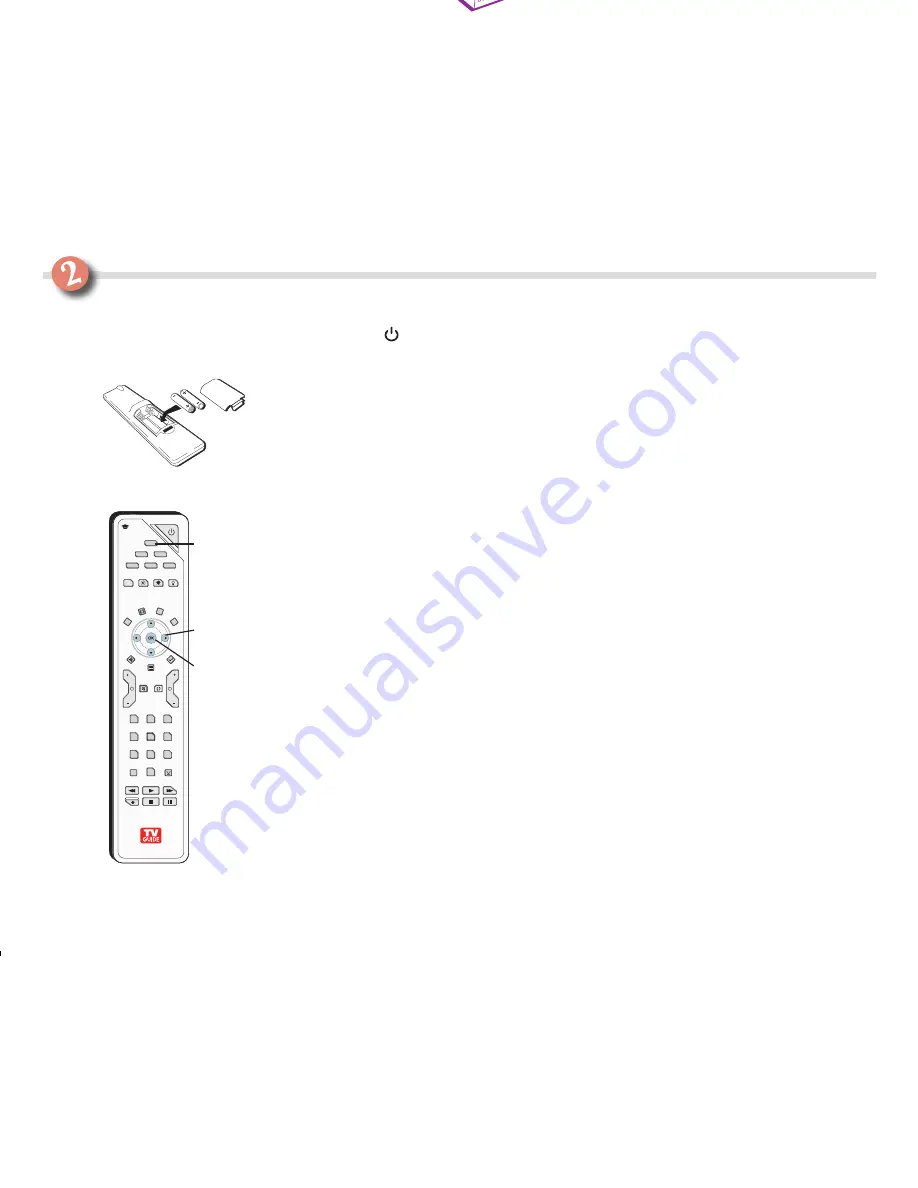
Put batteries in the remote
Use these buttons during
the Assisted Setup
TV
button
OK
button
Arrow
buttons
Notes:
The HDMI/DVI Input is not intended to be used with a computer. For problems with the HDMI/DVI connection, refer to the
Troubleshooting section of the User’s Guide.
Inputs 2 and 3 can be used as either component video (Y P
B
P
R
) inputs, composite video (Y/Video) inputs, or S-VIDEO inputs.
There are several ways to connect your HDTV, depending on the devices you want to connect and the quality of
the signal you want to achieve. The HDMI/DVI and component inputs are considered excellent; S-Video is very
good; and composite jacks are good.
For more information about connecting your HDTV to other devices, refer to Chapter 1 of the User’s Guide.
B.
Put Batteries in the Remote.
Insert 2 “AA” batteries by matching the polarities (+ and -) to the diagram
inside of the remote.
C.
Turn on the TV
. Press TV on the remote, or press the Power button on the TV’s front panel.
• The lamp inside the TV needs approximately one minute to reach full brightness. You’ll hear audio
during this time and the picture gets increasingly brighter as the lamp warms up.
• You might hear a fan noise when the TV is on. This is normal.
• While the TV is warming up, look at the remote to see the buttons you’ll be using during the Assisted
Setup:
• Arrow buttons
•
OK
button
D.
Complete the Assisted Setup.
The fi rst time you turn on your TV, the
Assisted Setup
screen appears
automatically. Select
Begin Setup
to start or select
Cancel Setup
to exit.
•
Set the Menu Language.
Use the arrow buttons to highlight your preferred language for the menu
system. Press OK to select that language. Press the left arrow button to highlight
Continue Setup
and press
OK to continue.
•
Complete Channel Search .
Even though this initial channel search can take several minutes, it is
important to complete in order for your TV to display channels and programming information. Make sure
you have completed Step 1
Connecting Your HDTV
before you begin the channel search. To do a complete
channel search, check each box that pertains to your TV. For example, if you’re only receiving channels
from the CABLE INPUT, highlight
Cable Input
and press OK to place a check mark in the box. Select
Start
to begin the setup. When the channel search is complete, a message screen appears. Select
Continue
and
press OK to setup the TV Guide On Screen system.
Notes:
If you skip Channel Search now, you can access it later through the Connections menu. For more detailed
instructions, refer to Chapter 4 of the User’s Guide.
If a cable box is connected to your TV’s CABLE INPUT, or a digital cable card is in use, Channel Search won’t work for Cable
Input.
E. Complete the TV Guide On Screen system setup.
The TV Guide On Screen system is a no-fee, on-
screen interactive program guide that lists what shows are on TV in your area. In order to receive program
listings, you need to complete the steps after you’ve read through the introductory screens. For detailed
instructions on completing the TV Guide On Screen system setup, refer to Chapter 1 of the User’s Guide.
F. Edit the Channel List.
Some channels might be found during the channel search that are unavailable to
view. If your TV’s screen displays
Unusable Signal
, you might want to get rid of these so they no longer
appear in your channel list. Go to the
Parental Controls
menu, then depending on which input you want
to delete channels from, choose
Cable
or
Antenna Channel List
. Editing the channel list may be time
consuming, so you might want to do it later. For detailed instructions, refer to the beginning of Chapter 3
of the User’s Guide.
HDMI and High-Defi nition Multimedia Interface are trademarks or registered trademarks of HDMI Licensing LLC.
DVI is a trademark of the Digital Display Working Group (DDWG).
In the United States, TV GUIDE and other related marks are registered marks of Gemstar-TV Guide International, Inc. and/or one of its affi liates.
In Canada, TV GUIDE is a registered mark of Transcontinental Inc., and is used under license by Gemstar-TV Guide International, Inc.
The TV Guide On Screen system is manufactured under license from Gemstar-TV Guide International, Inc. and/or its related affi liates.
The TV Guide On Screen system is protected by one or more issued United States patents 6,498,895, 6,418,556, 6,331,877; 6,239,794; 6,154,203;
5,940,073; 4,908,713; 4,751,578; 4,706,121.
Important:
Connect the supplied
G-LINK™ cable to
enable the TV Guide
On Screen™ system
(the on-screen
interactive program
guide) to work with
your VCR and/or cable
box. For more detailed
instructions on
connecting the G-LINK
cable, refer to Chapter
1 of the User’s Guide.
Quick Start167.indd 3
4/11/05 10:20:14 AM