background image

15

Managing videos on your computer

Computer system requirements

•   Windows® XP with Service Pack 2 or Windows 

Vista™

•   USB Port (2.0 recommended)
•   Internet Access (broadband recommended)
•   16-bit color video card
•   Mac®: Mac OS® X version 10.4.11 or later. To view 

videos on your Mac, copy the video files to your 
computer and use Quicktime® for viewing 
(plugin may be required)

PC Hardware:

•   Pentium 4, 800 MHz or better
•   At least 512MB system RAM
•   Video card with 64 MB of RAM (128 MB 

recommended)

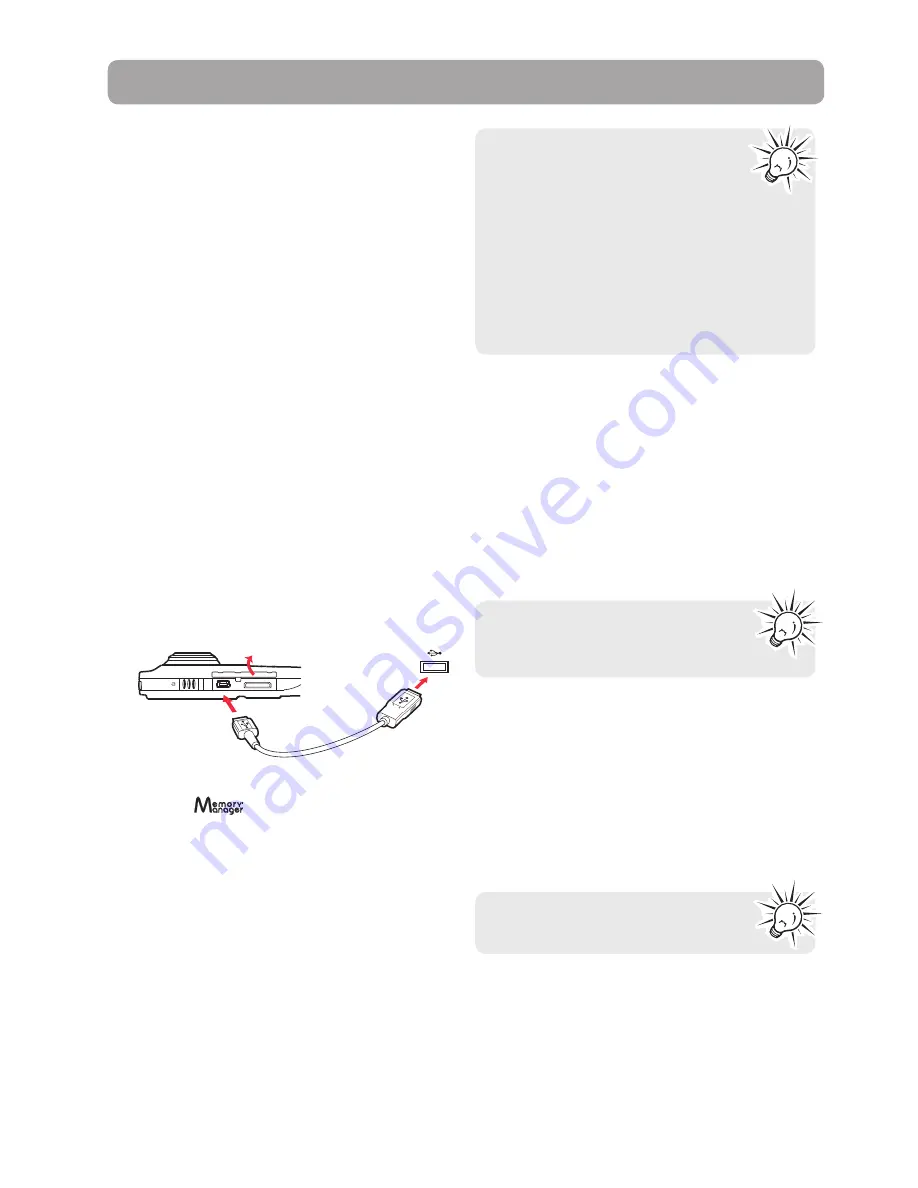
Connecting to a PC

1.  Open the USB cover.

2.  Connect the supplied USB cable to the 

connection jack.

• 

USB connector standard: mini-B 

3.  Connect the other end of the cable to the 

computer.


Lift up the cover

USB port of  
your computer

USB cable

4.   The first time you connect the camcorder to a PC, 

the RCA                 application** will start 
installation automatically. Follow the instructions 
on screen for installation.  

• 

Camcorder will not record when it is connected 
to computer.

• 

If the installation does not start automatically, 
open My Computer and double-click the 
SmallWonder icon. Double-click 

rcasw_setup

 to 

start the installation.

• 

The installation sequence will only appear the 
first time you connect your camcorder to a PC. 
Each subsequent time you connect the 
camcorder to that PC, the RCA Memory Manager 
application should open automatically.

• 

Certain video codecs required to 
view videos on a PC are licensed 
under GPL Version 2. Please refer 
to www.gnu.org/licenses/old-
licenses/gpl-2.0.txt 

• 

Memory Manager® is proprietary software 
licensed by Audiovox Corporation. Text for 
the Memory Manager End User License 
agreement for this product can be found in 
the Help Section of the Memory Manager 
application. 

* Available for free download at www.microsoft.com
** The application is also available for free download at www.rcaaudiovideo.com
Windows is a registered trademark of Microsoft Corporation in the United States and other countries.

For more detailed instructions on using 
RCA Memory Manager, please refer to 
the help section in the software. 

About RCA Memory Manager

The included RCA Memory Manager application lets 
you: 
• 

Browse and play videos

• Delete 

videos

• 

Save videos to your computer

• 

Edit videos by simply drag-and-drop 

• 

Capture video screens as photos

• 

Send videos as email attachments

• 

Upload videos to YouTube or Box.net

Viewing videos on PC

To ensure that videos can be managed and 
played on your PC:

• 

Make sure to install the included Memory 
Manager application. 

• 

Use the SHARE functions of the Memory 
Manager for sharing videos with friends and 
family. The native files from the camcorder may 
not play in other computers.

The AVI files recorded by the camcorder 
complies to the H.264 standard. 

Содержание EZ409HD - Small Wonder Camcorder

Страница 1: ...EZ409HD user manual It is important to read this user manual prior to using your new product for the first time ...

Страница 2: ...uipment does cause harmful interference to radio or television reception which can be determined by turning the equipment off and on the user is encouraged to try to correct the interference by one or more of the following measures Reorient or relocate the receiving antenna Increase the separation between the equipment and receiver Connect the equipment into an outlet on a circuit different from t...

Страница 3: ...unit Do not store the unit near fire places with high temperature or in direct sunlight Exposure to direct sunlight or extreme heat such as inside a parked car may cause damage or malfunction Do not expose to rain or moisture Do not operate or store unit in places with frequent static electricity or electrical noise e g speaker TV set Clean the unit with a soft cloth or a damp chamois leather Neve...

Страница 4: ... photos 11 Photo Quality 11 Playback mode Playing back recordings 12 Deleting Deleting recordings 13 Menu settings Using the camcorder menu 13 Menu options and settings 13 Connecting to external devices Viewing videos on TV 14 Recording videos to VHS tape or DVD 14 Managing videos on your computer Computer system requirements 15 Connecting to a PC 15 About RCA Memory Manager 15 Viewing videos on P...

Страница 5: ...inal Program unless such upgrade or update is accompanied by separate license terms and conditions in which case the terms of that separate license will govern You acknowledge and agree that AUDIOVOX may automatically download upgrades or updates to the Program software to your computer in order to update enhance and or further develop the Program 2 LICENSE RESTRICTIONS a Except for the licenses e...

Страница 6: ...FOR THE INSTALLATION USE AND RESULTS OBTAINED 7 THIRD PARTY SOFTWARE ANY THIRD PARTY SOFTWARE THAT MAY BE PROVIDED WITH THE PROGRAM IS INCLUDED FOR USE AT YOUR OPTION IF YOU CHOOSE TO USE SUCH THIRD PARTY SOFTWARE THEN SUCH USE SHALL BE GOVERNED BY SUCH THIRD PARTY S LICENSE AGREEMENT AN ELECTRONIC COPY OF WHICH WILL BE INSTALLED IN THE APPROPRIATE FOLDER ON YOUR COMPUTER UPON INSTALLATION OF THE ...

Страница 7: ... is recommended for recording as the camcorder internal memory will only permit minutes of recording time Lift up the cover Push the card in until a click is heard As the memory card is small in size it is recommended to use a small coin to help insert or remove it The card icon appears on the screen with memory card inserted To remove card push card in until a click is heard then slowly release t...

Страница 8: ...screen USB and HDMI video output Lift up the cover to access the connectors Volume during playback or zoom Previous or next recording fast rewind or forward Microphone microSD card slot Lift up the cover to show the card slot Camcorder strap hole Panel controls To reset the camcorder if it is not functioning properly Slide and hold the On Off switch for more than 10 seconds ...

Страница 9: ...lways enter into Video mode after switched on Refer to the diagram below for switching between modes and read relevant sections in the user manual for detailed operations Press RECORD to start stop video recording Press RECORD Press RECORD Photo mode read page 11 Playback mode read page 12 Video mode read page 10 Press PHOTO Press PHOTO to take photos Press PHOTO ...

Страница 10: ...he recording quality The selected setting HD Sports or webQ appears on the display screen during recording Refer to the table below for more information on quality settings Light conditions can greatly affect the quality of your videos You can set to optimize the performance of the camcorder under different light sources Refer to Menu settings for more information Settings Recommended for Resoluti...

Страница 11: ... taking photos press the red RECORD button to exit Photo mode and return to Video mode Photo Quality The default resolution of the photos is 8 mega pixel You can select among 3 5 8 and 12 mega pixel by going to the camcorder menu Refer to Menu settings for more information 8 mega pixel is extrapolated from 5 mega pixel sensor Photo mode You must return to Video mode before recording videos ...

Страница 12: ...or Elapsed playback time 4 Press PLAY PAUSE to pause playback Press PLAY PAUSE again to resume playback Pause indicator Remaining playback time 5 To select another video press or to cue the previous or next video Type of file Video Photo Duration of current file Current file number Total number of files 6 Press the red RECORD button to return to Video mode or if no video is selected after playback...

Страница 13: ...HOTO QUALITY TV OUTOUT DATE TIME Press Menu to Save and Exit AUTO 8MP NTSC US 2009 01 01 12 00 PM 3 Press to enter the highlighted menu option 4 Press or to change the setting LIGHTING PHOTO QUALITY TV OUTOUT DATE TIME Press Menu to Save and Exit NTSC US 2009 01 01 12 00 PM AUTO 5 Press to exit the current menu option 6 Press MENU to save settings and exit the camcorder menu Menu options and setti...

Страница 14: ...the camcorder and connect the double connector ends to corresponding video yellow and audio white inputs of the recording device VHS or DVD recorder 2 Turn on the camcorder and the recording device 3 Switch recording device to the video input connected to the camcorder Refer to your user manual of the recording device for instructions 4 Start recording of your recording device and press and hold P...

Страница 15: ...r to that PC the RCA Memory Manager application should open automatically Certain video codecs required to view videos on a PC are licensed under GPL Version 2 Please refer to www gnu org licenses old licenses gpl 2 0 txt Memory Manager is proprietary software licensed by Audiovox Corporation Text for the Memory Manager End User License agreement for this product can be found in the Help Section o...

Страница 16: ...card slot again when the camcorder is powered off Camcorder not turned on after connected to PC or AC DC adapter The camcorder battery may be very low Slide the power button to turn on the camcorder after connected to PC or AC DC adapter Cannot record videos Make sure the memory space is not full for recording Available time for recording has significantly reduced Make sure you have properly selec...

Страница 17: ...y The manufacturer is not responsible for lost data Additional information Visiting RCA website Please visit www rcaaudiovideo com for Latest software and firmware RCA Memory Manager Software User manual Frequently asked questions FAQ Customer service and technical support information ...

Страница 18: ...EACH OF ANY WARRANTY HEREUNDER INCLUDING ANY IMPLIED WARRANTY OF MERCHANTABILITY MUST BE BROUGHT WITHIN A PERIOD OF 24 MONTHS FROM DATE OF ORIGINAL PURCHASE IN NO CASE SHALL THE COMPANY BE LIABLE FOR ANY CONSEQUENTIAL OR INCIDENTAL DAMAGES FOR BREACH OF THIS OR ANY OTHER WARRANTY No person or representative is authorized to assume for the Company any liability other than expressed herein in connec...

Страница 19: ...vered by the warranty A new or refurbished unit will be shipped to you freight prepaid What we will do Provide you with a new or at our option a refurbished unit The exchange unit is under warranty for the remainder of the original product s warranty period For Canada Customers please ship to Audiovox Return Centre c o Genco 6685 Kennedy Road Unit 3 Door 16 Mississuaga Ontario L5T 3A5 Warranty inf...

Страница 20: ...iovideo com V1 0 Illustrations contained within this publication are for representation only and subject to change The descriptions and characteristics given in this document are given as a general indication and not as a guarantee In order to provide the highest quality product possible we reserve the right to make any improvement or modification without prior notice ...

Отзывы: