background image

Chapter 1: Connections and Setup

4

Graphics contained within this publication are for representation only.

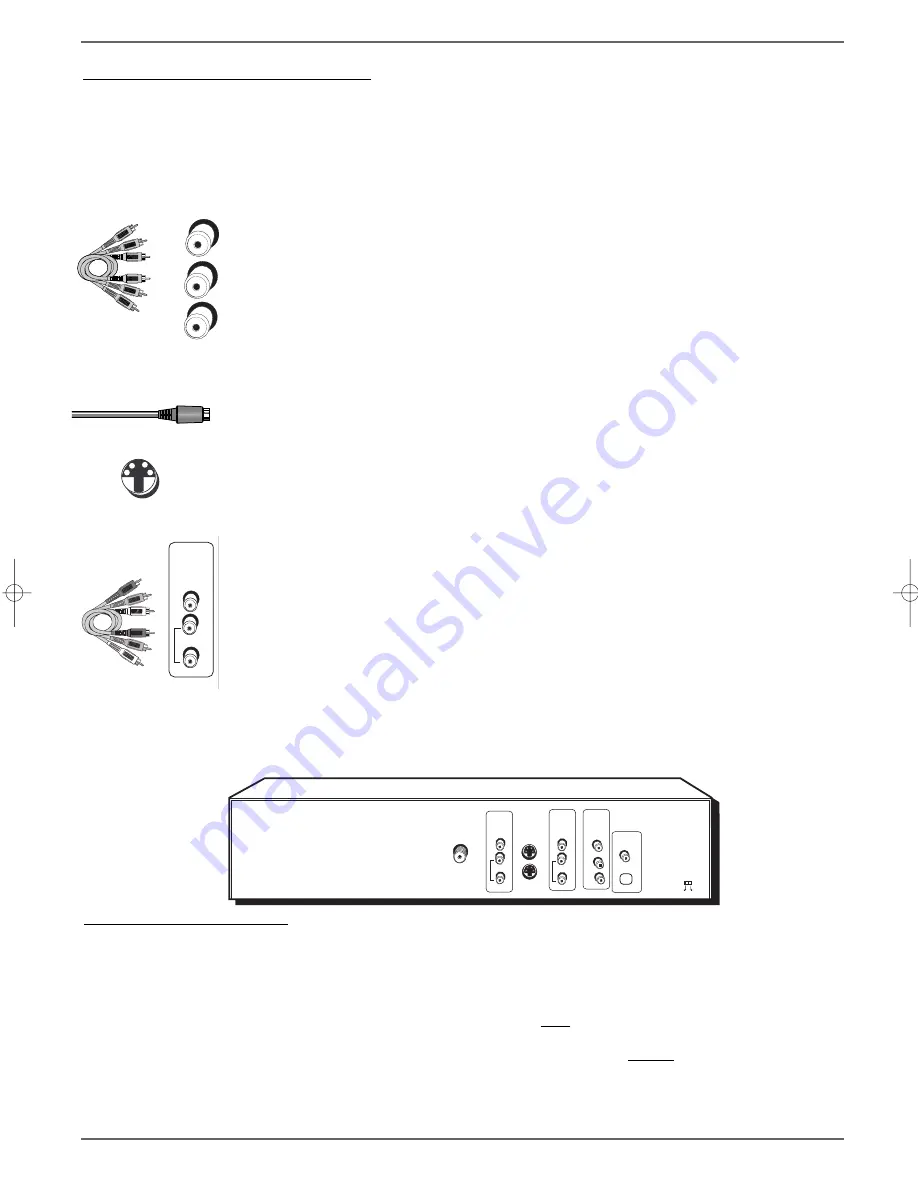
Back of the DVD Recorder

The back of your recorder might look a little overwhelming at first.This section explains what goes where and why.There are two sets of jacks on the
back of your DVD Recorder — INPUT jacks and OUTPUT jacks.

Each jack is explained individually below, but the basic idea is about sending and receiving information to be played on or through your DVD
Recorder and displaying that information on your TV screen.We call it Signal Flow.

INPUT

The cables connected to INPUT jacks bring the signal that carries the content INTO the DVD Recorder, such as the cable signal

(programming) from the cable company or satellite programming from a satellite receiver.

OUTPUT

The cables connected to the OUTPUT jacks are sending the signal from the DVD Recorder OUT TO your TV so you can see it on

the screen.The correct cables must be connected to the DVD Recorder’s Output jacks and the corresponding Input Jacks on the TV so you can
see the program on the TV.You must also tune the TV to the correct channel, called a Video Input Channel (for details, go to page 16).

OPTICAL

COAXIAL

Y

Pb

ON

OFF

VIDEO

INPUT

RF ANTENNA/CABLE

INPUT

L

R

PROG.

SCAN

AUDIO

VIDEO

OUTPUT

L

R

AUDIO

S-VIDEO OUT

S-VIDEO IN

Pr

 COMPONENT

VIDEO OUTPUT

 DIGITAL 

AUDIO OUT

Component Video (Y, Pb, Pr) Jacks and Cables

The Y, Pb, Pr jacks provide optimum picture quality because the video is separated into three signals (two signals are
dedicated to the color portion of the image, and the other signal is dedicated to the black and white part of the image).

To ensure maximum picture quality, use three video-grade cables (not supplied) for the connection.There are bundled
component video cables (not supplied) sold that are color-coded to match the Y, Pb, Pr jacks (red, green, and blue).
Component Video Input jacks are usually found on high-end TVs, such as HDTVs; multimedia monitors; and some of the
“flat” LCD and Plasma TVs or monitors.

Note: Also, remember to connect the left and right audio cables because the Y, Pb, Pr jacks and cables carry only the picture signal, not the

Explanation of Input Jacks and Cables

This section describes the jacks and cables you can use to make connections (only S-Video and Audio/Video cables are packed with your DVD Recorder —
you can purchase other cables by calling 1-800-338-0376, details are on page 55, or order online at www.rca.com, or go to your local electronics store).
There are several ways to connect your DVD Recorder to your TV depending upon the cables you have and the jacks that are on the back of your TV.

Different jacks and cables provide a different level of performance. It’s important to remember, we’re talking about degrees of picture improvement for
comparison. If your TV has Component jacks (Y, Pb, Pr), S-VIDEO, and composite video (often color-coded yellow and grouped with Audio Left and Right
jacks that are white and red); Component (Y, Pb, Pr), would be considered excellent, S-Video would be very good, and the composite video jack (yellow)
would be considered good.

Y

Pb

Pr

S-Video Jacks and Cables

The S-Video (separate video) jack provides better picture quality than a composite video jack (sometimes labeled VIDEO
and color-coded yellow on TVs) because S-Video keeps the color (chrominance, also called chroma) part of the signal
separate from the black and white (luminance) part of the picture. S-Video cables are designed to keep the color
information separated. If your TV has an S-VIDEO jack, connect the DVD Recorder to the TV with an S-Video cable for a
better quality picture. One S-Video cable is supplied with your DVD Recorder.

Note: Remember to connect the left and right audio cables because the S-Video cable carries only the picture signal, not the sound.

Audio/Video Jacks and Cables (RCA-type)

Audio

These jacks are used to send the audio from the disc you’re playing in the DVD Recorder to the TV.The audio jacks and
cables (supplied) are often color-coded (red for right audio, and white for left audio).You must connect audio cables to
the AUDIO L and R jacks on the DVD Recorder and the corresponding Audio Input Jacks on the TV no matter which
Video jack you connect (VIDEO; S-VIDEO;Y, Pb, Pr)

Note: If your TV has only one input for audio (mono), connect it to the left (white L/Mono) audio jack on the TV and don’t connect the right
audio part of the cable.

Video

The basic Video jack (usually color-coded yellow) is also referred to as composite video. Composite video doesn’t keep
color information separated (like S-Video), but it’s better than the video quality you get from an RF coaxial cable (the
type used to plug the cable feed into a TV).

S-VIDEO

VIDEO

OUTPUT

L

R

AUDIO

DRC8005N_part1_2_1  2/2/04  6:21 PM  Page 4

Содержание DRC8005N - Progressive-Scan DVD Player/Recorder

Страница 1: ...DVD Recorder User s Guide Changing Entertainment Again DRC8005N ...

Страница 2: ...y per view uses only unless otherwise authorized in writing by Macrovision Reverse engineering or disassembly is prohibited CAUTION FCC Regulations state that unauthorized changes or modifications to this equipment may void the user s authority to operate it FCC INFORMATION This equipment has been tested and found to comply with the limits for a Class B digital device pursuant to Part 15 of the FC...

Страница 3: ...diting Recordings with the Hide Chapter Feature 28 Chapter 4 Playing Discs Regional Coding 30 How to Load and Play Discs 30 Using Different Menus 31 Search Options 31 Playback Options 31 Using the On Screen Info Display 32 Time Display 33 Selecting aTitle on DVDs or aTrack on Audio CDs orVCDs 33 Chapter Icon 33 Subtitle Icon 33 Repeat Feature 34 Changing the Audio Language 34 Changing the Camera A...

Страница 4: ...NGLE GUIDE OPEN CLOSE ZOOM REVERSE PLAY FORWARD PAUSE STOP RECORD AGAIN ADVANCE LIVE Remote control and batteries part number 261387 1 set of audio video cables part number 233086 2 Way Splitter part number VH47 You must connect the 2 Way Splitter in order to watch one program while you record another one Not applicable with satellite or digital cable box DVD Recorder S Video cable part number 257...

Страница 5: ...ect the DVD Recorder to your TV choose an option above go to page 10 for general information about connecting an audio video receiver VCR Connection go to pages 55 56 If you want to copy content from a DVD to a videotape or vice versa go to pages 55 and 56 for general information Note You cannot transfer copy protected content Coaxial TV cable p 8 Audio video box S Video Coaxial TV satellite p 10 ...

Страница 6: ... connections only S Video and Audio Video cables are packed with your DVD Recorder you can purchase other cables by calling 1 800 338 0376 details are on page 55 or order online at www rca com or go to your local electronics store There are several ways to connect your DVD Recorder to your TV depending upon the cables you have and the jacks that are on the back of your TV Different jacks and cable...

Страница 7: ...eive audio and video from a compatible component such as a satellite receiver Another set of Input Jacks INPUT 2 are on the front of the DVD Recorder VIDEO Color coded yellow the video cable you use with this jack provides better quality than an RF Coaxial cable but isn t as good as S Video Connect corresponding video cable to a compatible component such as a satellite receiver AUDIO L left Color ...

Страница 8: ... s remote control to tune the TV to the channel you want to watch Tune the TV its Input 1 channel or Vid 1 channel If you need help finding your TV s various Video Input Channels go to page 16 The remote control packed with your DVD Recorder is capable of being programmed to operate many brands and models of TVs and VCRs For instructions go to page 19 If the remote operates your TV press TV and IN...

Страница 9: ...audio cables to the OUTPUT AUDIO L left white and R right red jacks on the back of your DVD Recorder and to the corresponding Audio Input jacks on your TV sometimes labeled AUDIO IN L and R 4b Connect the video cable The cables you use for the video determine the quality of the picture you ll see on your TV when you re playing DVDs For more information about cables and signal quality go to page 56...

Страница 10: ...you record another To play a disc Tune the TV to its Input 1 channel or Vid 1 channel Tune the DVD Recorder to the cable box channel usually channel 2 3 or 4 Use the channel buttons on the cable box to tune to the channel you want to record Press the RECORD button on the DVD Recorder Use the buttons on the TV or the TV s remote control to tune the TV to the channel you want to watch Tune the TV to...

Страница 11: ...acks on your TV sometimes labeled AUDIO IN L and R 2b Connect the video cable The cables you use for the video determine the quality of the picture you ll see on your TV when you re playing DVDs For more information about cables and signal quality go to page 4 Connect the video cable yellow to the OUTPUT VIDEO jack on the back of your DVD Recorder and to the Video Input jack on your TV sometimes l...

Страница 12: ...e TV to Input 1 channel or Vid 1 channel If you want to add a VCR to this connection consult the manual that came with your satellite receiver SATELLITE DISH Satellite Receiver AUDIO OUT L R VIDEO PHONE JACK LOW SPEED DATA OUT TO TV IN FROM ANT SATELLITE IN S VIDEO OPTICAL COAXIAL Y Pb ON OFF VIDEO INPUT RF ANTENNA CABLE INPUT L R PROG SCAN AUDIO VIDEO OUTPUT L R AUDIO S VIDEO OUT S VIDEO IN Pr CO...

Страница 13: ...ing DVDs For more information about cables and signal quality go to page 4 Connect the video cable yellow to the OUTPUT VIDEO jack on the back of your DVD Recorder and to the Video Input jack on your TV sometimes labeled VIDEO IN S VIDEO not shown If your TV has an S VIDEO jack connect one end of the S Video cable provided to the S VIDEO jack on the back of the TV and the other end to the S VIDEO ...

Страница 14: ... and right audio cables to your audio video receiver and to the OUTPUT AUDIO L left white and R right red jacks on the back of your DVD Recorder If you have a Dolby Digital or DTS receiver use one of the DIGITAL AUDIO OUT jacks to connect the receiver to the DVD Recorder cables not supplied with DVD Recorder You must also adjust the Digital Output setting go to page 44 for information Notes The DI...

Страница 15: ...for help Note You can program your remote to operate most brands of remote controllable TVs Instructions are on page 19 ON OFF MUTE RETURN GO BAC K INPUT ANTENNA 1 2 3 4 5 6 7 8 0 9 VOL CH SAT CAB LE TV DVD MENU CLEAR INFO ANGLE TIMER GUIDE OPEN CLOSE ZOOM REVERSE PLAY FORWARD Up arrow button Right arrow button OK button Left arrow button Down arrow button Use the arrow buttons on the remote to mo...

Страница 16: ...From the Channel List screen you can delete channels you rarely watch You ll still be able to tune to the deleted channels directly by using the number buttons on the remote control but the DVD Recorder won t tune to a channel you delete when you press the CH CH buttons on the remote control Press the down arrow button to scroll through the channels or press the CH button to scroll a screen at a t...

Страница 17: ...l go to page 16 The Main Menu Appears The main menu appears whenever you turn on the DVD Recorder To watch TV press the OK button when the Watch TV menu is highlighted When you change channels the channel banner appears to give you programming information that is available for more information go to page 24 Changing Channels You might notice a slight delay when you re changing channels because the...

Страница 18: ...hooting information the product s warranty accessories you might want to purchase and an explanation of the buttons and controls on the front of the DVD Recorder How to find your TV s Video Input Channel In order to see what s playing on your DVD Recorder you need to tune the TV to the Video Input Channel that corresponds to the Input Jacks on your TV that you used to connect the DVD Recorder to t...

Страница 19: ...o operate yourTV Programming the remote to operate other components Graphics contained within this User s Guide are for representation only Some of the menu screens buttons and display messages might be different in your product than they appear in this book The on screen help text provides the most current operational information ...

Страница 20: ... remote in DVD mode so it operates the DVD Recorder FORWARD Searches forward through the disc GO BACK Returns you to the previous menu When watching TV goes back to the previous channel INFO Displays the on screen Info Display for details about the Info Display go to page 32 Chapter 2 The Remote Control ON OFF MUTE RETURN GO BAC K INPUT ANTENNA 1 2 3 4 5 6 7 8 0 9 VOL CH SAT CAB LE TV DVD MENU CLE...

Страница 21: ... button While you continue pressing the TV button press and hold the ON OFF button until the indicator light on the remote turns on then release both buttons 3 Point the remote at the TV Press and release PLAY then wait 5 seconds or until the indicator on the remote stops flashing At this point the remote is searching for the correct code to program you ll know it s found the correct code when the...

Страница 22: ...de when the satellite receiver or cable box turns off go to step 4 If after 5 seconds the the satellite receiver or cable box doesn t turn off press PLAY again to tell the remote to search the next set of codes Continue pressing PLAY until the satellite receiver or cable box turns off or you have searched through all of the codes When the indicator light turns off and stays off the remote has sear...

Страница 23: ...8 1063 1064 1072 1087 1105 1128 1171 1172 1181 1201 Janeil 1174 JBL 1062 JCB 1002 Jensen 1004 1006 JVC 1012 1013 1014 1054 1060 1065 1066 1067 1157 1158 1159 1182 Kawasho 1002 1004 1006 Kenwood 1004 1006 1019 Kloss Novabeam 1068 1069 1174 1183 KTV 1038 1070 1171 1177 Loewe 1062 Logik 1083 Luxman 1004 1006 LXI 1000 1006 1049 1062 1071 1072 1073 1162 1181 1207 Magnavox 1004 1006 1008 1019 1062 1068 ...

Страница 24: ...210 1217 Cable Box SAT CABLE button ABC 5002 5003 5004 5006 5053 Antronix 5008 5009 Archer 5008 5009 5010 Cabletenna 5008 Cableview 5008 Colour Voice 5012 5013 Comtronic 5014 Contec 5016 Eastern 5017 GC Electronics 5009 GE 5000 5001 Gemini 5018 5019 General Instrument 5003 Hamlin 5020 5021 5022 5028 5035 5045 Hitachi 5003 Jerrold 5003 5018 5023 5024 5046 5053 Magnavox 5025 Memorex 5026 Movie Time ...

Страница 25: ...nly Some of the menu screens buttons and display messages might be different in your product than they appear in this book The on screen help text provides the most current operational information Chapter 3 Recording Playback Features WatchingTV Recording Playback Disc Library ...

Страница 26: ...ified and then stop automatically If you press INFO the amount of recording time left appears At anytime during the recording you can extend the recording time by pressing the RECORD button 02 15 pm Ch 9 Favorite Show 3 00 Audio Stereo TV PG 00 01 08 REC Ch 9 0h 30min 00h 54min available Audio Stereo TV PG 1 Space available on disc Watching one channel while you record another channel If you want ...

Страница 27: ... the highlight moves to StopTime 7 Use the number buttons to enter the time you want the DVD Recorder to stop recording Press the right arrow button to change a m p m setting 8 You can change the quality of the recording by pressing the right arrow button The better the quality the more space the recording takes up on the disc less recording time available go to page 45 for more information Press ...

Страница 28: ...of the discs from the Disc Library to make room Finding a title movie program etc by using the Sort Feature 1 Press MENU the main menu appears 2 Press the down arrow button until Disc Library is highlighted and press OK a list of titles appears 3 Press the right arrow button Each time you press the down arrow button the next option appears Sort byTitle When you press OK with Sort by Title highligh...

Страница 29: ...iscs However the edit feature includes special options for DVD RW discs 1 While playing a disc press the INFO button 2 Press the right arrow button to highlight the Edit icon and press OK The following choices appear use the up down arrow buttons to highlight a choice and press OK to select Insert Chapter Marker DVD RW discs only When you re recording to a disc the DVD Recorder adds a chapter mark...

Страница 30: ...rder cuts the recording at that point you ll have to wait for a minute or so while the information is updated Now you have two titles named Simon s 4th birthday Start playing the second title and rename it to fit the description of the event Continue this sequence until you ve divided the disc into as many separate titles as you want 12 Additionally you can easily remove any unused part of the dis...

Страница 31: ... buttons and display messages might be different in your product than they appear in this book The on screen help text provides the most current operational information Regional Coding Types of DiscsYou Can Play How to Load and Play Discs Using the Different Menus Search Options Playback Options Using the On Screen Info Display ...

Страница 32: ...iscs may not be compatible due to laser pickup and disc design To Load and Play Discs Turn on the TV and your DVD Recorder press ON OFF on the remote or press the STANDBY ON button on the DVD Recorder 1 Make sure the TV is tuned to its Video Input channel if you need more information go to page 16 2 Press the OPEN CLOSE button the disc tray opens 3 Place a disc gently into the tray with the disc s...

Страница 33: ...cs you can use the Zoom Feature to see details of an image Zoom 1 While you re playing a disc press ZOOM the player zooms in on the image Each time you press ZOOM the picture is magnified even more until you get to the maximum zoom level 2 To see other parts of the picture when you ve zoomed in on the image press the up down left and or right arrow buttons to go in corresponding directions ON OFF ...

Страница 34: ... icons is grayed out the Info Display feature isn t available for the disc you re playing The invalid symbol appears on the screen when you press a button that doesn t have any function To make the Info Display disappear from the screen press INFO on the remote control Time display page 33 Chapter page 33 Audio page 34 Angle page 35 Title page 33 Subtitles page 33 Repeat page 34 Text will appear h...

Страница 35: ...For example if you enter 01 35 12 playback will start one hour 35 minutes and 12 seconds into the title Notes For Audio CDs the time displayed refers to the track that s playing Some portions of a disc might prohibit searching or scanning such as warnings or opening credits Selecting a Title on DVDs or a Track on Audio CDs or Video CDs Some discs contain more than one title For example there might...

Страница 36: ...ou want to repeat Press OK to set the B point the segment you marked will play repeatedly until you turn off the Repeat feature 4 To turn off the Repeat feature highlight the Repeat icon and press the up arrow button on the remote until Repeat Mode Standard appears at the bottom of the Info Display Note Repeat is also cancelled when you eject the disc from the DVD Recorder Audio Icon DVD and Video...

Страница 37: ...feature lets you set up the order in which you want the tracks on the CD to play There are three Play Modes Standard the tracks play in the same order as listed on the CD starting with track 1 This is the default play mode Random the tracks on the CD play in a random order Program the tracks play in the order you designate To use the Program play mode you must set up the order in which you want th...

Страница 38: ...Control icon Press the up or down arrow button to go back and forth between On and Off How Playback Control PBC works varies for different Video CDs With most Video CDs turning on Playback Control enables you to access the Video CD s menu if it has one and requires that you navigate through the Video CD s contents by using the Video CD menu instead of the DVD Recorder s Info Display When PBC is on...

Страница 39: ... the disc tray with the printed side facing up a choice list appears If you want to play mp3 files highlight Music if you want to view JPEG files highlight Pictures if you want to play both highlight Both 2 If the AutoPlay option in the Play Mode menu is enabled see page 42 the disc s contents are displayed otherwise press the PLAY button to display them 3 Select a folder using the and buttons on ...

Страница 40: ...38 Graphics contained within this publication are for representation only This page intentionally left blank ...

Страница 41: ...f the menu screens buttons and display messages might be different in your product than they appear in this book The on screen help text provides the most current operational information Overview of the DVD Recorder s Menu System WatchTV Menu Disc Menu Disc Library Menu Timer Menu Setup Menu Memory Card Menu ...

Страница 42: ...and has storage limits You may need to delete some library contents in the future to make room for new recordings For detailed information about the Disc Library go to page 26 Timers set up timer recordings and view the list of existing timer recordings Go to page 42 for information about this menu For instructions to set up a timer go to page 25 Setup accesses all of the menus from the Interactiv...

Страница 43: ... Rename title Play title Play full title Delete title and Clear chapters Player Menu shows you how a DVD R or DVD RW disc s menu will appear in other DVD Players A small still frame from each title you record program show movie appears as a thumbnail You ll use the DVD player s left and right arrow buttons to highlight a thumbnail so you can play the recording If you have multiple recordings and w...

Страница 44: ...VD Recorder is connected to a widescreen TV If you choose this setting and you don t have a widescreen TV the images on the screen might appear distorted due to vertical compression If you play a disc recorded in 4 x 3 format on a widescreen TV the left and right sides of the screen will appear black Angle Icon Some DVDs are produced with multiple camera angles However it is difficult to know when...

Страница 45: ...is locked or unlocked Locked You need to enter the password in order to play discs that have a higher rating than what you ve allowed When the player is locked nobody can access the Lock menu without entering the password Unlocked No password required to play discs Even if you ve set ratings limits they won t be enforced when the player is unlocked Notes The player is shipped unlocked without any ...

Страница 46: ...ital Output If you connected your DVD Recorder to a receiver via the DIGITAL AUDIO OUT jack COAXIAL or OPTICAL on the back of the player choose the type of receiver or decoder you have Dolby Digital and or DTS Note If you select DTS and you don t have a DTS receiver connected to the DVD Recorder you won t hear any audio or the audio will be distorted SRS TruSurround The TruSurround feature simulat...

Страница 47: ...e option you chose during the interactive setup To change the lan guage of the on screen displays menus use the arrow buttons to highlight a language and press OK to select it Audio the language that appears when you access this menu the first time reflects the option you chose during the interactive setup You can change the audio language by highlighting an option and pressing the OK button Subti...

Страница 48: ...e arrow buttons to navigate Follow the on screen instructions Note In order for Timer Recordings to work you must set the clock to the correct time and date Channel List Enables you to change what channels are accessed when you press the DVD Recorder s channel up and down buttons if you delete a channel from the channel list you can still access it by using the number but tons on the remote For mo...

Страница 49: ...nt in your product than they appear in this book The on screen help text provides the most current operational information Troubleshooting Handling Cautions Maintenance of Cabinet Buttons and Controls on the front of the DVD Recorder LimitedWarranty Accessory Information Copying content from DVD R or DVD RW disc toVCR videocassette CopyingVCR videocassette to a DVD R or DVD RW disc ...

Страница 50: ...wo programs that overlap there s not enough room on the disc to record or the disc is locked Turn on the TV and DVD Recorder and go to the Timers menu to find out what s wrong A screen saver appears on the TV Your player is equipped with a screen saver that appears on the TV after your player has been idle for several minutes To make it disappear press STOP or CLEAR on the remote The menu is displ...

Страница 51: ...NENT jacks Y Pb Pr and turned on the PROG SCAN switch the DVD Recorder automatically switches between progressive scan and regular interlace because progressive scan is only available when you play DVD discs As the signal is converted from interlace to progressive and vice versa the Recorder resynchronizes the signal Depending upon your TV this resynchronization process might cause a slight jump i...

Страница 52: ... The buttons on the front of the DVD Recorder operate the DVD Recorder s basic functions but you won t be able to use the menu system without the remote control The buttons on the front of the unit are described on page 17 Also if you have another RCA GE or Proscan brand product with a remote control that has a DVD button some of the buttons will probably operate this product if you press the DVD ...

Страница 53: ...abinet with a soft cloth Formation of Condensation Due to sharp changes in temperature and humidity condensation may form if warm air comes in contact with any cold parts inside the player When condensation forms inside the player the player may not operate correctly If this occurs leave the player at room temperature until the inside of the player becomes dry and operational If condensation forms...

Страница 54: ...on the DVD Recorder For example if your camcorder is connected to the Audio andVideo Input jacks on the front of the DVD Recorder behind the door you would press the INPUT button until INPUT 2 Front appears OPEN CLOSE Opens and closes the disc tray PLAY PAUSE Press to begin playback Pauses playback or recording STOP Stops playback and or recording RECORD Records content to a DVD disc DVD R or DVD ...

Страница 55: ...he online Product Registration on RCA com or complete and mail the Product Registration Card packed with your unit It will make it easier to contact you should it ever be necessary The return of the card is not required for warranty coverage Limitation of Warranty THE WARRANTY STATED ABOVE IS THE ONLY WARRANTY APPLICABLE TO THIS PRODUCT ALL OTHER WARRANTIES EXPRESS OR IMPLIED INCLUDING ALL IMPLIED...

Страница 56: ...t off Surge Protector part number SCTV4000C price 49 95 Remote Control RCR311DBM1 part number 261387 How to Order To place an order by phone have your Visa MasterCard or Discover Card ready and call the toll free number listed below Use this number only to place an order for accessory items 1 800 338 0376 ON OFF MUTE RETURN GO BAC K INPUT ANTENNA 1 2 3 4 5 6 7 8 0 9 VOL CH SAT CAB LE TV DVD MENU C...

Страница 57: ...DVD Recorder are plugged into working power outlets 4 Turn on all of the components 5 Tune the TV to channel 3 or 4 depending on the whether the VCR s 3 4 switch is set to 3 or 4 because the VCR is connected to the TV with an RF Coaxial Cable 6 Change the channel on the VCR to its Video Input Channel sometimes called LINE or LINE INPUT because the DVD Recorder is connected to the VCR s INPUT jacks...

Страница 58: ...V s INPUT Jacks sometimes labeled INPUT VIDEO L and R 3 Connect the signal from your cable or off air antenna to the 2 Way Splitter provided the end with one connector 4 Use the RF Coaxial Cable provided to connect the 2 Way Splitter to the DVD Recorder s RF ANTENNA CABLE INPUT jack 5 Connect another RF Coaxial Cable not provided to the other connector on the 2 Way Splitter Connect the other end o...

Страница 59: ......

Страница 60: ...iland TOCOM 16357160 Please do not send any products to the Indianapolis address listed in this manual or on the carton This will only add delays in service for your product Thomson Inc 10330 North Meridian Street Indianapolis IN 46290 THOMSON Visit our website at www rca com ...

Отзывы: