background image

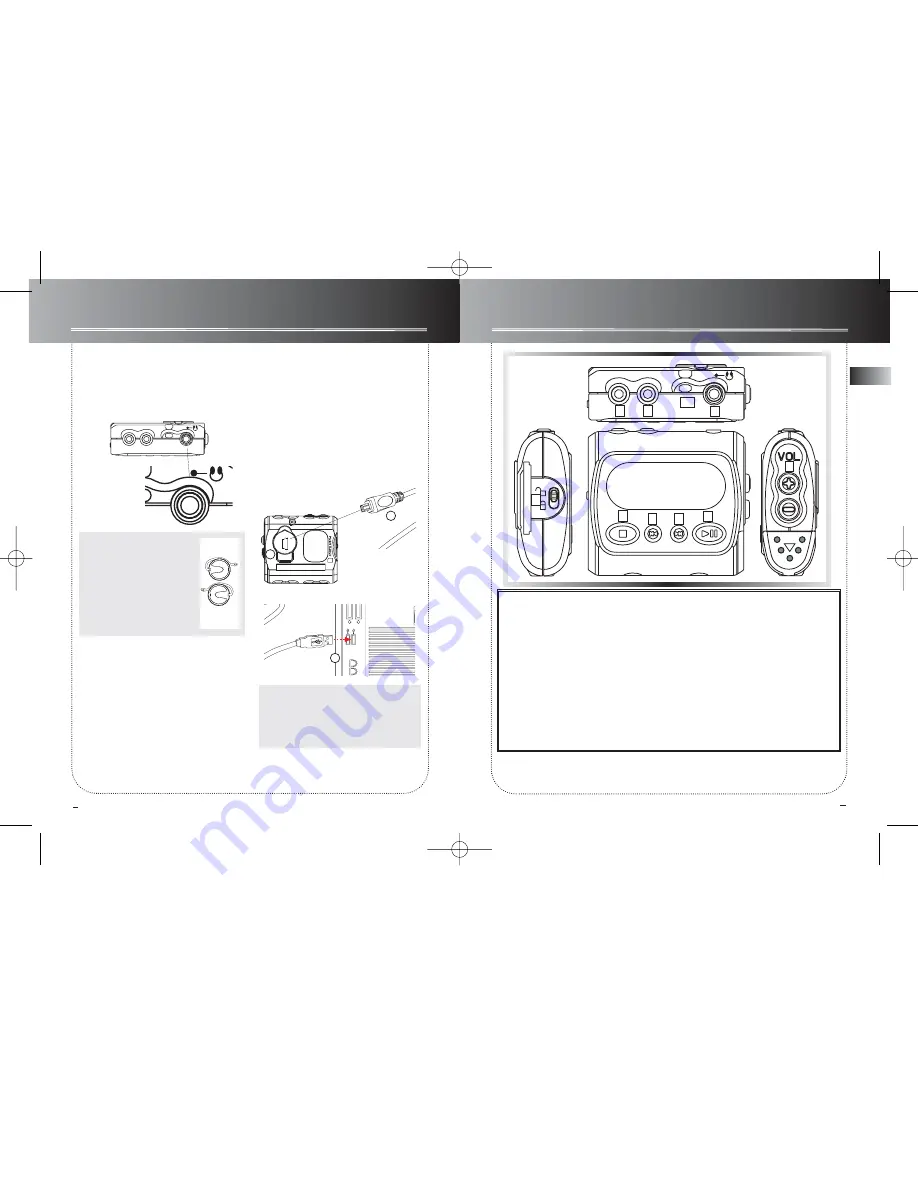
General Controls  

4

5

Before You Begin

6. Using Headphones

Insert phone jack into 

PHONES 

at the top

of player for listening.

7. Connecting the Player to
your Computer

1. Lift the rubber cover on the player.
2.  Insert the smaller end of the connection
cable into the socket tightly.
3.  Insert the opposite end of the connect-
ing cable to the USB socket on the back of
the computer.
4. Press "PLAY" button and "USB
Connected" will be dis-
played on the device.

Note: 

Have a Blast- Just

Not in Your Eardrums. Make
sure you turn down the vol-
ume on the unit before you
put on headphones.
Increase the volume to the
desired level only after
headphones are in place.

Note: 

Refer to the Software

Instruction manual for procedures in
setting up USB drivers and 
transferring files to the player.

3

DSP

MODE

last

next

DSP

MODE

OPEN

2

3

1

8

6

9

7

4

5

10

play

on

stop

off

1. 

PLAY 

- Turn unit on, start playback

and pause.
2. 

STOP

- Stop playback and turn unit

off .
3. 

Skip backward

- Skip back to last

track.  Press and hold to search back-
ward within the same track.
4. 

Skip forward

- Skip to next track.

Press and hold to search forward with-
in saved tracks.
5. 

MODE

- Select among repeat all, 

random , random repeat, program and
repeat program modes. 

6. 

DSP

- Select among DSP modes.

(Flat, Bass, Pop, Rock, Jazz)
7. 

PHONES 

- headphones jack.

8. 

HOLD

- Slide to lock keys to avoid 

accidental key activation.
9. 

VOLUME

- Adjust sound volume.

10. Hole for carrying strap.

EN

2

1

RD1021/1071 IB-EN  5/19/03  2:55 PM  Page 10

Содержание 5567206A

Страница 1: ...seinterferencetoradioortele visionreception whichyoucandeterminebyunplug gingtheunit trytocorrecttheinterferencebyoneor moreofthefollowingmeasures Re orientthereceivingantenna thatis theantenna fortheradioortelevisionthatis receiving theinterfer ence Movetheunitawayfromtheequipmentthatisreceiv inginterference Plugtheunitintoadifferentwalloutletsothatthe unitandtheequipmentreceivinginterferenceareo...

Страница 2: ...rca com LatinAmerica Printed In China Impreso en China IMPORTADOR Comercializadora Thomson de México S A de C V Miguel de Cervantes Saavedra 57 Col Ampliación Granada C P 11529 Mexico D F Telefono 55 25 81 53 20 RFC CTM 980723 KS5 0151 It is important to read this instruction book prior to using your new product for the first time Es importante leer este manual antes de usar por vez primera su eui...

Страница 3: ...utomo bile or moving vehicle is not recommended and is unlawful in some states and areas Be careful and attentive on the road Stop operation of the unit if you find it disruptive or distracting while driving Important Information Care of Memory Card Not Included Do not touch the golden electrodes Use a soft dry cloth to clean any dirt Do not bend Memory Cards Do not operate or store MultiMediaCard...

Страница 4: ...you haveremovedalltheaccessoriesandinforma tionpapers Theitemsshownbelowarepacked withyourplayer 1 ThePlayer 2 Battery 3 SoftwareCD 4 Headphones 5 ConnectionCable 6 CarryCase WARNING Thearmbandisdesignedforcarry ingtheplayeronupperarmonly DONOTwear thearmbandonotherpartsofthebodysuchas thenecktoavoidchokinghazardorbreathing difficulty 2 How to Use Your Clip Phones The e clipz Therightearclipphone ...

Страница 5: ...ard push the Memory Card to eject EN Before You Begin Before you Begin 2 3 3 What s so special about this mp3 player This player is meant to play mp3 audio files encoded on a memory card or recorded in the built in flash memory To do so you need the use of a Windows computer with USB port connection cable included and a music management software MusicMatch Jukebox MusicMatch Jukebox STOP LAST NEXT...

Страница 6: ...eadphones are in place Note Refer to the Software Instruction manual for procedures in setting up USB drivers and transferring files to the player 3 DSP MODE last next DSP MODE OPEN 2 3 1 8 6 9 7 4 5 10 play on stop off 1 PLAY Turn unit on start playback and pause 2 STOP Stop playback and turn unit off 3 Skip backward Skip back to last track Press and hold to search back ward within the same track...

Страница 7: ...next track starting Press and hold for quick forward scan of play ing track Press Skip backward once to return to previous track start Press and hold for quick backward scan of playing track Note If the elapsed time of the playing track is less than 0 04 pressing Skip backward once will return to previous track If the elapsed time of the playing track is greater than 0 04 pressing Skip backward on...

Страница 8: ...econds if there is no key acti vation See section on Play Modes to playback programmed tracks P Editing program Overwriting Programmed Tracks 1 In stop mode press and hold MODE to enter program mode 2 Press MODE to select the pro grammed track you want to overwrite 3 Press Skip backward or Skip for ward to select the new track you want to store 4 Press MODE to confirm selection 5 Repeat steps 2 an...

Страница 9: ...oduct s warranty period Proof of purchase in the form of a bill of sale or receipted invoice which is evidence that the product is within the warranty period must be presented to obtain warranty service For rental firms proof of first rental is also required How to make a warranty claim Properly pack your unit Include any cables etc which were originally provided with the product We recommend usin...

Страница 10: ...AME OF STORE Product Registration Please complete and mail the Product registration Card packed with your unit It will make it easier to contact you should it ever be necessary The return of the card is not required for warranty cover age Limitation of Warranty THE WARRANTY STATED ABOVE IS THE ONLY WARRANTY APPLICABLE TO THIS PRODUCT ALL OTHER WARRANTIES EXPRESS OR IMPLIED INCLUDING ALL IMPLIED WA...

Отзывы: