background image

19

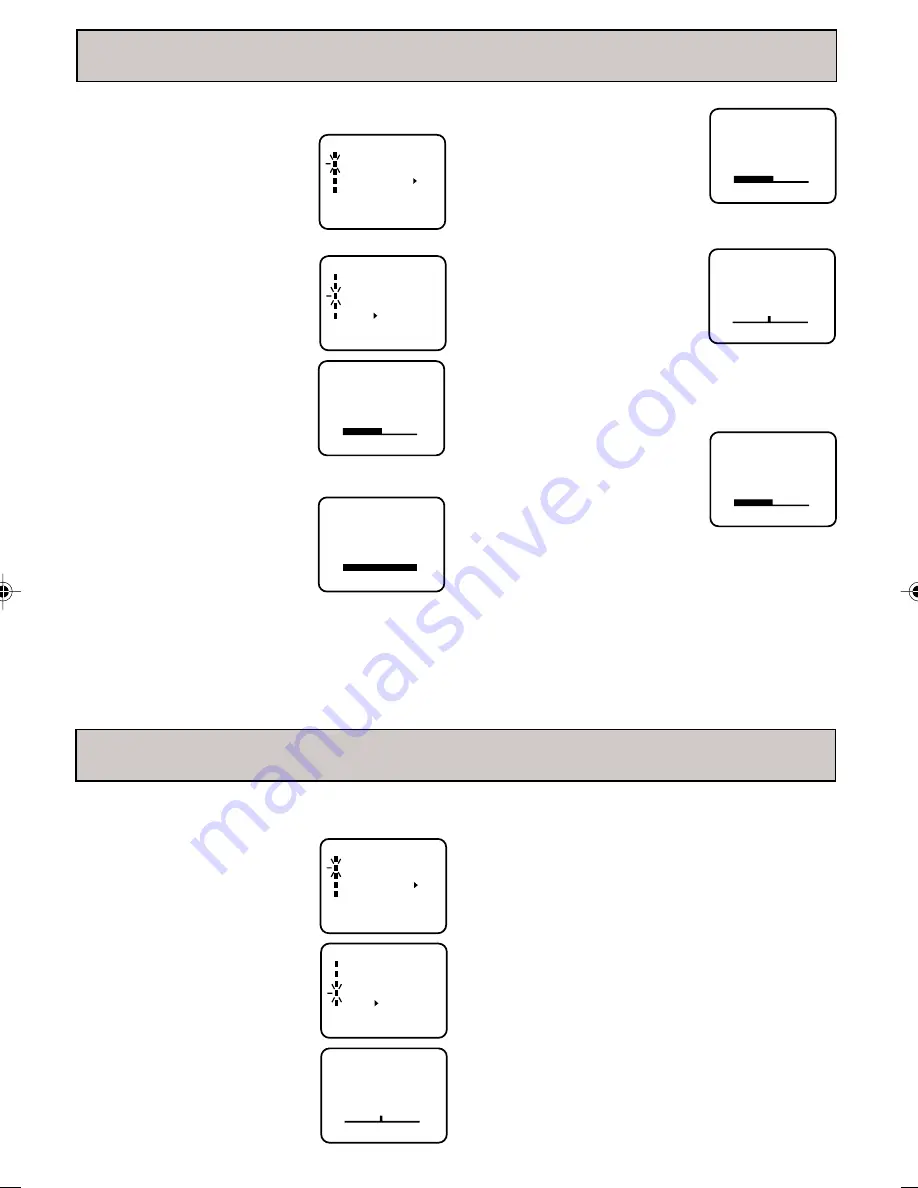
BRIGHTNESS

Press the ENTER button until
“BRIGHTNESS” appears on the
screen, then press the SET + or –
button to adjust the brightness of the
picture. When the SET + button is
pressed, the darker portions of the picture become lighter.

CONTRAST

Press the ENTER button until
“CONTRAST” appears  on the
screen, then press the SET + or –
button to adjust the contrast of the
picture. Pictures look  sharpest in the
daytime (bright light) by increasing the contrast. At night
(dim light), the sharpest picture is obtained by reducing
the contrast.

Picture controls are factory preset but you can
adjust them individually as follows:

1

To display the picture adjust-

ment screen, press the MENU
button. Press the SET + or –
button to select the TV SET-UP
option, then press the ENTER
button.

2

Press the SET + or –


button to

select the PICTURE option, then
press the ENTER button.

M E N U
TIMER REC SET

TV SET-UP

CH SET-UP

AUTO REPEAT   ON   OFF

SYSTEM  SET-UP

+/–/ENTER/MENU

BRIGHTNESS

0

+/–/ENTER/CANCEL/MENU

CONTRAST

32

+/–/ENTER/CANCEL/MENU

NOTE: The CONTRAST default setting is set to maxi-

mum at the factory.

á

+/–/ENTER/MENU

ñ

TV  SET-UP
V-CHIP  SET
ON/OFF  TIMER
PICTURE
AUDIO
SAP  ON    OFF

NOTE: The On-screen display will disappear 6 seconds

after finishing an adjustment or by pressing the
MENU button three times. The settings can only
be adjusted when they are displayed on the TV
screen.

COLOR

Press the ENTER button until
“COLOR” appears on the screen,
then press the SET + or – button to
adjust the color intensity of the
picture. The control should be set
when colors appear normal in
intensity and brilliance.

TINT

Press the ENTER button until
“TINT” appears on the screen, then
press the SET + or – button to
adjust the tint of the picture. This
determines how accurately the
colors are reproduced by the TV.
Adjusting the tint for natural facial tone is the best method
of obtaining accurate color reproduction of the entire pic-
ture.

SHARPNESS

Press the ENTER button until
“SHARPNESS” appears on the
screen, then press the SET + or –
button to adjust the sharpness of
the picture.

CANCEL

Pressing the CANCEL button while making picture
adjustments will return all adjustments to the factory
preset levels.

SHARPNESS

0

+/–/ENTER/CANCEL/MENU

COLOR

0

+/–/ENTER/CANCEL/MENU

TINT

0

+/–/ENTER/CANCEL/MENU

PICTURE CONTROL ADJUSTMENTS

SOUND CONTROL ADJUSTMENTS

Sound controls are factory preset but you can
adjust them individually as follows:

1

To display the audio adjustment

screen, press the MENU button.
Press the SET + or –


button to

select the TV SET-UP option,
then press the ENTER button.

2

Press the SET + or –


button to

select the AUDIO option, then
press the ENTER button.

M E N U
TIMER REC SET

TV SET-UP

CH SET-UP

AUTO REPEAT   ON   OFF

SYSTEM  SET-UP

+/–/ENTER/MENU

á

+/–/ENTER/MENU

ñ

TV  SET-UP
V-CHIP  SET
ON/OFF  TIMER
PICTURE
AUDIO
SAP  ON    OFF

BASS:
Press the SET + or –


 button to adjust the bass sound.

TREBLE:
Press the SET + or –


button to adjust the treble sound.

BALANCE:
Press the SET + or –


button to obtain an equal sound

level from both speakers.
CANCEL
Pressing the CANCEL button while making audio
adjustments will return all adjustments to the factory
preset levels.

NOTE: The On-screen display will disappear 6 seconds

after finishing an adjustment or by pressing the
MENU button three times. The settings can only
be adjusted when they are displayed on the TV
screen.

3

Press the ENTER button to
select the item you want
to adjust.  Press the SET + or –
button to adjust the setting.

BASS

0

+/–/ENTER/CANCEL/MENU

  5J70101B E P17-25

4/11/03, 5:40 PM

19

Содержание 19V400TV

Страница 1: ...TV VCR User s Guide Changing Entertainment Again ...

Страница 2: ... dealer or an experienced radio TV technician for help CAUTION Changes or modifications not expressly approved by the party responsible for compliance with the FCC Rules could void the user s authority to operate this equipment 1 READ INSTRUCTIONS All the safety and operating instructions should be read before the unit is operated 2 RETAIN INSTRUCTIONS The safety and operating instructions should ...

Страница 3: ...tning storm or when it is left unattended and unused for long periods of time unplug it from the wall outlet and disconnect the antenna or cable system This will prevent damage to the unit due to lightning and power line surges 14 POWER LINES An outside antenna system should not be located in the vicinity of overhead power lines or other electric light or power circuits or where it can fall into s...

Страница 4: ...t have the same characteristics as the original part Unauthorized substitutions may result in fire electric shock or other hazards 21 SAFETY CHECK Upon completion of any service or repairs to this unit ask the service technician to perform safety checks to determine that the unit is in proper operating condition 22 HEAT The product should be situated away from heat sources such as radiators heat r...

Страница 5: ...LOCATION AND HANDLE DO NOT OPERATE ANY FUNCTIONS ON THIS UNIT FOR AT LEAST TWO OR THREE HOURS WHEN MOISTURE IN THE AIR CONDENSES ON IT LET THE UNIT STAND WITH POWER ON SEE BELOW WHAT IS MOISTURE CONDENSATION When a cold liquid is poured into a glass for exam ple water vapor in the air will condense on the surface of the glass This is called moisture conden sation MOISTURE WILL CONDENSE ON THE UNIT...

Страница 6: ...m picture quality during playback It is compatible with other VHS video cassette recorders 181 Channel Tuner Receives standard VHF and UHF broadcast channels and up to 113 cable channels The actual number of channels received depends upon channel reception in your area or your cable system Closed Caption Decoder With Full Text Mode Displays text captions or screen text on the screen for hearing im...

Страница 7: ...nd video signal cables from an external source can be connected here 18 AC Power Cord Connect to a 120V 60Hz outlet FRONT 1 Cassette Loading Slot To insert or remove a video tape 2 POWER Button Press to turn the TV VCR on or off 3 T REC Indicator Lights when the unit is in the Timer Record Mode 4 REC OTR Indicator Lights up when the TV VCR is recording 5 CH Buttons Press to select a channel for vi...

Страница 8: ...ape speed for recording 30 TV VCR Button Used to temporarily view a TV channel selected on the VCR while in the playback mode 25 19 21 23 20 26 29 28 30 22 1 2 11 3 6 7 8 9 10 12 13 14 16 4 5 15 1 POWER Button Press to turn the TV VCR on Press again to turn the TV VCR off 2 Direct Channel Selection Buttons 0 9 Allows direct access to any channel 3 CALL Button Displays the present time day of the w...

Страница 9: ...atteries not intended to be recharged they can overheat and rupture Follow battery manufacturer s directions EFFECTIVE DISTANCE OF THE RE MOTE CONTROL Slide the battery compartment cover Install two AAA batteries paying attention to the polarity diagram in the battery compartment Replace the compartment cover Use the AC polarized line cord provided for operation on AC Insert the AC cord plug into ...

Страница 10: ...biner then attach the Combiner to the Antenna Jack ANTENNA CONNECTIONS Connect the 75 ohm cable from the combination VHF UHF antenna to the Antenna Jack If your combination VHF UHF antenna has a 300 ohm twin lead wire the use of the 300 75 ohm Matching Transformer may be necessary Combination VHF UHF Antenna Single 75 ohm cable or 300 ohm twin lead wire Combination VHF UHF Antenna Separate VHF and...

Страница 11: ...ck of the TV VCR If you subscribe to a cable TV service which requires the use of a Converter Descrambler box connect the incoming 75 ohm Coaxial Cable to the Converter Descrambler box Using another 75 ohm Coaxial Cable connect the output jack of the Converter Descrambler box to the Antenna Jack on the TV VCR Follow the connections shown below Set the TV VCR to the output channel of the Converter ...

Страница 12: ...ress the SET or button to select your time zone then press the ENTER button ATLANTIC GMT 4 hours GMT Greenwich Mean Time EASTERN GMT 5 hours CENTRAL GMT 6 hours MOUNTAIN GMT 7 hours PACIFIC GMT 8 hours ALASKA GMT 9 hours HAWAII GMT 10 hours AUTO AUTO SET 5 Press the MENU button twice to return to the normal screen When shipped from factory the AUTO CLOCK option is set to ON But if you do not want ...

Страница 13: ...on the TV VCR press the POWER button 2 Adjust the volume level by pressing the VOL or button The volume level will be indicated on the screen by green bars As the volume level increases so do the number of bars If the volume decreases the number of green bars also decreases 3 Set the TV CATV menu option to the appropriate position See page 15 VOLUME 32 NOTE FOR CHANNELS 1 12 If only 1 or 2 buttons...

Страница 14: ... The Closed Captioned text will disappear during Cue Fast Forward Search Review Rewind Search and Pause Modes or if the VCR tracking is not adjusted properly TO VIEW CLOSED CAPTIONS Press the CAPTION button on the remote control to switch between normal TV and the two Closed Caption Modes Captions and Screen Text MUTING GO BACK CAPTION Press the CALL button The clock date channel number real time ...

Страница 15: ...C When selecting Closed Captions the captioning will be delayed approximately 10 seconds If no caption signal is received no captions will appear but the television will remain in the Caption Mode When Captions are being displayed on screen displays such as volume and mute may not be seen or may interfere with Closed Captions Misspellings or unusual characters may occasionally appear during Closed...

Страница 16: ...the AC cord plug from the AC outlet and leave the unit unplugged for more than two minutes Insert the AC cord plug again and turn the volume level to a minumum Press the VOL button on the unit and the 0 button on the remote control for more than 2 second simultaneously 1 Press the MENU button 2 Press the SET or button to select the CH SET UP mode then press the ENTER button 3 Press the SET or butt...

Страница 17: ...Press the ENTER button to display ON Now your settings are set into the memory 5 6 7 V CHIP SET V CHIP OFF TV RATING OFF MOVIE RATING OFF CHANGE PASSWORD á ENTER MENUñ NOTE The V Chip function is activated only on programs and tapes that have the rating signal To use the TV after the TV is protected When the program applied to the V Chip setting is received enter the password then press the ENTER ...

Страница 18: ...CANCEL OFF TIMER 12 00AM CANCEL á ENTER MENUñ TV SET UP V CHIP SET ON OFF TIMER PICTURE AUDIO SAP ON OFF M E N U TIMER REC SET TV SET UP CH SET UP AUTO REPEAT ON OFF SYSTEM SET UP ENTER MENU TO SET THE ON TIMER 6 Press the SET or button to select the SET mode then press the ENTER button Press the MENU button repeatedly to return to normal screen 5 Set the desired minute channel and daily or weekly...

Страница 19: ... on the screen then press the SET or button to adjust the tint of the picture This determines how accurately the colors are reproduced by the TV Adjusting the tint for natural facial tone is the best method of obtaining accurate color reproduction of the entire pic ture SHARPNESS Press the ENTER button until SHARPNESS appears on the screen then press the SET or button to adjust the sharpness of th...

Страница 20: ...break off the erase prevention tab if you do not wish to record over the tape Cover the hole with adhesive tape Be careful the tape does not extend past the edges of the video cassette housing Use only video cassette tapes marked To play a prerecorded tape NOTE This TV VCR selects the playback tape speed SP LP or SLP automatically Load a prerecorded tape When loading a cassette tape without the er...

Страница 21: ...nd SP or SLP will appear on the screen about 4 seconds 3 Set the TV CATV option to the appropriate position See page 15 00 00 00 SP NOTES If power is switched off during recording the TV set goes off and the VCR continues to record Press the STOP button to halt the recording and turn off the VCR The TV VCR Channel cannot be changed during recording CH 012 Press the PAUSE button to avoid recording ...

Страница 22: ...nd tape speed as in step 4 The One Touch Timer Recording feature provides a simple and convenient way to make a timed recording ONE TOUCH TIMER RECORDING OTR 5 Press the Direct Channel Selection buttons or CH or button to select the channel to be recorded 6 Press the REC OTR button to begin recording Press the button again to stop recording after 30 minutes Each additional press of the REC OTR but...

Страница 23: ...load a tape the counter will reset to 00 00 00 The counter does not function on nonrecorded blank sections of the tape When you rewind fast forward or play tapes through blank sections the counter stops The On Screen Real Time Tape Counter shows the tape running time in Hours Minutes and Seconds You can easily determine how long the tape has been running or how much time is left on the tape 1 Pres...

Страница 24: ...tem stereo TV programs may be transmitted over a mono cable channel In this case the word STEREO will not appear and the sound will be in mono OUTPUT SELECTION The VHS Hi Fi audio system permits high fidelity recording of MTS STEREO TV broadcasts When viewing an MTS STEREO TV program or playing a prerecorded VHS Hi Fi STEREO videotape press the SOUND button to allow the audio to be heard through b...

Страница 25: ...ress the PAUSE STILL button 5 Release the recording pause and the playback still simultaneously to begin the duplicating process NOTES It is recommended that the tape speed be set to the SP mode on the TV VCR for best result Unauthorized recording of copyrighted television programs films video cassettes and other materials may infringe the rights of copyright owners and be contrary to copy right l...

Страница 26: ...ected or possible local interfer ence TV station experiencing problems Picture control is not adjusted Possible local interference Antenna CATV connector is not connected or possible local interference TV station experiencing problems Antenna CATV connector is not connected or possible local interference Cable TV channel is scrambled CATV connector is not connected TV CATV Mode menu option is set ...

Страница 27: ...EC button The T Rec indicator is lit Tape is old or worn Tracking adjustment is beyond range of automatic tracking circuit Video heads are dirty Replace the tape Adjust tracking manually using the TRK or buttons on the remote control Clean the video heads Aim the remote control at the remote sensor Operate within 15 feet or reduce the light of the room Clear the path of the beam Replace the batter...

Страница 28: ...le TV system the disturbance may be caused by the local Cable TV company broadcast To prevent fire or shock hazard disconnect the TV VCR from the AC power sources before cleaning The finish on the cabinet may be cleaned with mild soap and a soft damp cloth and cared for as other furniture Use caution when cleaning or wiping the plastic parts The video heads are the means by which the TV VCR reads ...

Страница 29: ...SP 33 35 mm sec LP 16 67 mm sec SLP 11 12 mm sec F FWD REW Time at 25 C 77 F F FWD Approx 4 minutes 50 seconds REW Approx 2 minutes 30 seconds T 120 Cassette Speed Search SP 3 5 x Normal Speed LP 7 9 x Normal Speed SLP 9 15 x Normal Speed Hi Fi Frequency Response 20Hz to 20 000Hz Hi Fi Dynamic Range More than 90dB GENERAL Power Source AC 120V 60Hz Power Consumption 86 Watts AC 120V Dimensions W 19...

Страница 30: ...horized RCA VCR Service Center If not you must take your TV VCR to the Service Center location at your own expense or pay for the cost the Service Center may charge to transport your unit to and from your home To identify your nearest Authorized RCA Service Center ask your dealer visit www rca com look in the Yellow Pages or call 1 800 336 1900 Proof of purchase in the form of a bill of sale or re...

Страница 31: ...E USE OF THIS PRODUCT OR ARISING OUT OF ANY BREACH OF ANY EXPRESS OR IMPLIED WARRANTY ON THIS PRODUCT THIS DISCLAIMER OF WARRANTIES AND LIMITED WARRANTY ARE GOVERNED BY THE LAWS OF THE STATE OF INDIANA EXCEPT TO THE EXTENT PROHIBITED BY APPLICABLE LAW ANY IMPLIED WARRANTY OF MERCHANTABILITY OR FITNESS FOR A PARTICULAR PURPOSE ON THIS PRODUCT IS LIMITED TO THE APPLICABLE WARRANTY PERIOD SET FORTH A...

Страница 32: ... address listed in this manual or on the carton This will only add delays in service for your product 2003 Thomson Inc Trademark s Registered Marca s Registrada s TOCOM 16320470 This Class B digital apparatus complies with Canadian ICES 003 Visit the RCA web site at www rca com THOMSON Printed in Thailand 03 12 K ...

Отзывы: