background image


Using the CncGcoder

®


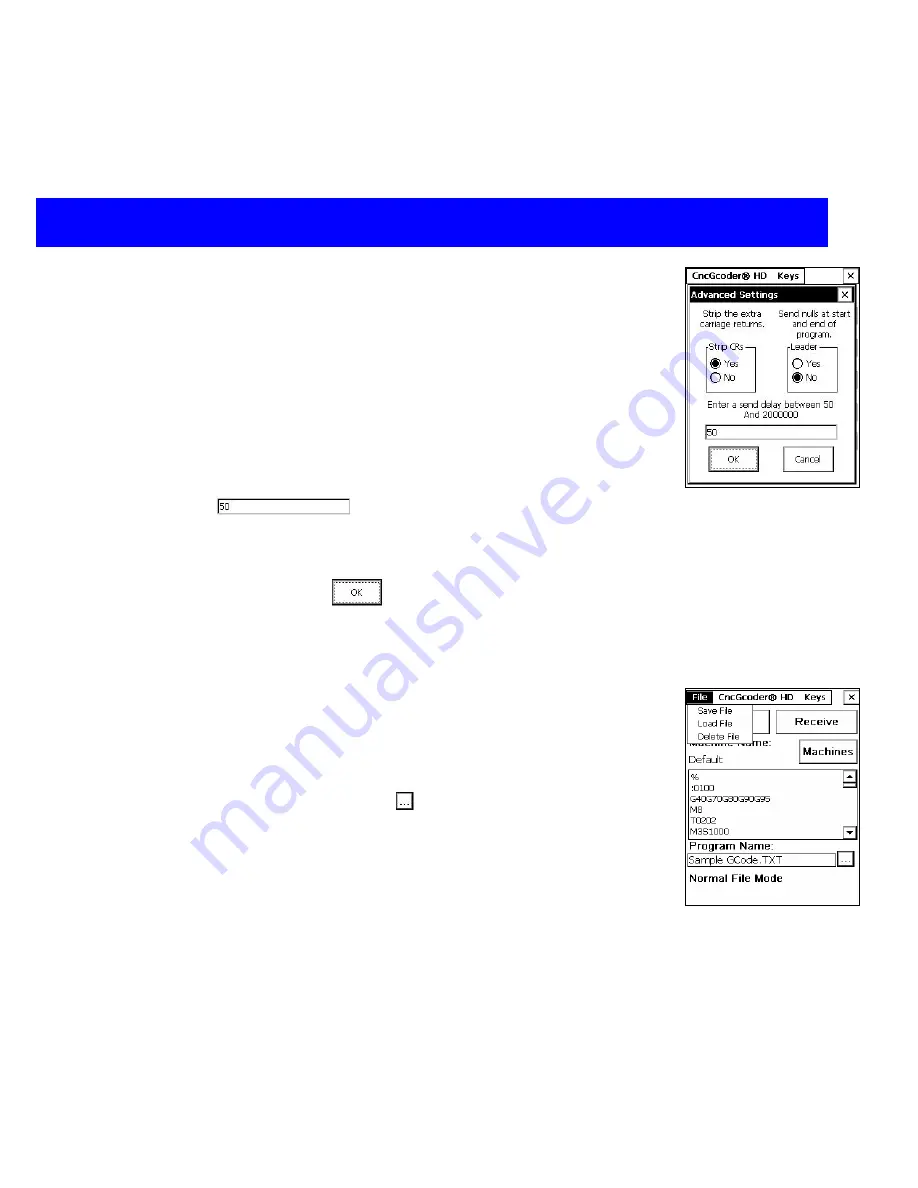
Setting the Advanced Settings 

 
NOTE:  These settings rarely need to be changed.  Only change these 
settings if you are having trouble communicating with the CNC. 

1. Select 

CncGcoder

®

 HD > Advanced

 from the menu bar. 

2. Select 

Yes

 or 

No

 to turn the Strip CRs feature on and off.  The 

Strip CRs feature will remove excess carriage returns from the G-
Code program as it is received from the CNC. 

3. Select 

Yes 

or 

No 

to turn the Leader feature on and off.  When 

Leader is turned on, nulls will be sent at the beginning and end of 
the program.  This may fix problems sending to the CNC. 

4.  Enter a number between 50 and 2,000,000 in the send delay 

box

.  The number represents the time delay 

between each packet of data sent to the CNC.  Larger numbers 
will increase the delay and send the program at a slower speed.  
This may fix buffer overflow errors on the CNC.   

5. Tap the 

OK

 button 

to accept changes 


Managing CNC Programs 

Select an option under the 

File

 menu bar to access the File screen.  From 

this screen, you can access programs from the handheld’s memory, the 
on-board flash, and the SD card. 
 
NOTE:  Tap on the 

Complete


Path 

icon to view the complete path and 

file name of the current G-Code program. 
 
NOTE:  Program names can be entered while on the main screen. Tap on 
the box under 

Program Name:

 to see a flashing cursor.  Use the on-

screen keyboard or the keypad to enter a program name.  The file will not 
be saved until Saving a G-Code File is completed. 
 
IMPORTANT:  Save programs to the on-board flash drive or the SD card 
for non-volatile storage. (See Important Directory Drives for more 
information) Files saved to the memory of the device may be lost if the 
power is lost. 

CncGcoder® HD Manual 

15

Содержание CncGcoder HD

Страница 1: ...CncGcoder Models HD HDx Manual...

Страница 2: ...ns 9 Device Desktop 10 Desktop Icons 10 Device Preferences 10 Setting Date and Time 10 Setting Backlight and Contrast 11 Configuring Stylus 11 Setting the power 12 USING THE CNCGCODER 13 Opening the P...

Страница 3: ...Y PRECAUTIONS 20 Disposing of the Battery 20 TROUBLESHOOTING 21 Resetting the Device 21 Soft Reset 21 Hard Reset 21 Blank Screen 21 Recalibrate Screen 21 Trouble Communicating with the CNC 22 REVISION...

Страница 4: ...der HD or the CncGcoder HDx You are now able to easily communicate with you Machine Tool CNCs right on the shop floor Review the following manual for information on how to set up and use the CncGcoder...

Страница 5: ...wer Adapter Cord Extreme duty CncGcoder HD RS 232 Serial Cable W USB Jack Setup Sheet Optional Accessories USB SD Card Reader and SD Cards available at electronics stores Adds storage capabilities to...

Страница 6: ...Setting Up CncGcoder HD Manual 5 Handheld Overview Overview...

Страница 7: ...orange while the battery is charging Turning On and Off Press the Power key to turn the unit on and off When the Power key is pressed to turn the unit off the unit actually enters Suspend mode In Susp...

Страница 8: ...g up Tighten the two screws to ensure a secure connection Connect the 25 pin end into the serial port on the machine tool CNC HD cable shown HDx cable similar Inserting SD Cards Insert the SD Card wit...

Страница 9: ...ions open files and view the contents of folders Drag Hold the stylus on the screen and drag across the screen to select text and images Using the Keypad The CNC style keypad was designed for easier t...

Страница 10: ...On Board Flash is the handheld s flash drive Files saved to this location are non volatile and will not be lost if the device loses power or is reset An SD Card inserted into the handheld will display...

Страница 11: ...er The CncGcoder is the program that allows you to transfer CNC G Code files Device Preferences The Control Panels are used to configure and customize the settings of the device Use the Control Panels...

Страница 12: ...k Tip While the device is off press and hold the Power and then Shift keys to launch the Contrast Control Panel Use the Up and Down arrow keys adjust the contrast Configuring Stylus Open Stylus Select...

Страница 13: ...tab to monitor the battery level Charging will display on the screen while the handheld is plugged in Select the Schemes tab to set up the Power Schemes Select how long the device stays on while the...

Страница 14: ...ext and editing the displayed G Code programs 1 Select Keys on the menu bar to show the keyboard 2 Position the keyboard by tapping on Input Panel and dragging 3 Use the stylus to select the keys 4 Se...

Страница 15: ...chine name box below Machine Name 2 Tap the Select Machine button to choose the machine and return to the CncGcoder main screen Editing an Existing Machine 1 Select a machine from the list of machines...

Страница 16: ...rs will increase the delay and send the program at a slower speed This may fix buffer overflow errors on the CNC 5 Tap the OK button to accept changes Managing CNC Programs Select an option under the...

Страница 17: ...level Tap on a Folder to view the contents of that directory Tap on a File to select the G Code program Slide the scrollbar across the bottom of the screen to view the date and time the file was crea...

Страница 18: ...xt to Name 3 Tap the Delete button to delete the G Code program and return to the main screen File Transfer between Computer See Tech Note 1 Transferring using the SD Card NOTE SD Cards and SD card re...

Страница 19: ...5 Tap the Send button on the CncGcoder The Characters Sent will count up at the bottom of the screen 6 When the send completes successfully a message box will display the total characters sent Receiv...

Страница 20: ...ton to return to the topic list Select Done on the menu bar to return to the main screen About CncGcoder Screen The CncGcoder HD version and serial number can be found on the About CncGcoder screen 1...

Страница 21: ...attery Keep it away from children Do not puncture mutilate disassemble solder or alter it Keep it away from any heat source above 140 F Use extreme caution with any liquid residue from a leaking batte...

Страница 22: ...Files stored in the On board Flash are NOT erased 1 Hold down the Power key 2 Press the Reset button while continuing to hold Power Key 3 Hold for 2 seconds 4 Release the Reset button 5 Release the Po...

Страница 23: ...CncGcoder are set to ISO data format 7 data bits and even parity Make sure the baud rates match Make sure the handshaking on the CncGcoder HD and the CNC are the same If they are different the unit m...

Страница 24: ...omatically switch to the default directory 4 When a directory cannot be found switch to root directory 5 When a file can not be found go back to last entered file path 6 Does not erase file name while...

Страница 25: ...memory cards can be used which translates to unlimited storage Current program file structures and directories can be transferred directly to the handheld NO limitations on program management Recomme...

Страница 26: ...Windows ME Windows XP Mac OS 9 Mac OS X Transfer files from an older computer that does not meet the requirements Use a CD ROM Floppy Disk Network or other method to transfer G Code programs from an o...

Страница 27: ...to the bottom of handheld and the USB port on the PC ActiveSync will mount the CncGcoder HD as a drive called Mobile Device on the PC Drag and drop G Code programs into and out of the directories on t...

Страница 28: ...RBR Associates Inc 8408 Wilmette Ave Darien IL 60561 Phone 630 971 8729 FAX 630 971 2974 www cncgcoder com Updated 09 23 2008...

Отзывы: