background image

24

FUTERA II INSTALLATION AND OPERATION INSTRUCTIONS

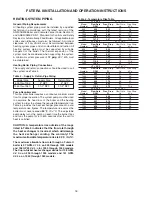
Note: Multiply the gas volume by 0.62 for propane flow capacity in ft

3

/hr.

Multiply the propane flow capacity by 2500 Btu/ft

3

 to determine

the propane Btu/hr capacity for a given pipe size and length.

1"

1 1/4"

1 1/2"

2"

Type of pipe fitting

Equivalent pipe length, (ft)

90˚ Elbow

2.6

3.5

4.0

5.2

Tee

1

5.2

6.9

8.0

10.3

Gate Valve

2

0.6

0.8

0.9

1.2

Gas Cock

2

1.5

1.9

2.3

3.0

Nominal

Iron Pipe

Size, (in)

Notes:

1. For flow through branch.
2. For flow at full open.

Nominal

Iron Pipe

Size, (in)

10

520

1050

1600

3050

20

350

730

1100

2100

30

285

590

890

1650

40

245

500

760

1270

50

215

440

670

1270

60

195

400

610

1150

80

170

350

530

990

100

150

305

460

870

Maximum pipe capacity in ft

3

/hr based on 0.60 specific gravity gas

at a pressure of 0.5 psig or less and a 0.3" W.C. pressure drop.

150

120

250

380

710

Pipe length in feet

1"

1 1/4"

1 1/2"

2"

Maximum gas volume of pipe, (ft

3

/hr)

GAS SUPPLY PIPING

WARNING: Check the boiler/water heater rating
plate to make sure that the boiler/water heater is
for the type of gas that will be used. If it isn’t, do
not connect the boiler/water heater to the gas
supply. Gas supply piping must be in accordance
with the National Fuel Code, ANSI Z223.1-latest
revision or applicable provisions of the local
building codes. Canadian installations must
comply with CAN/CGA B149.1 or .2 Installation
Code. Failure to comply with this warning can
result in extensive property damage, severe
personal injury or death!

The Futera II comes from the factory ready to be piped to
the gas supply. If for any reason the boiler/water heater is
not for the type of gas available at the installation site, call
your RBI representative to resolve the problem.

NOTE: A minimum gas supply pressure of 6 in, 

152 mm

W.C. natural or 11 in, 

279 mm

 W.C. propane and

maximum 14 in, 

356 mm

  W.C. natural or propane, must

be available at the safety shutoff valve inlet with the
unit(s) operating.

Table 6 should be used to ensure that the gas supply piping
is sized properly.  If more than one appliance is supplied
by the same supply pipe, the piping must be sized based
on the maximum possible demand. Do not neglect the
pressure drop due to pipe fittings. Table 6 should be used
in conjunction with Table 7 to ensure that the gas supply
piping has the capacity to meet the demand.

Figure 18 depicts the proper way to connect the boiler/
water heater to the gas supply piping. The manual shut-
off valve MUST be installed in the supply piping. It should
be installed 

5 ft

1.5 m above the floor where required by

local codes. Provide a sediment trap at the bottom of the
vertical section of the gas supply pipe upstream of the gas
controls.

A ground joint union should be installed between the boiler
gas controls and the supply piping. Each of these items
are needed to ensure long life and ease of servicing.
Always use a pipe sealant that is suitable for use with LP
gas.

Table 6 – Gas Pipe Capacity

Table 7 – Equivalent Pipe Length Chart

Figure 18 – Gas Supply Piping

CAUTION: Always use a wrench on the gas valve body
when making gas connections to it. Never over-tighten
the piping entering the gas valve body or gas valve
failure may result!

When applicable, provisions for vent, bleed and gas relief
lines must be made in accordance with the latest revision
of ANSI Z223.1/NFPA 54.

Safe lighting and other performance criteria were met with
the gas manifold and control assembly provided on the
boiler. All gas connections MUST be leak tested before
putting the boiler into operation.

WARNING: Never use an open flame to test for gas
leaks. Always use an approved leak detection
method. Failure to comply with this warning can
cause extensive property damage, severe personal
injury or death!

Whenever the gas supply piping is pressure tested the
boiler/water heater gas controls must be protected. If the
test pressure is equal to, or less than 

1/2 psig

3.5 kPa

isolate the boiler/water heater by closing it’s manual shut
off valve, see Figure 18. If the test pressure is greater than,
or equal to 

1/2 psig

3.5 kPa, disconnect the boiler/water

heater and its individual shut-off valve.

Содержание FB series

Страница 1: ...ical switch Do not use any phone in your building Immediately call your gas supplier from a neighbor s phone Follow the gas supplier s instructions If you cannot reach your gas supplier call the fire department Installation and service must be performed by a qualified installer service agency or the gas supplier DESIGNED AND TESTED ACCORDING TO A S M E BOILER AND PRESSURE VESSEL CODE SECTION IV FO...

Страница 2: ...ien doivent être assurés par un installateur ou un service d entretien qualifié ou par le fournisseur de gaz The Futera II Series finned copper heating boiler water heaters have been design certified by CSA for use with natural and propane gas under the latest revision of ANSI Z21 10 3 CSA 4 3 Gas Water Heaters ANSI Z21 13 CSA 4 9 Gas Fired Low Pressure Steam and Hot Water Boilers and CAN1 3 1 Ind...

Страница 3: ...er water heater in a location that would restrict the introduction of combustion air into the unit or subject it to a negative pressure see GENERAL VENTING GUIDELINES 6 NEVER place this boiler water heater in a location that would subject it to temperatures at or near freezing See the Freeze Protection section on page 15 CAUTION Units installed outdoors MUST be protected from ice and snow accumula...

Страница 4: ...ust be given to the blockage effects of louvers grills and screens Screens must have a minimum mesh size of 1 4 in 6 4 mm If the free area through a louver or grill is not known ducts should be sized per Table 2 Table 2 Make up Air Louver Sizing Required Cross Sectional Area Input 1 4 in 6 4 mm 75 Free Area 25 Free Area MBH Wire Screen Metal Louvers Wooden Louvers in2 cm2 in2 cm2 in2 cm2 500 125 8...

Страница 5: ...th for the horizontal combustion air pipe on installations that use the Horizontal Power Vent option is 100 ft 30 5 m Each 90 elbow and the combustion air terminal are equal to 10 linear ft 3 1 m of pipe If horizontal runs exceed 5 ft 1 5 m they must be supported at 3 ft 0 9 m intervals with overhead hangers The certified combustion air terminal from RBI must be used and installed as shown in Figu...

Страница 6: ... ft 0 30 m above any door window or gravity air inlet into any building It must not terminate less than 4 ft 1 2 m horizontally from and in no case above or below unless a 4 ft 1 2 m horizontal distance is maintained from electric meters gas meters regulators and relief equipment and not less than 7 ft 2 1 m from any adjacent public walkway The bottom of the vent terminal s shall be located at lea...

Страница 7: ...7 FUTERA II INSTALLATION AND OPERATION INSTRUCTIONS Figure 1 Air Intake Vertical or Thru Wall Figure 2 Venting Thru Wall Vertical ...

Страница 8: ... running horizontal combustion air and venting for single or multiple units exhaust and combustion air terminals must be installed on the same plane outside wall in order to prevent pressure differences due to prevailing winds In cold climates double wall or insulated inlet pipe recommended to prevent condensation 5 FT 1 5 m 3 FT 0 9 m 16 FT 4 9 m 4 FT 1 2 m 5 FT 1 5 m 1 4 IN PER FOOT 20 mm m 1 5 ...

Страница 9: ...9 FUTERA II INSTALLATION AND OPERATION INSTRUCTIONS Figure 5 Vertical Air Intake and Venting for Direct Vent System Figure 6 Combination Direct Vent Systems ...

Страница 10: ... appropriate power venter for the boiler water heater see Table 3 Follow the power venter manufacturer s installation instructions Table 3 Power Venter Sizes VERTICAL CHIMNEY VENT NEGATIVE PRESSURE CATEGORY I The Futera II is listed as a Category I appliance when vented vertically into a listed metal chimney system or properly sized masonry chimney Figures 8 9 The chimney must provide a negative p...

Страница 11: ...t least 3 corrosion resistant sheet metal screws Always provide a minimum clearance of 6 in 152 mm between single wall vent pipe and any combustible materials Type B1 vent may be used clearance between it and any combustible material must be as listed WARNING Failure to maintain minimum clearances between vent connectors and any combustible material can result in a fire causing extensive property ...

Страница 12: ...12 FUTERA II INSTALLATION AND OPERATION INSTRUCTIONS Figure 8 Vertical Venting with a Metal Chimney System ...

Страница 13: ...cent units The boiler water heater must be at least 10 ft 3 1 m from any door window or gravity air inlet into any building and at least 3 ft 0 9 m from any overhang unless local codes dictate differently Avoid locations where wind deflection off of adjacent walls buildings or shrubbery might cause a downdraft The unit s should be located at least 3 ft 0 9 m from structures Outdoor installations a...

Страница 14: ...tructions Adjust thermostat so appliance will operate continuously Mettre l appareil inspecté en marche Suivre les instructions d allumage Régler le thermostat de façon que l appareil fonctionne de façon continue e Test for spillage at the draft hood relief opening after 5 minutes of main burner operation Use the flame of a match or candle or smoke from a cigarette cigar or pipe Faire fonctionner ...

Страница 15: ...r systems must be isolated from the water heater by the use of a heat exchanger or other approved method 3 If the unit must be shut off for any reason the electric gas and water supplies MUST be shut off and the unit and its pump completely drained Figure 12 Futera II Piping CAUTION Improper outdoor installation of this unit can cause boiler failure voiding the manufacturer s warranty Relief Valve...

Страница 16: ...C The adjustable pump delay turns the pump on each time the burner fires and runs the pump for 6 to 600 seconds after the call for heat is satisfied CAUTION A temperature rise outside of the range listed in Table 5 indicates that the flow rate through the heat exchanger is incorrect which will damage the heat exchanger voiding the warranty The maximum allowable temperature rise is 35 F 19 4 C The ...

Страница 17: ...ressure drop in the primary system see Figure 13 Low Return Water Temperatures To prevent the problems associated with condensation of the products of combustion due to low return water temperatures a primary secondary piping system with a bypass and bypass valve must be installed see Figure 14 The bypass and bypass valve must be sized the same as the secondary piping A balancing valve must also b...

Страница 18: ...e To Maintain Inlet Temperature Above Dew Point T1 Temp Min 110 For Atmospheric T1 Temp Min 125 Sealed Combustion NOTES 1 Boiler circuit piping must be sized large enough to handle maximum flow through unit 2 Boiler pump sized to boiler design flow requirements 3 All boilers furnished with factory mounted outlet water temperature gauge 4 Boiler pump purging required Use terminals supplied Notice T...

Страница 19: ...lobe Valve Balance Valve Backflow Prevention Device 5 Secondary loop pipe diameter must be sized large enough to handle maximum flow through all units NOTES 1 Boiler circuit piping must be sized large enough to handle maximum flow through unit 2 Boiler pump sized to boiler design flow requirements 3 All boilers furnished with factory mounted outlet water temperature gauge 4 Boiler pump purging req...

Страница 20: ...ause excessive corrosion of the heat exchanger Water that has a hardness greater than 18 grains per gallon and or a level of dissolved solids exceeding 350 ppm will require a recalculation of the pump size and temperature rise A cupro nickel heat exchanger may also be required The manufacturer should be consulted when these water conditions are encountered See Table 5A CAUTION The maximum allowabl...

Страница 21: ...21 FUTERA II INSTALLATION AND OPERATION INSTRUCTIONS Table 5A Futera II Heat Exchanger Selection Graph Table 5B Futera II Pumping Performance Requirement ...

Страница 22: ...g the warranty The method outlined below can be employed to prevent this condition from occurring A balancing valve should be installed on the outlet side of the water heater for purposes of adjusting the flow rate through the heat exchanger Thermometers are installed on both the inlet and outlet of the water heater for determining the temperature rise through the unit The proper velocity through ...

Страница 23: ...locate remote aquastat well in lower 1 3 of tank Install aquastat with heat sensing compound 3 Thermal expansion tank may be required check local codes 4 When using optional factory mounted pump max pipe length 30 total 6 90 elbows full pipe size 5 CAUTION MEASURE WATER HARDNESS AND pH AT JOB SITE The pH and water hardness must be measured before selecting heat exchanger and pump Consult the Heat ...

Страница 24: ... ensure that the gas supply piping is sized properly If more than one appliance is supplied by the same supply pipe the piping must be sized based on the maximum possible demand Do not neglect the pressure drop due to pipe fittings Table 6 should be used in conjunction with Table 7 to ensure that the gas supply piping has the capacity to meet the demand Figure 18 depicts the proper way to connect ...

Страница 25: ...ater En cas de surchauffe ou si l alimentation en gaz ne s arrête pas fermez manuellement le robinet d arrêt de l admission de gaz Hydronic Heating Boilers Open the make up water valve and slowly fill the boiler and all of the radiation with water Ensure that all bleed and drain valves are closed Adjust the make up water pressure regulator so a minimum 12 psig 82 7 kPa system pressure is maintaine...

Страница 26: ...e 4 Close the manual main and pilot gas shut off valves 5 Wait five 5 minutes to clear out any gas Then smell for gas including near the floor If you smell gas STOP Follow B in the safety information above to the left on this label If you do not smell gas go to the next step 6 Connect a manometer having a minimum capacity of 20 in 508 mm WC to the gas pressure test port see Figure 22 Make sure tha...

Страница 27: ... 50 to 64 mm above the surface of the burner Figure 19 To adjust the pilot the following steps must be taken 1 Remove the pilot gas pressure regulator cap 2 Turn the pressure regulator adjustment screw clock wise to increase the flame and counterclockwise to decrease it 3 Replace the pressure regulator adjustment screw cap Fire Testing 1 For an on off unit confirm that the low fire side of the two...

Страница 28: ...er will retry every 5 minutes Inspect the ignition system to determine what the problem is 7 With the main burner in operation close the manual firing valve As soon as the main burner flames go out open the manual firing valve A normal ignition sequence should take place If the burner fails to light the system will make one more ignition attempt 8 With the burners in operation interrupt the power ...

Страница 29: ...econds 7 If the computed rate deviates by more than 5 from the rated input value of the unit adjust the manifold pressure accordingly DO NOT adjust the manifold pressure by more than 5 If a proper rate cannot be maintained without adjusting the manifold pressure beyond the 5 limit the main burner orifices must be replaced If the input rate is too low go to the next larger size of main burner orifi...

Страница 30: ...0 F 11 C higher than the operating control Refer to the HOT WATER SUPPLY section for the proper supply water temperature Flow Switch A flow switch is provided in the water outlet piping to prevent the boiler water heater from firing without adequate water flow through the heat exchanger DIAGNOSTICS The Futera II has a number of indicator lights that are intended to display the current operation an...

Страница 31: ...es Black soot indicates poor combustion Green deposits indicate condensation due to low return water temperatures In either case the heat exchanger must be cleaned thoroughly and the problem resolved before the boiler water heater is returned to service 6 If there are no signs of damage sooting or corrosion reassemble the unit following the previous steps in reverse order 7 A badly corroded or dam...

Страница 32: ...e technician to have it inspected NEVER try to clean or repair the relief valve If the valve fails to operate properly have it replaced 5 The aquastat high limit controls the maximum water temperature in the boiler It is adjustable from 140 F 60 C to 250 F 121 C If the water temperature reaches the set temperature before the demand for heat has been met the aquastat high limit should shut the boil...

Страница 33: ...ake systems to ensure that blockages are not present Ensure that the vent and air intake systems conform to the guidelines in this manual Confirm that the blocked flue switch connections are correct and that it is functioning properly Ensure that the blower air inlet damper pressure switch are adjusted for the correct air box pressure 4 The Trial for Ignition indicator light illuminates Confirm th...

Страница 34: ...34 FUTERA II INSTALLATION AND OPERATION INSTRUCTIONS Figure 24 Exploded View ...

Страница 35: ...per C7027A 16 0009 1 1 1 1 1 1 1 NS Rocker Switch 48 0012 1 1 1 1 1 1 1 NS Toggle Switch 48 0010 1 1 1 1 1 1 1 15 Transformer 40VA 15 0002 1 1 1 1 1 1 1 NS Pump Contactor 1PH 15 0118 1 1 1 1 1 1 1 NS Terminal Block 2P 48 0151 1 1 1 1 1 1 1 NS Terminal Block 4P 48 0152 1 1 1 1 1 1 1 NS Terminal Block 12P 48 0158 1 1 1 1 1 1 1 NS 7 sec Prepurge Relay MOR24A 15 0119 1 1 1 1 1 1 1 NS Pump Delay Relay ...

Страница 36: ... 1 06 0012 1 1 1 1 NS Thermometer 14 0004 1 1 1 1 1 1 1 32 Flame Safeguard RM7895C 16 0024 1 1 1 1 1 1 1 NS UV Amplifier R7849A 16 0006 1 1 1 1 1 1 1 33 High Limit L4008E FW 14 0105 1 1 1 1 1 1 1 High Limit L4008E FB 14 0112 1 1 1 1 1 1 1 34 Operator Jumo 16 0025 1 1 1 1 1 1 1 NS Temperature Probe Assembly 16 0026 1 1 1 1 1 1 1 NS Operator T6031A Pool Heater 14 0003 1 1 1 1 1 1 1 35 Burner Stud 57...

Страница 37: ...0656 1 30 0657 1 30 0658 1 30 0659 1 30 0660 1 30 0661 1 43 Sealing Collar Assembly 70 2220 1 70 2221 1 70 2222 1 70 2223 1 1 70 2224 1 1 44 Main Burner Assembly Flame Rod Sensing 70 2206 1 70 2207 1 70 2208 1 70 2209 1 70 2210 1 70 2211 1 70 2212 1 Main Burner Assembly UV Flame Sensing 70 2213 1 70 2214 1 70 2215 1 70 2216 1 70 2217 1 70 2218 1 70 2219 1 45 Main Gas Valve V48A 1 120V 11 0151 1 1 ...

Страница 38: ...0456 1 1 Firing Valve 1 1 4 11 0457 1 1 1 Firing Valve 1 1 2 11 0458 1 1 NS Valve Body V5055A 1 11 0259 1 1 Valve Body V5055A 1 1 4 11 0260 1 1 1 Valve Body V5055A 1 1 2 11 0261 1 1 NS Valve Actuator V4055D 13 sec On Off 11 0311 1 1 1 1 1 1 1 Valve Actuator V4055D 13 sec 2 Stage 11 0307 1 1 1 1 1 1 1 N O V V V4295S 3 4 11 0361 1 1 1 1 1 1 1 NS Gas Regulator RV61 1 11 0501 1 1 Gas Regulator RV81 1 ...

Страница 39: ... 50 30 0360 1 1 1 Pressure Relief Valve 50 30 0374 1 Pressure Relief Valve 50 30 0379 1 1 1 Pressure Relief Valve 125 30 0364 1 1 1 1 1 1 1 NS Tridicator FB 13 0308 1 1 1 1 1 1 1 Tridicator FW 13 0305 1 1 1 1 1 1 1 NS Flow Switch 14 0203 1 1 1 1 1 1 1 Flow Switch Outdoor 14 0205 1 1 1 1 1 1 1 NS Exhaust Terminal 09 0107 1 09 0108 1 09 0109 1 09 0110 1 1 09 0111 1 1 NS Rain Canopy 70 2102 1 1 70 21...

Страница 40: ...t HS3 12 0011K1 1 1 Sidewall Vent Kit HS4 12 0001K1 1 1 Sidewall Vent Kit HS5 12 0002K1 1 1 1 NS Sidewall Vent Kit with air intake hood HS3 12 0011K 1 1 Sidewall Vent Kit with air intake hood HS4 12 0001K 1 Sidewall Vent Kit with air intake hood HS4 12 0001CK 1 Sidewall Vent Kit with air intake hood HS5 12 0002K 1 Sidewall Vent Kit with air intake hood HS5 12 0002CK 1 1 NS Vent Termination Hood 8 ...

Страница 41: ...ght 7 Fan no gas Verify no air leaks through outer cabinet 8 With fan running Record air box pressure W C 9 With fan running Record back pressure W C 10 Vent configuration HOR horizontal VER vertical 11 Equivalent vent length each fitting is 10 equivalent 12 Breaching size 13 Barometric installed location 14 Through wall venting with factory supplied termination 15 Pilot adjusted to within 1 turn ...

Страница 42: ...er STEP DESCRIPTION 1 2 3 4 5 1 Remove manometers and replace plugs 2 Complete this start up form for rep 3 Fill out factory start up form w boiler 4 Correct each boiler s settings sticker 5 Replace all covers no air leaks 6 All valves opened and adjusted 7 Boiler pump is running 8 Final operator setting 9 Final high limit setting 10 Boiler left in operation 11 Boiler to require return visit 12 En...

Страница 43: ...ve installed on outlet prior to isolation boiler only Yes No 7 T P gauge installed on outlet prior to isolation boiler only Yes No 8 Low water cut off installed and wired Yes No 9 Lead lag external controls installed and tested Yes No 10 All gas connections are complete Yes No 11 Gas pressure verified between 4 and 14 W C Yes No 12 Gas lines purged and tested for leaks Yes No 13 All stacks vents c...

Страница 44: ...260 North Elm Street 1300 Midway Boulevard Westfield MA 01085 Mississauga Ontario L5T 2G8 Canada Phone 413 568 9571 Phone 905 670 5888 Fax 413 568 9613 Fax 905 670 5782 www rbiwaterheaters com ...

Отзывы: