background image

Installation

2–26

F232048

Air Requirements

A clean, dry compressed air source is required 
to operate the drain valve(s) and the supply 
tank drain valves. The compressed air inlet for 
the machine is on the rear of the machine.

Control Function Test

The machine should be cleaned after 
the installation is complete. A function test 
should then be executed on the unloaded 
machine:

1.

Verify that the wire tie which keeps the 
door lock open is removed.

2.

Check the power supply for such 
characteristics as correct voltage, phase, 
and cycles to be certain they are correct for 
the machine.

3.

Open manual shut-off valves to 
the machine.

4.

Turn on electric power.

5.

Check the door interlock before starting 
operation:

a.

Open the loading door by pressing and 
holding the door unlock button on the 
front of the control panel and then 
pressing the door handle button and 
turning the handle clockwise.

b.

Attempt to start the machine 
with the door open. The machine 
should not start with the 
door open.

c.

Close the door without locking it and 
attempt to start the machine. The 
machine should not start with the door 
unlocked.

d.

Close and lock the door and start a 
cycle. Attempt to open the door while 
the cycle is in progress. The door 
should not open.

e.

Open the sample port while the cylinder 
is rotating. The cylinder should stop.

If the door lock and interlock are 
not functioning properly, call a 
service technician.

6.

Run a complete cycle, checking operation 
of water inlet valves, drain, and extract 
functions.

7.

Rotation must be forward in the extract 
step. If rotation is not forward in the 
extract step, disconnect power. A qualified 
electrician must reverse any two leads 
between the AC inverter drive and the 
motor.

Air Supply Information

Air inlet connection size, in/mm

1/4 / DN6

Number of air inlets

1

Recommended air pressure, 
psi/bar

90-95 / 
6.0-6.3

Functioning limits, psi/bar

90-100 / 

6.0-6.7

Содержание UY75

Страница 1: ...nelView 550 PanelView 550 Part No F232048R3 September 1997 Commercial Laundry Technical Communications P O Box 990 Ripon WI 54971 0990 Dye Extractor Cabinet Hardmount Unidye and Heynau Controllers Mod...

Страница 2: ...mber Familiarization Guide 2 6 Machine Dimensions 2 8 Dimensional Clearances 2 10 Machine Foundation 2 10 Mechanical Installation 2 12 Expansion Bolt Installation 2 13 J Bolt Installation 2 14 Elevate...

Страница 3: ...F232048 LL RS ULJKW 5D WKHRQ RPPHUFLDO DXQGU OO ULJKWV UHVHUYHG 1R SDUW RI WKLV ERRN PD EH UHSURGXFHG RU WUDQVPLWWHG LQ DQ IRUP RU E DQ PHDQV ZLWKRXW WKH ZULWWHQ SHUPLVVLRQ RI WKH SXEOLVKHU...

Страница 4: ...terminals Only qualified personnel familiar with electrical test procedures test equipment and safety precautions should attempt adjustments and troubleshooting Disconnect power from the machine befo...

Страница 5: ...DWHULDOV 7KLV ZDUQLQJ V PERO LQGLFDWHV WKH SUHVHQFH RI KRW VXUIDFHV WKDW FRXOG FDXVH VHULRXV EXUQV 6WDLQOHVV VWHHO DQG VWHDP OLQHV FDQ EHFRPH H WUHPHO KRW DQG VKRXOG QRW EH WRXFKHG 7KLV ZDUQLQJ V PERO...

Страница 6: ...1 3 Safety F232048 Safety decals appear at crucial locations on the machine Failure to maintain legible safety decals could result in injury to the operator or service technician Figure 1 1...

Страница 7: ...machine The machine should not start with the door unlocked c Close and lock the door and start a cycle Attempt to open the door while the cycle is in progress The door should not open If the door loc...

Страница 8: ...for machines in installations where floor space is shared with equipment sensitive to radio frequency emissions Elevation If the machine is to be operated at elevations of over 3 280 feet 1 000 meter...

Страница 9: ...ed at a pressure of 90 95 psi 6 0 6 3 bar Drainage System Provide drain lines or troughs large enough to accommodate the total number of gallons that could be dumped if all machines on the site draine...

Страница 10: ...erter drive to generate nuisance errors If input voltage measures above 240V for a Q voltage machine above 415V for a P voltage machine or above 480V for an N voltage machine either ask the power comp...

Страница 11: ...1 8 Notes F232048 Safety...

Страница 12: ...SHHG LV GLVSOD HG RQ WKH 3DQHO9LHZ VFUHHQ 8QL H PDFKLQHV DOVR KDYH YDULDEOH VSHHG H WUDFWLRQ WUDFWLRQ VSHHG FDQ EH SURJUDPPHG WR UXQ DW DQ VSHHG XS WR WKH PD LPXP VSHHG RI WKH SDU WLFXODU PDFKLQH LQ L...

Страница 13: ...WUROOHG PDFKLQHV VDOW FKHPLFDO SRUW LV SURYLGHG VR WKDW VDOW RU RWKHU VXEVWDQFHV QRW VXLWDEOH IRU XVH LQ WKH DX WRPDWLF VXSSO GLVSHQVHU FDQ EH DGGHG GXULQJ WKH G H F FOH OHFWULFDO FRQWUROV DORQJ ZLWK...

Страница 14: ...2 3 Installation F232048...

Страница 15: ...m3 81 7 2 32 129 9 3 69 145 5 4 12 Wash Cylinder Information Cylinder diameter in mm 21 533 26 25 667 30 762 Cylinder depth in mm 13 75 349 18 375 467 20 508 Cylinder volume ft3 l 2 76 78 1 5 76 163 1...

Страница 16: ...rrier and file a written claim immediately Customer Service If literature or replacement parts are required contact the source from whom the dye extractor was purchased or contact Raytheon Commercial...

Страница 17: ...city cylinder volume in liters H A Type of Electrical Control H Heynau ES24 S A Unidye V Variable Speed Q P N Electrical Characteristics Q 200 240V 50 60Hz 3Ph 3 wire 120V Control P 380 415V 50 60Hz 3...

Страница 18: ...ne Operation Parameters 8 Machine Mass 3 Required Circuit Breaker Size for Electrical Connection Do not use fuses 9 Machine approval as applicable 4 Electrical Connection Data Amps 10 Steam Heat Conne...

Страница 19: ...e 2 2 Dimension 75 160 230 Dimension 75 160 230 in mm in mm in mm in mm in mm in mm A 51 25 1302 58 1473 60 25 1530 K 2 5 64 2 375 60 2 25 57 B 9 229 10 254 10 254 L 8 203 5 127 5 127 C 26 660 30 125...

Страница 20: ...48 Figure 2 2 1 Drain 5 Air Inlet 2 Condensate Cooling return 6 Hot water inlets 3 Cooling water inlet 7 Cold water inlet 4 Electrical connection 8 Steam Inlet B C E A M L D P N O R T S Q I F G H K 7...

Страница 21: ...ation work to insure a stable unit installation eliminating possibilities of excessive vibration during extract The machine must be secured to a foundation or floor of adequate construction The floor...

Страница 22: ...Static and dynamic loads on the floor or foundation are shown in the table below This table can be used as a reference when designing floors and foundations If the existing floor fails to meet these...

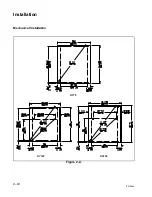
Страница 23: ...Installation 2 12 F232048 Mechanical Installation Figure 2 4 UY75 UY160 UY230...

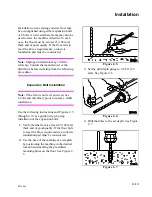
Страница 24: ...Bolt Installation Note If the floor is not level and even use J bolts and machinery grout to ensure a stable installation Use the following instructions and Figures 2 5 through 2 10 as a guide to ste...

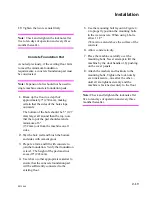
Страница 25: ...ocknuts after five to ten days of operation and every three months thereafter J Bolt Installation Install J bolts in concrete per the mounting bolt layout in Figure 2 4 Use the following instructions...

Страница 26: ...the door handle or by pushing on the cover panels 6 If the mounting surface is level and even and grouting is not desired place the washers and lock nuts on the mounting bolts and skip to step 11 Whe...

Страница 27: ...rain away 11 Attach the washers and locknuts to the J bolts 12 Tighten the lock nuts by even increments one after the other until all are tightened evenly and the machine is fastened securely to the f...

Страница 28: ...ctions as a guide to step by step installation of the elevated base frame 1 Use the elevated base frame as a template by positioning the frame in the desired location and marking the pre drilled mount...

Страница 29: ...g should be approximately 1 2 13 mm wide to allow any surface water build up under the base of the machine to drain away 9 Attach the washers and locknuts to the J bolts after the grout has hardened 1...

Страница 30: ...ith cement grout 3 Prepare a form and fill with concrete to join the foundation Verify that foundation is level The height of the pad must not exceed 8 203 mm 4 Use rebar or other appropriate material...

Страница 31: ...or using elbows or bends decreases the flow rate and increases drain times impairing machine performance If the machine is equipped with the optional indirect steam heating water cooling option drain...

Страница 32: ...the basket to rotate at high speeds with the door open When using a parameter unit to control the AC inverter drive a large sign should be placed on the front of the machine warning people of the imm...

Страница 33: ...manufacturer for assistance Use wire size indicated in the Voltage Designation Chart for runs up to 50 feet Use next larger size for runs of 50 to 100 feet Use two sizes larger for runs greater than 1...

Страница 34: ...National Electric Code or other applicable codes The connection must be made by a qualified electrician using the wiring diagram provided with the machine See the table below for correct wire sizes Ro...

Страница 35: ...machines will require proportionately larger water lines See the adjacent table Suitable air cushions should be installed in supply lines to prevent hammering If the water pressure is above 60 psi fle...

Страница 36: ...directly into a closed drain system Steam Supply Information Steam inlet connection size in mm 1 2 NPT 13 Number of steam inlets 1 Recommended pressure psi bar 50 3 4 Maximum pressure psi bar 80 5 4...

Страница 37: ...handle button and turning the handle clockwise b Attempt to start the machine with the door open The machine should not start with the door open c Close the door without locking it and attempt to sta...

Страница 38: ...the machine for leaks 2 Inspect steam hose connections for leaks 3 Verify that insulation is intact on all external wires and that all connections are secure If bare wire is evident call a service tec...

Страница 39: ...e s top front and side panels with mild detergent Rinse with clean water 5 Leave loading door open at the end of each day to allow moisture to evaporate Weekly 1 Check the machine for leaks a Start an...

Страница 40: ...en motor mounting bolt locknuts and bearing bolt locknuts if necessary 5 Use compressed air to clean lint from motor 6 Clean interior of machine both basket and shell by wiping with a water soaked spo...

Страница 41: ...emoved with detergent and water The metal should be thoroughly rinsed and dried after washing Periodic cleaning will help to maintain the bright surface appearance and prevent corrosion 2 Contact with...

Страница 42: ...ring with a powder or by employing special chemical solutions 7 Sanitizers or sterilizing solutions should not be left in stainless steel equipment for prolonged periods of time They often contain chl...

Страница 43: ...r lock and interlock before starting operation a Attempt to start the machine with door open b Close the door without locking it and attempt to start the machine c Close and lock the door start a cycl...

Страница 44: ...__________ Operator ___________________________ Month __________ Week Ending Checks OBSERVE ALL SAFETY WARNINGS 1 Check the machine for leaks a Start an unloaded cycle to fill the machine b Verify tha...

Страница 45: ...t or adjustment a Check V belt s for uneven wear and frayed edges b Verify that V belt s is are properly aligned 3 Remove back panel and check hoses for leaks 4 Tighten motor mounting bolt locknuts an...

Страница 46: ...INGS Disconnect power to the machine before performing the quarterly maintenance procedures 1 Tighten door hinges and fasteners if necessary 2 Tighten anchor bolts 3 Check all painted surfaces for bar...

Страница 47: ...3 10 NOTES F232048 Maintenance...

Страница 48: ...machine to drain Then disconnect drain hose from the machine 4 Turn off air supply and disconnect air hose 5 Disconnect steam hoses a Turn off steam supply and allow time for the valves to cool b Disc...

Страница 49: ...4 2 NOTES F232048 Removal From Service...

Отзывы: