18
2-5
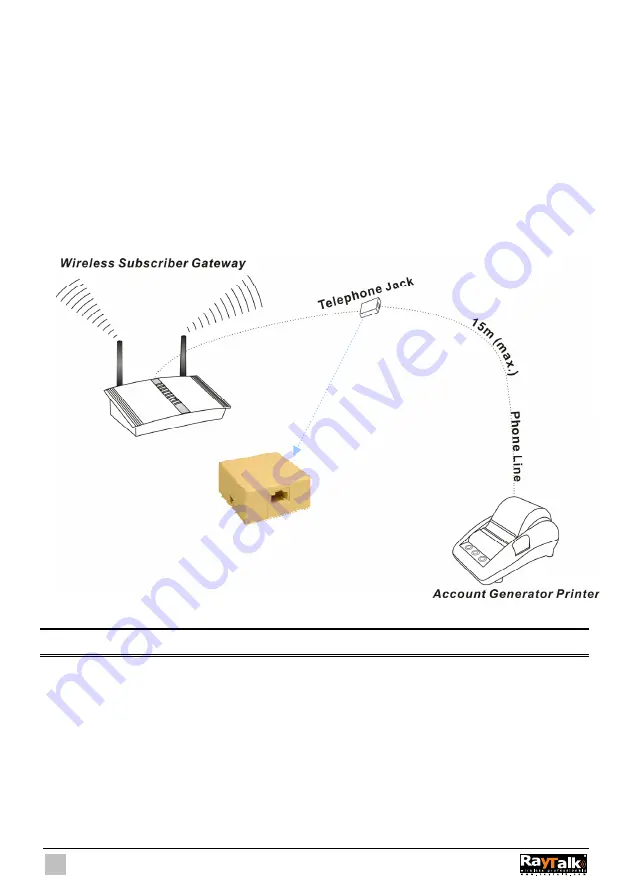
How expanding your Account Generator Printer’s distance
1. Place the Wireless Subscriber Gateway and Account Generator Printer on a flat work surface.
2. Connect the DB9 connector of printer cable to the Wireless Subscriber Gateway’s device port at the
rear panel of the device.
3. Connect the other end of the printer cable to the telephone jack’s RJ11 port.
4. Use the phone line (2-pair
cable with RJ11 plugs
) to connect the Account Generator Printer’s RJ11
port at the rear panel of the device.
5. Connect the other end of the phone line to the telephone jack’s RJ11 port. Check that the account
generator printer status LED lights.
6. Done.
Figure 2-5 Account Generator Printer Connection
Note:
By using the phone line you can increase the maximum distance up to 15 meter.
Telephone surface jack
Содержание RA-490
Страница 1: ......
Страница 2: ...2 RA 490...
Страница 37: ...37 Figure 3 20 Example Account Printout...
Страница 42: ...42 Figure 3 27 Example Post paid Printout...
Страница 45: ...45 3 2 1 System Define the Wireless Subscriber Gateway System configuration Figure 3 30 System Setting Screen...
Страница 59: ...59 3 2 5 RADIUS Authentication Figure 3 45 Authentication Setting Screen...
Страница 71: ...71 Figure 3 58 Account Generator Panel Figure 3 59 Web based Account Generator Printout Time to Finish...
Страница 72: ...72 Figure 3 60 PC connected Printer Printout Time to Finish...
Страница 73: ...73 Figure 3 61 Web based Account Generator Printout Accumulation...
Страница 77: ...77 Below is an example of the account printout Figure 3 67 Account Printout...
Страница 79: ...79 Below is an example of the account printout Figure 3 69 Account Printout...
Страница 88: ...88 3 2 9 Keypad Figure 3 79 Keypad Setting Screen...
Страница 95: ...95 Network Report Printout Figure 3 91 Network Report Printout Press ABCAB...
Страница 102: ...102 Figure 3 102 Logo Setting Screen Figure 3 103 Login Page...
Страница 109: ...109 Figure 3 116 Account Generator Printer Printout Figure 3 117 Account Generator Printer Printout...
Страница 111: ...111 Figure 3 120 Billing Setting Screen...
Страница 113: ...113 Figure 3 122 Service Selection Page Setting Screen iValidate net...
Страница 114: ...114 Figure 3 123 Service Selection Page Setting Screen Secure Pay...
Страница 115: ...115 Figure 3 124 Service Selection Page Authorize net...
Страница 116: ...116 Figure 3 125 Service Selection Page iValidate net...
Страница 117: ...117 Figure 3 126 Service Selection Page SecurePay...
Страница 118: ...118 Successful Page Figure 3 127 Successful Page Setting Screen...
Страница 145: ...145 3 2 22 Wireless Figure 3 154 Wireless Setting Screen...
Страница 151: ...151 Figure 3 158 System Status Screen...
Страница 167: ...167 3 5 2 Glossary of Terms Figure 3 189 Glossaries of Terms...


