background image

34

Operation

Remote Control

Your remote control has been programmed at the factory to operate with your garage door opener.

Up to 40 S 2.0

®

remote controls can be programmed to the garage door opener. Older Raynor

remote controls are NOT compatible, see page 39 for compatible accessories. Programming can be
done through the door control or the learn button the garage door opener. To program additional
accessories refer to the instructions provided with the accessory or visit www.raynor.com. If your vehicle is
equipped with a Homelink

®

, you may require an external adapter depending on the make, model, and

year of your vehicle. Visit www.homelink.com for additional information.

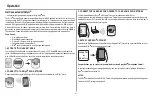
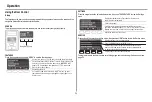
TO ADD, REPROGRAM, OR CHANGE A REMOTE CONTROL/KEYLESS ENTRY PIN USING THE
DOOR CONTROL

1. Press the navigation button below "MENU" to view the Features menu.
2. Use the navigation buttons to scroll to "PROGRAM".
3. Select "REMOTE" or "KEYPAD" to program from the program menu.
4.

Remote Control:

Press the button on the remote control that you wish to operate your garage

door.

Keyless Entry:

Enter a 4-digit personal identification number (PIN) of your choice on the

keyless entry keypad. Then press the ENTER button.

The garage door opener lights will flash (or two clicks will be heard) when the code has been
programmed. Repeat the steps above for programming additional remote controls or keyless entry
devices. If programming is unsuccessful, program the remote using the learn button.

Press

to continue.

TO REMOTE

Press

to continue.

1

2

3

OR

PIN

?

?

?

?

4

GHI

5

JKL

7

PRS

8

TUV

9

WXY

0

 QZ

*

#

ENTER

0

 QZ

*

#

ENTER

6

  MNO

4

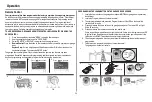
PROGRAM USING THE LEARN BUTTON ON THE GARAGE DOOR OPENER

1. Locate the Learn button on the garage door opener.

NOTE:

Your garage door opener may

look different.

2. Locate the Program button on the remote control.
3. To enter programming mode, press the Program button until the LED on the front of the

remote control turns on.

4. Press and release the Learn button on the garage door opener. The Learn LED will light.

Within 30 seconds...

5. Press and release the remote control button you want to use...

Check to see if the garage door opener light bulb blinks. If not, wait for the remote control LED
to light solid then slowly press and release the remote control button again. Repeat until the
light bulb blinks.DO NOT press the button after the light bulb blinks.

6. To exit programming mode, press any remote control button except the button that was just

programmed.

7. To test, press the programmed button on the remote control...

The garage door opener will activate.

1

2

3

4

5

7

6

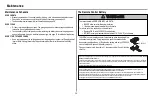
Program Button

Visor Clip

Learn 
LED

Yellow

Содержание 8550WRGD Admiral II

Страница 1: ...s s e l n u E S O L C T O N L L I W r o o d e h T is connected and properly aligned Periodic checks of the garage door opener are required to ensure safe operation Q y M h t i w e l b i t a p m o c Y L N O s i r e n e p o r o o d e g a r a g s i h T and Security 2 0 accessories r o o d e g a r a g e h t g n i l l a t s n i e r a u o y f i e r u t a e f e s o l C o t r e m i T e h t e l b a n e T O...

Страница 2: ...company them The hazard may come from something mechanical or from electric shock Read the warnings carefully Mechanical Electrical When you see this Signal Word on the following pages itwill alertyou to the possibility ofdamage to your garage door and or the garage door opener ifyou do notcomply with the cautionary statements that accompany it Read them carefully Unattended Operation The Timer to...

Страница 3: ...nician ifgarage door binds sticks or is outof balance An unbalanced garage door may NOT reverse when required l NEVER try to loosen move or adjustgarage door door springs cables pulleys brackets or their hardware ALL ofwhich are under EXTREME tension l Disable ALL locks and remove ALL ropes connected to garage door BEFORE installation and operating garage door opener to avoid entanglement To preve...

Страница 4: ...4 Tools Needed 3 16 5 32 5 16 7 16 1 2 5 8 9 16 1 4 7 16 Preparation ...

Страница 5: ... SmartControl Panel 41A3705 M White and red white wire N The Protector System Safety reversing sensors with white and white black wire attached Sending senor 1 receiving sensor 1 and safety sensor brackets 2 O Safety labels and literature P Rail grease Q Remote control model 893RGX Assembly Washered Bolt5 16 18 x 1 2 2 mounted in the top ofthe garage door opener Installation Hex Bolt5 16 18 x 7 8 ...

Страница 6: ...on the packing material to preventscratching 1 Remove the two bolts from the top ofthe garage door opener 2 Align the rail and the styrofoam over the sprocket Cutthe tape from the rail belt and styrofoam 3 Fasten the rail with the previously removed bolts 4 Position the beltaround the garage door opener sprocket 5 Attach the sprocketcover over the garage door opener sprocketand attach with hex scr...

Страница 7: ... one ofthe nutring slots and brace itfirmly againstthe trolley 3 Tighten the spring trolley nutwith an adjustable wrench or a 7 16 open end wrench abouta quarter turn until the spring releases and snaps the nutring againstthe trolley This sets the spring to optimum belttension Spring Trolley Nut To motor unit Nut ring slot Nut Ring Nut Ring AFTER RELEASE 1 1 4 3 18 cm BEFORE 1 2 5 cm 1 2 3 ...

Страница 8: ...7 NEVER connectgarage door opener to power source until instructed to do so 8 NEVER wear watches rings or loose clothing while installing or servicing opener They could be caughtin garage door or opener mechanisms 9 Install wall mounted garage door control l within sightofthe garage door l outofreach ofchildren atminimum heightof5 feet 1 5 m l away from ALL moving parts ofthe door 10 Place entrapm...

Страница 9: ...the line onto the header wall above the door You can fasten the header bracketwithin 4 feet 1 22 m ofthe leftor rightofthe door center only ifa torsion spring or center bearing plate is in the way or you can attach itto the ceiling when clearance is minimal Itmay be mounted on the wall upside down ifnecessary to gain approximately 1 2 1 cm Ifyou need to install the header bracketon a 2x4 on wall o...

Страница 10: ...sten the bracketsecurely to a structural supportwith lag screws Wall Mount Optional Mounting Holes Vertical Centerline of Garage Door Header Wall Header Bracket 2x4 Structural Support Door Spring Garage Door Highest Point of Garage Door Travel Horizontal Line Lag Screw 5 16 9 x 1 5 8 OPTION B CEILING INSTALLATION 1 Extend the vertical centerline onto the ceiling as shown 2 Center the bracketon the...

Страница 11: ...amage to garage door restgarage door opener rail on 2x4 placed on top section of door 1 Remove the packing material and liftthe garage door opener onto a ladder 2 Fully open the door and place a 2x4 laid flat under the rail A 2x4 is ideal for setting the distance between the rail and the door Ifthe ladder is nottall enough you will need help atthis point Ifthe door hits the trolley when itis raise...

Страница 12: ...fthe motor unitto the structural support 2 Cutboth pieces ofthe hanging bracketto required lengths 3 Drill 3 16 pilotholes in the structural supports 4 Attach one end ofeach bracketto a supportwith 5 16 18x1 7 8 lag screws notprovided 5 Fasten the opener to the hanging brackets with 5 16 18x7 8 hex bolts lock washers and nuts 6 Check to make sure the rail is centered over the door or in line with ...

Страница 13: ...or DEATH from a falling garage door l Ifpossible use emergency release handle to disengage trolley ONLY when garage door is CLOSED Weak or broken springs or unbalanced door could resultin an open door falling rapidly and or unexpectedly l NEVER use emergency release handle unless garage doorway is clear ofpersons and obstructions l NEVER use handle to pull door open or closed Ifrope knotbecomes un...

Страница 14: ...acket2 4 5 10 cm below the top edge ofthe door OR directly below any structural supportacross the top ofthe door 3 Mark drill holes and install as follows depending on your door s construction Metalorlight weight doors using a verticalangle iron brace between the doorpanelsupport and the doorbracket l Drill 3 16 fastening holes Secure the door bracketusing the two selfthreading screws Figure 1 l A...

Страница 15: ...oles as far apartas possible and attach using the bolts nuts and lock washers NOTE Ifthe holes do notline up reverse the straightdoor arm Selecttwo aligned holes as far apartas possible and attach using the bolts nuts and lock washers 5 Pull the emergency release handle toward the garage door opener until the trolley release arm is horizontal The trolley will re engage automatically when the garag...

Страница 16: ...tof5 feet 1 5 m where small children cannotreach and away from the moving parts ofthe door For gang box installations itis notnecessary to drill holes or install the drywall anchors Use the existing holes in the gang box NOTE Your productmay look differentthan the illustrations HARDWARE Screw 6ABx1 2 Drywall Anchors 2 Screw 6 32x1 2 1 Strip 7 16 inch 11 mm ofinsulation from one end ofthe wire and ...

Страница 17: ...ox or pre wired installations Do notpierce the wire with the staple as this may cause a shortor an open circuit 2 Strip 7 16 inch 11 mm ofinsulation from the end ofthe wire near the garage door opener 3 Connectthe wire to the red and white terminals on the garage door opener To insertor release wires from the terminal push in the tab with screwdriver tip 7 16 11 mm 2 3 1 Staple RED WHITE WHITE GRE...

Страница 18: ...n and the garage door opener lights will flash 10 times NOTE For energy efficiency the garage door opener will enter sleep mode when the door is fully closed The sleep mode shuts the garage door opener down until activated The sleep mode is sequenced with the garage door opener lightbulb as the lightbulb turns offthe sensor LEDs will turn off and whenever the garage door opener lights turn on the ...

Страница 19: ...or bracket No more than 6 inches 15 cm Carriage Bolt 1 4 20x1 2 Wing Nut 1 4 20 1 2 3 OPTION B WALL INSTALLATION Ifadditional clearance is needed an extension bracket notprovided or wood blocks can be used Make sure each brackethas the same amountofclearance so they will align correctly 1 Position the sensor bracketagainstthe wall with the curved arms facing the door Make sure there is enough clea...

Страница 20: ...age Bolt 1 4 20x1 2 Wing Nut 1 4 20 3 4 2 Wire the Safety Reversing Sensors PRE WIRED INSTALLATIONS Ifyour garage already has wires installed for the safety reversing sensors see page 20 HARDWARE Insulated Staple Not shown OPTION A INSTALLATION WITHOUT PRE WIRING 1 Run the wire from both sensors to the garage door opener Attach the wire to the wall and ceiling with the staples 2 Strip 7 16 inch 11...

Страница 21: ...ite black wire would connectto the purple wire 4 Atthe garage door opener strip 7 16 inch 11 mm ofinsulation from each end ofthe wires previously chosen for the safety reversing sensors Twistthe like colored wires together 5 Insertthe wires connected to the white safety sensor wires to the white terminal on the garage door opener Insertthe wires thatare connected to the white black safety sensor w...

Страница 22: ...outlet Ifthe plug doesn tfitinto your outlet contacta qualified electrician to install the proper outlet THERE ARE TWO OPTIONS FOR CONNECTING POWER OPTION A TYPICAL WIRING 1 Plug in the garage door opener into a grounded outlet 2 DO NOT run garage door opener atthis time TYPICAL WIRING OPTION B PERMANENT WIRING Ifpermanentwiring is required by your local code refer to the following procedure To ma...

Страница 23: ...rrectly Green LED Amber LED If the receiving sensor is in direct sunlight switch it with sending sensor so it is on the opposite side of the door invisible light beam SENDING SENSOR RECEIVING SENSOR IF THE AMBER LED ON THE SENDING SENSOR IS NOT GLOWING 1 Make sure there is power to the garage door opener 2 Make sure the sensor wire is notshorted broken 3 Make sure the sensor has been wired correct...

Страница 24: ...s designed with electronic controls to make setup and adjustments easy The adjustments allow you to program where the door will stop in the open UP and close DOWN position The electronic controls sense the amountofforce required to open and close the door The force is adjusted automatically when you program the travel NOTE Ifanything interferes with the door s upward travel itwill stop Ifanything ...
Страница 25: ...desired DOWN position NOTE The UP and DOWN Buttons can be used to move the door up and down as needed 5 Once the door is in the desired DOWN position press and release the AdjustmentButton The garage door opener lights will flash twice and the UP Button will begin to flash 6 Press and release the UP Button When the door travels to the programmed UP position the DOWN Button will begin to flash 7 Pr...

Страница 26: ...ntactwith the 1 1 2 inch board remove the board and open close the door 3 or 4 times to testthe adjustment Ifthe garage door opener continues to fail the safety reversal test call a trained door systems technician 1 2 3 Test the Protector System Withouta properly installed safety reversing sensor persons particularly small children could be SERIOUSLY INJURED or KILLED by a closing garage door 1 Op...

Страница 27: ...ry compartmentwith the terminals facing out 4 Connectred and black wires from the garage door opener to the corresponding terminals on the battery 5 Replace the battery cover 6 Plug in the garage door opener 7 Waitfor the green Battery Status LED to startflashing before proceeding to testthe battery Battery Status LED 2 Test the Battery 1 Unplug the garage door opener The battery status LED will e...

Страница 28: ...ener lights Timer to Close and Remote Close features are unavailable Battery Status LED GREEN LED All systems are normal l A solid green LED lightindicates the battery is fully charged l A flashing green LED indicates the battery is being charged ORANGE LED The garage door opener has lostpower and is in battery backup mode l A solid orange LED with beep sounding approximately every 2 seconds indic...

Страница 29: ...R use handle to pull garage door open or closed Ifrope knotbecomes untied you could fall 9 After ANY adjustments are made the safety reversal system MUST be tested 10 Safety reversal system MUST be tested every month Garage door MUST reverse on contact with 1 1 2 3 8 cm high object or a 2x4 laid flat on the floor Failure to adjustthe garage door opener properly increases the risk ofSEVERE INJURY o...

Страница 30: ...e garage door opener lights turn on the sensor LEDs will light The garage door opener will notgo into the sleep mode until the garage door opener has completed 5 cycles upon power up LIGHTS The garage door opener lightbulbs will turn on when the opener is initially plugged in power is restored after interruption or when the garage door opener is activated The lights will turn offautomatically afte...

Страница 31: ...connection process beep SETUP WIFI TO REMOTE 2 CONNECT TO THE MyQ Wi Fi NETWORK On your mobile device go to Settings Wi Fi and selectthe network with the MyQ prefix 3 CONNECT THE GARAGE DOOR OPENER TO YOUR HOME WI FI NETWORK Launch the web browser Safari or Chrome on your smartphone or tablet Enter setup myqdevice com into the browser address bar Follow the on screen prompts to connectthe garage d...

Страница 32: ...ontrol and keyless entry This feature is useful for added peace ofmind when the home is empty i e vacation TIMER TO CLOSE TTC DO NOT enable TTC ifoperating a one piece door TTC is to be used ONLY with sectional doors Factory defaultis setto off TTC can be setto automatically close your garage door from the fully open position after a specified period oftime 1 5 10 minute intervals or a custom sett...

Страница 33: ...l your garage door opener lights or a keyless entry SETTINGS Press the navigation button below the down arrow till you see TEMPERATURE to view the Settings menu Display the temperature in Fahrenheit or Celsius and show hide the temperature Select a language Set duration for garage door opener light to stay on after operation selectable range of 1 1 2 to 4 1 2 minutes Turn the Motion sensor off on ...

Страница 34: ...The garage door opener lights will flash or two clicks will be heard when the code has been programmed Repeatthe steps above for programming additional remote controls or keyless entry devices Ifprogramming is unsuccessful program the remote using the learn button Press to continue TO REMOTE Press to continue 1 2 3 OR PIN 4GHI 5JKL 7PRS 8TUV 9WXY 0QZ ENTER 0 QZ ENTER 6MNO 4 PROGRAM USING THE LEARN...

Страница 35: ...ent Button To Open the Door Manually To preventpossible SERIOUS INJURY or DEATH from a falling garage door l Ifpossible use emergency release handle to disengage trolley ONLY when garage door is CLOSED Weak or broken springs or unbalanced door could resultin an open door falling rapidly and or unexpectedly l NEVER use emergency release handle unless garage doorway is clear ofpersons and obstructio...

Страница 36: ...stop flashing when the battery is low and needs to be replaced To replace battery open the case as shown Insertbattery positive side up Replace the battery with only 3V CR2032 coin cell batteries Dispose ofold battery properly Pry open the case firstin the middle 1 then ateach side 2 and 3 with the visor clip 3V CR2032 1 2 3 NOTICE To complywith FCC and orIndustryCanada IC rules adjustmentormodifi...

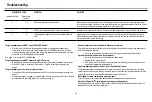
Страница 37: ... sensors to ensure both LEDs are steady and notflickering Make sure nothing is hanging or mounted on the door thatwould interruptthe sensors path while closing 1 5 Door moves 6 8 stops or reverses Manually open and close the door Check for binding or obstructions such as a broken spring or door lock correctas needed Check wiring connections attravel module and atthe logic board Replace travel modu...

Страница 38: ...n the garage Ensure the Wi Fi signal is reaching the garage see page 3 The garage dooropenercan beep forseveralreasons l Ifapplicable Operating on battery power or the 12 Vdc battery needs to be replaced see page 27 l Garage door opener has been activated through a device or feature such as Timer to Close garage door monitor or MyQ InternetGateway see page 30 My doorwillnot close and the light bul...

Страница 39: ...Compatible with Raynor garage door openers manufactured since 1997 Also compatible with Encrypted DIP for gate applications Accessories 823LM Remote Light Switch Automatically control your lights using your garage door opener a SECURITY 2 0 remote control or a MyQ Internet Gateway Simply replaces your current wired wall switch 825LM Remote Light Control Automatically control your lights using your...

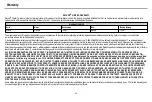
Страница 40: ...ERCHANTABILITY AND FITNESS FOR A PARTICULAR PURPOSE ARE LIMITED IN DURATION TO THE APPLICABLE LIMITED WARRANTY PERIOD SET FORTH ABOVE FOR THE RELATED COMPONENT S AND NO IMPLIED WARRANTIES WILL EXIST OR APPLY AFTER SUCH PERIOD Some States and Provinces do not allow limitations on how long an implied warranty lasts so the above limitation may not apply to you THIS LIMITED WARRANTY DOES NOT COVER NON...

Страница 41: ...41 Notes ...

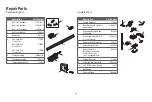
Страница 42: ...m 2770BD 5 Trolley Assembly 41B3869 3A 6 Tensioner Assembly 41B4103 7 Trolley Threaded Shaft 109B48 Description Part Number 1 Curved Door Arm 178B35 2 Door Bracket with Clevis Pin and Fastener 41A5047 1 3 Emergency Release Rope and Handle 41A2828 4 Header Bracket with Clevis Pin and Fastener 41A4353 1 5 Remote Control Visor Clip 29B137 6 Safety Sensor Bracket 41A5266 1 7 Safety Sensor Kit Receivin...

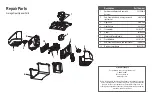
Страница 43: ...d Panel with all labels and light socket 041A8198 10 Receiver Logic Board 050DCTWF Garage Door Opener Parts Contact Information Before calling please have the model number of the garage door opener If you are calling about a Troubleshooting issue it is recommended that you have access to your garage door opener while calling If you are ordering a repair part please have the following information p...

Страница 44: ...Wi Fi is a registered trademark of Wi Fi Alliance 2016 The Chamberlain Group Inc 114A4861 All Rights Reserved ...

Отзывы: