background image

RAYFace    4. Operating Software 

66 


Settings 

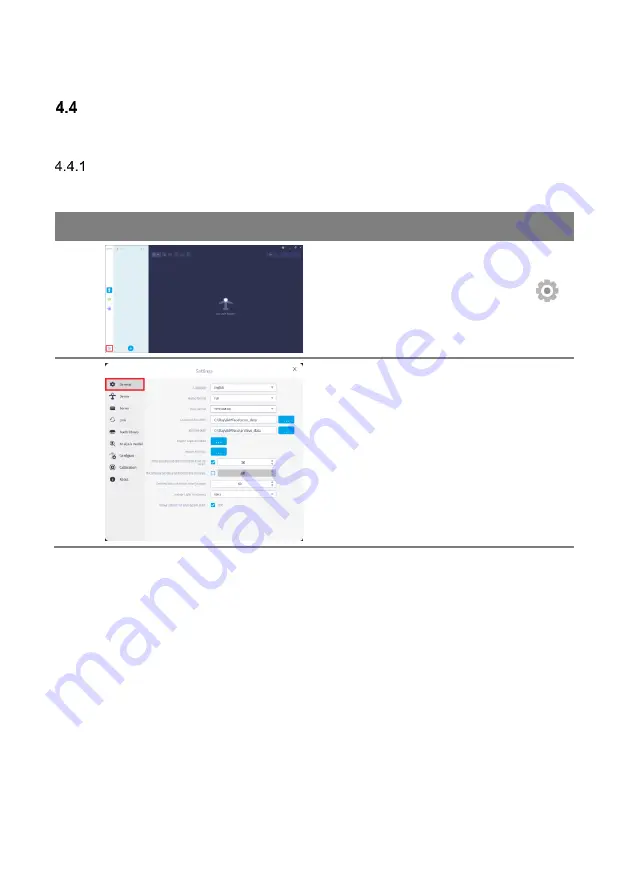
A user can change various settings of RAYFace, IP address, update firmware.   


General Settings 

Set the language, name format, data retention time, data path and import captured data.   

No. 

Figure 

Description 


Run  the  RAYFace  software  and  click  [

 ] 

button.   


Go to [General] tab.   


Содержание FACE

Страница 1: ...RAYFace 3D Scanner Model RFS200 User Manual RUG 3623 EN Rev 1 0...

Страница 2: ...injury to the operator and damage to the product Copyright Ray Co Ltd Publication number RUG 3623 EN_Rev 1 0 Revised Sep 01 2022 This manual is subject to quality upgrade and specification change with...

Страница 3: ...ntended use 13 Components 13 Sections and Functions Scanner Body 14 Sections and Functions Calibration Kit 15 Installation 17 Installation Environment 17 Installation Setting 17 Working Environment 18...

Страница 4: ...ct 42 Capture 43 Capture 43 Capture Options 46 Captured Data Management 50 Validate Captured Data 50 Unreconstructed Data Management 52 Reconstructed Data Management 54 Move Captured Data 58 Export Ca...

Страница 5: ...RAYFace 1 Introduction 5 Introduction 1...

Страница 6: ...enshot on the user manual might differ from actual ones depending on the software version of the product Related Terms Some terms used in this manual may be used interchangeably as follows 1 RAYFace i...

Страница 7: ...es are performed Use only genuine parts approved or provided by the manufacturer in this product Service and repairs due to equipment failure caused by not using genuine products are not covered under...

Страница 8: ...ibration or strong shock might occur Install the product in a place that meets the operating temperature conditions Use the product at temperature between 10 C to 35 C 50 F to 95 F Install the product...

Страница 9: ...nditions of the product Precautions for Use Risk of malfuction equipment failure or bodily injury Do not place heavy objects on top of the product Do not disconnect the power cord during operation If...

Страница 10: ...ove the power cord if the product emits strange sound smell or smoke and contact the seller Use with a rated voltage Use an outlet or multi outlet with a ground terminal that meets the rated voltage c...

Страница 11: ...ng Soak it with a little bit of water to clean the product and be careful not to get water on the inside Use after removing any dust or water from the power cord pin Do not use thinner alcohol benzene...

Страница 12: ...RAYFace 2 Product Introduction 12 Product Introduction 2...

Страница 13: ...t is a scanner which creates a 3D model by photographing a human face with multiple cameras Components Scanner body AC Adapter Power Cord Quick Guide Screwdriver Screws Calibration body Calibration ba...

Страница 14: ...e the equipment status 6 Left Camera Camera to scan an image from the left 7 Right Camera Camera to scan an image from the right 8 Bottom Camera Camera to scan an image from the bottom 9 Teeth Cam L C...

Страница 15: ...Functions Calibration Kit Front Side Rear Item Description 1 Face Cam Cal Pattern Panel that calibrates the cameras front and rear panels are used for calibration 2 Teeth Cam Cal Pattern 3 Main Body...

Страница 16: ...RAYFace 3 Installation 16 Installation 3...

Страница 17: ...t should be installed on a level surface within 1 of inclination and on a table capable of stably supporting a weight of 44 lb 20 kg or more and an area of 20 in x 20 in 50 cm x 50 cm or larger Remove...

Страница 18: ...t room temperature between 10 C to 35 C 50 F to 95 F 3 Do not install near a wireless apparatus or mobile device that generates electromagnetic interference 4 Do not move the product during operation...

Страница 19: ...ernet Operating System Microsoft Windows 10 x64 Microsoft Windows 11 x64 Microsoft Windows 10 x64 Microsoft Windows 11 x64 Laptop Item Minimum Requirements Recommended Requirments CPU Intel Core i5 10...

Страница 20: ...problems such as damage in product itself Do not throw away the packaging after the installation For warranty service the product must be brought into the service center in its original packaging Peri...

Страница 21: ...ht arms of main body Take out the main body from the packaging place it on the table rotate the arm and prepare as shown in the figure below While pulling each plunger handle rotate the left and right...

Страница 22: ...dapter specifications Connect the power cord and AC adapter as shown in the following figure Please contact your local distributor if the product and the enclosed power cord are different from those u...

Страница 23: ...power switch for 2 seconds to power up Press and hold the main power switch for 4 seconds to power down Connect to Network Connect the RAYFace to a computer or network using a network cable as shown i...

Страница 24: ...between computer and RAYFace When connecting the computer and RAYFace directly set a static IP addresss on the computer The IP address applied to the computer should be set differently from RAYFace 2...

Страница 25: ...Installation 25 Connect to PC IP information can be modified by connecting RAYFace to a PC using a USB cable as shown in the figure below The USB cable only needs to be connected for modifying IP inf...

Страница 26: ...RAYFace 3 Installation 26 Assemble Calibration Kit Assemble the calibration kit by using the included screws and screwdriver...

Страница 27: ...to the front of the base and align it in the correct position Make sure to insert the calibration base correctly until the printed side is not visible Connect the calibration port on the back of the R...

Страница 28: ...e RAYFace software by running the installation file At this time a warning window will pop up asking if the user continues the installation on the user administration account Click Yes button and cont...

Страница 29: ...t up for the installation has been completed Click Install button to continue the installation process 6 Wait until the RAYFace installation has been completed 7 Click Finish button to close the setup...

Страница 30: ...llation 30 RAYFace Screen Composition No Item Description 1 Menu Subject list acquisition settings etc can be set 2 Subject list Subject list can be viewed and managed 3 Image list Subject s scanned i...

Страница 31: ...tallation 31 Register Scanner No Figure Description 1 Connect RAYFace and PC with the provided USB cable 2 Execute the software and click button 3 Go to Device tab 4 Click button and Add device window...

Страница 32: ...click the Search button to find the COM port connected to the scanner 6 If there is no COM port connected to the PC the message will be displayed 7 If the PC does not have a COM port connected to the...

Страница 33: ...twork settings and clicking the Save button saves the network settings to the scanner and registers the scanner to the PC 10 In case of updating the scanner s firmware you can update the firmware afte...

Страница 34: ...Scan CBCT the user can register the server in order to import the CT data and Object Scan data and merge them with Smile Scan data No Figure Description 1 Start the Program and press button 2 Move to...

Страница 35: ...ith the inserted information the pop up window as shown on the left will appear 6 When RAYScan server is not able to connect with the inserted information the pop up window as shown on the left will a...

Страница 36: ...RAYFace 3 Installation 36 9 When the correct IP address for the RAYScan server has been entered and Save button has been pressed the RAYScan server IP address will be stored...

Страница 37: ...will be deactivated on that data on the client PC and will be moved to server PC s archive folder Archived data can be accessed either from the client or server PC and re synced if the user wants to...

Страница 38: ...tered RAYFace server cannot be connected the pop up window as shown on the left will appear 3 Once the RAYFace server connects it will be added to the server list and the connection status icon will a...

Страница 39: ...to Link menu 3 For Exocad integration set the path for DentalDB and DentalCADApp Once the path has been designated RAYFace utilizes the DentalDB to create a case and save data Once the Using RAYFace i...

Страница 40: ...RAYFace 3 Installation 40 4 Assign the path for Dolphin Once the path has been assigned the user can start Dolphin with the data created under RAYFace...

Страница 41: ...RAYFace 4 Operating Software 41 Operating Software 4...

Страница 42: ...ct A user can register subjects No Figure Description 1 Clcik button to enter the subject registration screen 2 Enter ID name DOB Date of Birth gender and click OK button Refer to 4 4 1 2 Name Format...

Страница 43: ...dy the lights will be turned on and live view is displayed 4 Adjust the subject s position Keep your head straight and look at the top of the front camera Adjust the position of the mouth so that it i...

Страница 44: ...selected capture data is displayed Click button to return to the live view for more captures 8 Select the capure data and press button to reconstruct the captured data into a 3D model 9 Wait for the r...

Страница 45: ...RAYFace 4 Operating Software 45 11 Upon completion of capture click button to return to the list of subjects...

Страница 46: ...ature decreases the photo turns bluish If the ambient light uses a red color lowering the color temperature can neutralize the ambient light color 3 As the color temperature increases the photo turns...

Страница 47: ...AYFace 4 Operating Software 47 Adjust Brightness No Figure Description 1 You can adjust the brightness of the scanner s light under Brightness option 2 Adjust the brightness based on the ambient light...

Страница 48: ...ge even if it is flipped left to right On the left images captured from the left camera are displayed and the same on the right camera When flipped left to right each image is displayed inverted left...

Страница 49: ...rk No Figure Description 1 Among the scan data you can bookmark scanned photos Bookmarks are also displayed in the subject list and if a photo is bookmarked it cannot be deleted 2 You can bookmark a p...

Страница 50: ...ete the subject s captured data Validate Captured Data No Figure Description 1 Select a subject to display the related data 2 Captured data is grouped by date 3 Click a date to shrink or expand the da...

Страница 51: ...mn specify the scan type of data In the fourth column specify the bookmark condition 6 You can change the bookmark status by clicking the buttons for each scan data means that it is bookmarked You can...

Страница 52: ...er a certain period of time Refer to 4 4 1 1 General Settings for details about capture options 2 3D reconstruction in progress 3 3D reconstructed data will be displayed 4 Click button to open the pat...

Страница 53: ...ed or restored from recycle bin When all the data of the subject is permanently deleted the subject is also deleted Refer to 4 3 7 Deleted Data Management for details about capture options 7 Double cl...

Страница 54: ...a 2 3D reconstructed data is displayed 3 Click button to delete captured data 4 Deleted data can be permanently deleted or restored from recycle bin When all the data of the subject is permanently del...

Страница 55: ...an check the image by zooming in out by using the Mouse Scroll Wheel and move the image by dragging it while holding the Left Mouse Button 8 Click button to open the path that the original data is sto...

Страница 56: ...list or clicking the button to switch to full screen 13 Click the button to exit full screen 14 You can switch between perspective and orthographic views by clicking the button Perspective view shows...

Страница 57: ...RAYFace 4 Operating Software 57 16 You can save the reconstructed image by clicking the button 17 You can enter data alignment menu by clicking the button...

Страница 58: ...on 1 If you select the wrong subject you can move the scan data to another subject 2 Select the scan data that you want to move and click the button 3 Select the subject for whom you want to move the...

Страница 59: ...exporting smile and scout images to a file including the color information For OBJ and PLY files including texture files MTL PNG or BMP JPG JPEG files of the same name are created For OBJ and PLY file...

Страница 60: ...t the unreconstructed scan data you can save the RFS file to a specified path and with a specified name 6 When multiple scan data are specified and exported the each scan data of RFS file is saved in...

Страница 61: ...ister the subject in the list The name is registered only the full name and a separated name First and Last will not be registred Today is the default for DOB Date of Birth and Other is for gender whi...

Страница 62: ...be automatically generated or entered manually 6 You can import captured data from another computer in the Import captured data 7 You can run in to this error where captured data cannot be imported fr...

Страница 63: ...ured data folder 10 Captured data is saved under Scan_Data path by subject path by captured time To import only specific captured data copy and import the path by acquisition date time To import the e...

Страница 64: ...deleted data the remaining period until permanent deletion is displayed After the certain period the captured data will be permanently deleted Refer to 4 4 1 1 General Settings for details about captu...

Страница 65: ...leted data of the subject 8 Click OK button to proceed with restoration of all deleted data 9 Captured data can also be examined in the recycle bin Double click on the unreconstructed data to display...

Страница 66: ...n change various settings of RAYFace IP address update firmware General Settings Set the language name format data retention time data path and import captured data No Figure Description 1 Run the RAY...

Страница 67: ...AYFace will restart automatically 3 Go to Date Format and select your preference in the list 4 Go to Unreconstructed data retention time and set the retention period of data that has not been reconstr...

Страница 68: ...ed as a 3D model among the captured data will be permanently deleted after a specified period to reduce disk usage You can specify from 30 to 90 days Default 60 days If the check box is left unchecked...

Страница 69: ...ng system If the operating system s country setting is different from the actual one you have to set it according to the country s mains power supply specifications 8 If you set Show subject list at p...

Страница 70: ...ure Description 1 Go to Name Format and select your preference in the list 2 Full option allows to enter full name of a subject 3 FirstMiddleLast LastFirstMiddle LastMiddle First option allows the use...

Страница 71: ...ered separately the name is displayed according to the current language setting If you change the name format the display changes according to the changed format If you change the name format to Full...

Страница 72: ...not be designated as a new save data path 3 In order to maintain the consistency of captured data management all captured data of a subject are saved in the same path Therefore if the data path has be...

Страница 73: ...h for the data which only resides in RAYFace server as an archival data and are not synced Changing the path only affects the local PC where this option has been utlized this does not affect the data...

Страница 74: ...RAYFace 4 Operating Software 74 Device Settings A user can change the scanner s IP address and update the firmware No Figure Description 1 Run the RAYFace software and click button 2 Go to Device tab...

Страница 75: ...rovided USB cable 2 Select the COM port and click Connect button Click Search buttton to find the COM port if the computer has multiple COM ports 3 If there is no COM port connected to the computer th...

Страница 76: ...tware 76 5 If the selected COM port is not connected to RAYFace this message will appear 6 Click Connect button to load the scanner information Modify the network settings and click Save button to sav...

Страница 77: ...le of RAYFace 3 If the selected file is not the firmware file of RAYFace this message will appear 4 If the selected file does not support the version of RAYFace this message will appear 5 Selecting th...

Страница 78: ...culated When all the calibration values are within the reference value 0 1 the calibration result is automatically saved in the device If the calibration value is out of the reference value the calibr...

Страница 79: ...RAYFace 5 Status Indicator 79 Status Indicator 5...

Страница 80: ...cator is located at the front mirror of RAYFace 2 Yellow It indicates the booting state 3 Blue It indicates that the scanner is ready to shoot after the booting completes 4 Red Please restart RAYFace...

Страница 81: ...5 3 x 21 7 in Weight 9 5 kg 20 9 lbs Connectivity Ethernet USB White LED CCT 5700 K AC adapter Input 100 240V 50 60Hz 1 5A Output 24Vdc 3 75A Operation environment Temperature 10 35 C 50 95 F Humidity...

Страница 82: ...ile configure camera options There is a problem with the camera while preparing to capture Restart the device If the problem persists even after restart contact your sales representative There is a pr...

Страница 83: ...while preparing to capture Restart the device If the problem persists even after restart contact your sales representative A capture is in progress on another computer A capture is in progress on ano...

Страница 84: ...ary file Select the proper firmware binary file of RAYFace Unable to connect to device The IP setting has been changed or the network cable is disconnected Check the network cable connection and IP se...

Страница 85: ...not in the format xxx xxx xxx xxx or contiguous Enter a valid netmask A problem occurred during serial communication There is a problem with the scanner firmware Update the scanner firmware If the pr...

Страница 86: ...nother computer Exit the capure on another computer and try again Unable to initialize the network device There is a problem with the scanner board installed on the RAYFace Restart the device If the p...

Страница 87: ...The path where the captured data is saved has been selected as the import path Unable to import from the path where the captured data is saved Choose another path There is a problem with the database...

Страница 88: ...lease confirm whether the calibration kit has been attached properly inspect if there are any damages to the calibration kit see if the target pattern on the calibration kit appears within the capture...

Страница 89: ...YFace server is operating properly Check if the program exists in the set path Wrong program path has been assigned Please check and confirm whether the correct path has been assigned No link program...

Страница 90: ...vice pursuant to Part 15 of the FCC rules These limits are designed to provide reasonable protection against harmful interference This equipment generates uses and can radiate radio frequency energy a...

Страница 91: ...Ray Co Ltd All rights reserved...

Отзывы: