27
EN
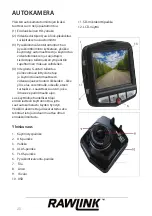
Power button (1)
Function A: on/off button
Press and hold this button to switch the
device on and off .
Function 2: night lights
In standby, short video and photo mode
this button is used to switch the night lights
on and off .
OK button (2)
Function 1: Start/stop video recording
In standby mode, press OK to start video
recording. Press OK again to stop video
recording.
Function 2: Camera
In photo mode, press OK to take a picture.
Function 3: File playback function
In playback mode, press OK to play and
pause video � les.
Function 4: Con� rm function
Saves an action in menu options.
Menu button (3)
Press the menu button to enter the video
settings menu in standby mode. In settings
mode, move to options using the Up and
Down buttons and press OK to select the
options. Press menu to exit.
Press the menu button to enter video
settings menu in photo mode. In photo
settings mode, move to options using the
Up and Down buttons and press OK to
select the options. Press menu to exit.
Down button (4)
Function 1
: Use this button to move down
the menu.
Function 2
: Increases volume. Press and hold
for fast forward.
Up button (5)
Function 1
: Use this button to move up the
menu.
Function 2
: Decreases volume. Press and
hold for rewind.
Function 3
: In video mode, press brie� y to
switch the microphone on and off .
Park monitor button (6)
Function 1
: Press this button before turning
off the camera. P will then be displayed in the
top right of the screen. The camera will enter
park monitor mode. When the camera is off , if
the car is involved in a crash, the camera will
turn on and begin recording automatically. It
will keep recording for 20 seconds then turn
off automatically again.
If you want to switch this function off , press
this button in standby mode. The P in the
upper right of the screen will disappear.
Mode button (7)
In video mode, press the Mode button to
enter camera mode.
In camera mode, press the Mode button to
enter playback mode.
In playback mode, press the Mode button to
enter video mode.

