background image

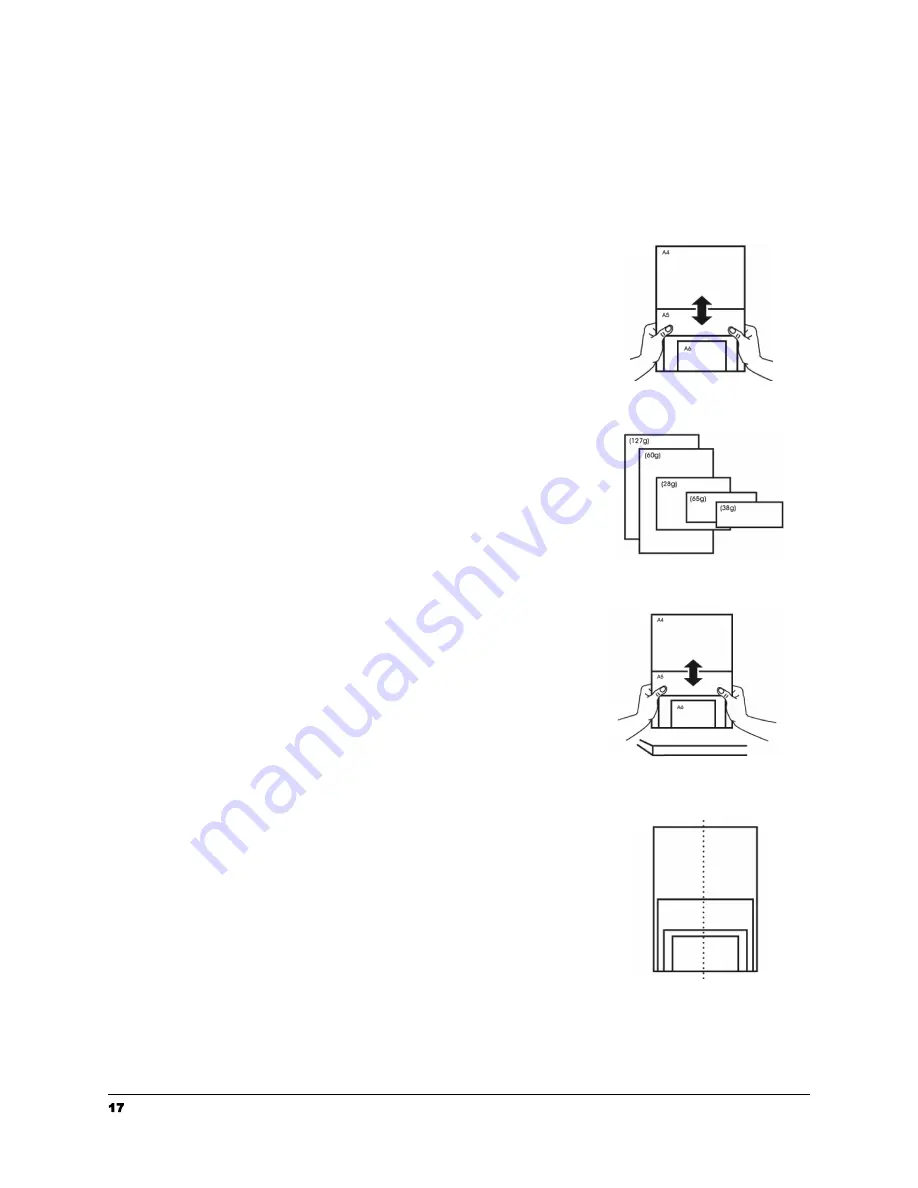
Scanning a Stack of Document with Various Sizes and Weights

When scanning a batch of documents with different sizes and weights, be sure to follow
the following guidelines to avoid a skewed image or a paper jam:

1. Align the documents TOP EDGE first in the sequence of

paper size from large to small.

2. If two pages are of the same size yet with different

weight, arrange these pages in the sequence of paper
weight from heavyweight to lightweight.

3. Align the edges of the documents by tapping the

bottom of the stack against the table top.

4. Center these pages in the document feeder and make

sure that the edges of page of the largest size slightly
touch the Paper Guide.

17

[email protected] | 1-800-713-9009 | raven.com/support

Содержание Original 2nd Generation

Страница 1: ...Raven Scanner Original 2nd Generation User Manual support raven com 1 800 713 9009 raven com support ...

Страница 2: ... operating environment improper maintenance or failure caused by a product for which the Manufacturer is not responsible or for cosmetic defects as long as such defects do not interfere with the functionality or performance of the Machine The warranty is voided by removal or alteration of Machine parts or identification labels Items not covered by the warranty Owner computer operating system appli...

Страница 3: ...MITATIONS MAY NOT APPLY TO YOU RAVEN S LIMITED WARRANTY DOES NOT APPLY TO A RAVEN PRODUCT THAT HAS BEEN SUBJECTED TO PHYSICAL DAMAGE AFTER PURCHASE CAUSED FOR EXAMPLE BY CASUALTY ACCIDENT ACTS OF GOD OR TRANSPORTATION INCLUDING A BY A FAILURE TO PROPERLY PACKAGE AND SHIP THE IMAGING PRODUCT BACK TO RAVEN FOR WARRANTY SERVICE IN ACCORDANCE WITH RAVEN S THEN CURRENT PACKAGING AND SHIPPING GUIDELINES...

Страница 4: ... LOST REVENUE PROFIT DATA OR FOR SPECIAL CONSEQUENTIAL INDIRECT INCIDENTAL OR PUNITIVE DAMAGES HOWEVER CAUSED AND REGARDLESS OF THE THEORY OF LIABILITY ARISING OUT OF THE USE OR INABILITY TO USE THE MACHINES EVEN IF MANUFACTURER HAS BEEN ADVISED OF THE POSSIBILITY OF SUCH DAMAGES IN NO EVENT WILL MANUFACTURER S LIABILITY WHETHER IN CONTRACT TORT OR OTHERWISE EXCEED THE PRICE PAID BY CUSTOMER The l...

Страница 5: ...ndicates further explanation or clarification Reading this is highly recommended WARNING To avoid hazardous electric shock or fire do not remove any covers or screws other than those specified in this manual CAUTION To reduce the risk of fire use only no 26AWG or larger telecommunication line cord Disconnect the power plug by pulling the plug not the cable Do not touch the metal fingers of the ADF...

Страница 6: ...which the receiver is connected Consult the dealer or an experienced radio TV technician for help This device complies with Part 15 of the FCC Rules Operation is subject to the following two conditions 1 This device may not cause harmful interference and 2 this device must accept any interference received including interference that may cause undesired operation FCC Caution Any changes or modifica...

Страница 7: ...ot place objects on top of the AC power cord and do not allow the AC power adapter or the AC power cord to be stepped on or run over Place the device and its AC power adapter near an electrical outlet where the AC power adapter can easily be unplugged If you use an extension cord with the device make sure that the total ampere rating of the devices plugged into the extension cord does not exceed t...

Страница 8: ...e may fall down and this may result in injury Do not place heavy objects on the unit It may cause unbalance and the device may fall down This may result in injury Store the AC Power cord USB cable bundled out of the reach of children to avoid the risk of injury Keep plastic bags bundled out of the reach of children to avoid the danger of suffocation If you are not going to use the device for a lon...

Страница 9: ...n the product also allows you to save the scanned image to an inserted USB flash drive Package Items Raven Scanner Original 2nd Gen Automatic Document Feeder Paper Tray Power Cord Quick Guide Note 1 Only use the AC adapter included in the machine Using other AC adapters may damage the machine and void the warranty 2 Please unpack the packing carefully and check the contents against the checklist I...

Страница 10: ...f the documents to prevent skewing of the scanned pages LCD Touch Panel Operate the scanner through the touch screen Power Button Press to turn on the power Output Tray Open to collect the document after scanned Extension Pull it out Documents are ejected from the ADF to the tray Paper Stopper Adjust to the length of the documents to prevent them from falling apart 9 support raven com 1 800 713 90...

Страница 11: ...to network with a LAN cable USB Port Connect to your computer via a USB cable to use the device as a regular scanner USB Flash Drive Port Connect your USB flash drive to this port Power Connector Connect the AC adapter to the scanner Kensington Security Slot Attach to a lock to secure the scanner 10 support raven com 1 800 713 9009 raven com support ...

Страница 12: ...d of the power cable to the power receptacle of the scanner Connect the other end to an appropriate power outlet ATTENTION Please make sure the scanner is turned OFF before you plug or unplug the scanner power adapter 2 2 Optional To use a wired internet connection connect one end of your Ethernet LAN cable to an available port of your Ethernet Hub router modem Connect the other end to the port ma...

Страница 13: ...an account 4 1 Sign in to your Raven account or sign 4 2 Welcome screen shows scan up for free options and displays quotes for fun Scan preview shows pages scanned You can change upload destination options 5 1 On scan preview screen you can 5 2 You can edit individual pages by combine separate files rearrange pages clicking on preview thumbnails or change file destination 12 support raven com 1 80...

Страница 14: ...ent with the first page facing up in the feeder One sided Face Down Choose to scan a single side of your document with the first page facing down against the feeder Two sided Face Down If you have a double sided document choose to scan both sides of your document with the first page facing down against the feeder Auto detect Automatically scan both sides and remove any blank pages without content ...

Страница 15: ...TP SFTP or FTPS drive or folder setup required Page Preview Page Preview Display previews of scanned pages for review and editing prior to sending to destinations No Page Preview Skip the previews and send directly to destinations after scanning Page Size Auto Scanner will auto detect page size and crop to the edges of the document max page size of 8 5 in x 14 in Letter Fixed letter page size of 8...

Страница 16: ... Raven account supports two factor authentication 2FA via phone call SMS text message or Authenticator App for added security When 2FA is enabled the authentication code will be required in order to sign in to your scanner or Raven Cloud account Once signed in to your scanner you will not need to re enter the 2FA code unless you log out To enable 2FA on your account follow these steps 1 Log into y...

Страница 17: ...e of staples paper clips paper sticky notes Loading Document s in the ADF Document Feeding 1 Load the stack of documents face down with the top of the pages pointing into the feeder 2 Verify that the paper guides are aligned with the edges of the stack by sliding the paper feed guides in the automatic feeder tray Feeding Tips To avoid occasional multi feeds or paper jams please fan your documents ...

Страница 18: ...nce of paper size from large to small 2 If two pages are of the same size yet with different weight arrange these pages in the sequence of paper weight from heavyweight to lightweight 3 Align the edges of the documents by tapping the bottom of the stack against the table top 4 Center these pages in the document feeder and make sure that the edges of page of the largest size slightly touch the Pape...

Страница 19: ...ents with the top of the pages pointing into the feeder 2 Verify that the paper guides are aligned with the edges of the stack by sliding the paper feed guides in the automatic feeder tray 3 Select Raven Cloud as the Destination 4 Press Scan 5 Preview thumbnails of the scanned pages and make any necessary edits Scanning Your Document to E mail Addresses 1 Load the stack of documents with the top o...

Страница 20: ...y visiting https app raven com connect 2 Load the stack of documents with the top of the pages pointing into the feeder 3 Verify that the paper guides are aligned with the edges of the stack by sliding the paper feed guides in the automatic feeder tray 4 Select SharePoint as the Destination 5 Press Scan 6 Preview thumbnails of the scanned pages and make any necessary edits Scanning Your Document t...

Страница 21: ...by visiting https app raven com connect 2 Load the stack of documents with the top of the pages pointing into the feeder 3 Verify that the paper guides are aligned with the edges of the stack by sliding the paper feed guides in the automatic feeder tray 4 Select Evernote as the Destination 5 Press Scan 6 Preview thumbnails of the scanned pages and make any necessary edits Scanning Your Document to...

Страница 22: ...e it will upload into the child folder However if you just type in child folder name then it will upload into that folder as well Additionally folders containing will not be accepted 7 USERNAME is the username that the user is set up for your SMB share if required 8 PASSWORD is the users password that is used to log in to your SMB share if required 9 Click TEST CONNECTION to verify connection Test...

Страница 23: ...re aligned with the edges of the stack by sliding the paper feed guides in the automatic feeder tray 3 Select the Destination option on the home screen and choose your destinations by tapping the destination rows individually until you have selected all destinations where you would like to send your document then choose Save Saving Contacts 1 From the main home screen press the gear in the top rig...

Страница 24: ...ort of your scanner Connect the rectangle end to the USB port at the rear side of your computer not provided 4 The computer should detect a new USB device and prompt a New Hardware Found message 5 Follow any on screen instructions clicking the Next button to continue If the certification screen appears click Continue Anyway to complete the installation 6 When the Finish dialog is prompted click th...

Страница 25: ... below to remove the paper 1 Press the ADF Release Button on the right side Gently open the Scanner Front Door to the left 2 Carefully pull the paper out of the ADF unit 3 Close the scanner front door Your Scanner is now ready to use 24 support raven com 1 800 713 9009 raven com support ...

Страница 26: ...lose the front door 4 Flatten the corners and edges Loosen the paper before putting it into the paper guide again 5 Check the feeding roller condition If necessary follow the cleaning directions and perform the cleaning Question Paper becomes skewed in the scanner Answer 1 Use the slide guide to keep the paper path straight 2 Check the condition of the feeding roller If necessary follow the cleani...

Страница 27: ...me the rollers and glass inside the scanner may become contaminated with ink toner particles or paper dust It is necessary to perform routine cleaning to ensure the optimum image quality and performance As a guideline please clean the rollers and glass after first 4 000 to 5 000 scans and then perform the cleaning on a weekly basis Note that the guideline varies according to the type of documents ...

Страница 28: ...en the front door to the left Wipe and rotate the ADF Roller until the surface is completely removed from dust 3 Wipe the rubber part of the ADF pad Be careful not to damage the pick springs 4 Close the scanner front cover Your scanner is now ready for use 27 support raven com 1 800 713 9009 raven com support ...

Страница 29: ...F Release button Open the front door to the left 2 Wet a clean cloth with some isopropyl alcohol 95 3 Wipe the glass and the white area as illustrated below to rid the dust or dirt 28 support raven com 1 800 713 9009 raven com support ...

Страница 30: ... 1 Pull the ADF Release lever 2 Locate the pull tab to the right and pull toward you 3 With the cover tray open locate the blue lever on the roller Push up to unlock the roller 4 Locate the white wheel to the right and gently pull the roller at an angle towards you to remove Reassembling Procedure 1 Insert the left end of the Reverse Roller to the hole of its original place 2 Insert the right end ...

Страница 31: ...r a replacement Disassembling Procedure 1 Press the ADF Release button to open the ADF front door 2 Push up on the cover to prop into a workable position 3 Pull the right side of the ADF roller towards you 4 The roller will detach and pull out of its setting Reassembling Procedure 1 Insert the left end of the ADF roller first to its slot and place the ADF roller to its proper position 2 One in pla...

Страница 32: ...th USB 3 0 Cable not included Internet Connectivity RJ 45 Ethernet 10 100 1000 Mb or Wi Fi Wi Fi Standard IEEE 802 11 b g n standards compliant Wi Fi Communication Mode 1T1R Mode Wi Fi Frequency Range 2 412 5GHz subject to local regulations Wi Fi Security WEP 64 128 TKIP WPA WPA2 mixed 802 1x and 802 11i Power Requirement 100 240V 50 60Hz 1 2A Max Power Source 24Vdc 2 0A Power Consumption Operatio...

Страница 33: ...Technical Support Raven 11150 S Wilcrest Drive Suite 200 Houston Texas 77099 1 800 713 9009 support raven com www Raven com 32 support raven com 1 800 713 9009 raven com support ...

Отзывы: