


Chapter 5
52
RoGator x54 Series (1996 & Older) AutoBoom Installation Manual
9.
Connect the machine’s tank hose to the opposite end of the installed tee fitting.
10.
Install the straight end of the supplied hydraulic hose (P/N 214-1000-136) on the 90° end of the installed tee
fitting.
11.
Connect the 90° end of the installed hydraulic hose to the fitting installed in Port T of the AutoBoom valve.
Install the Left and Right Cylinder Hoses
FIGURE 4.
Left and Right Cylinder Hoses Connected
1.
Disconnect the machine’s left raise hose from the elbow fitting in the rod-end of the machine’s left tilt
cylinder.
2.
Remove the machine’s orifice fitting installed in the elbow fitting on the rod-end of the left tilt cylinder.
3.
Install a 1/2” NPT M/M/F branch adapter tee fitting (P/N 333-0012-181) on the machine’s elbow fitting.
4.
Install the machine’s orifice fitting on the opposite end of the installed tee fitting.
5.
Connect the machine’s left raise hose to the orifice fitting.
6.
Install a 9/16” JIC (M) to 1/2” NPT (M) 90° elbow fitting (P/N 333-0012-158) to the 90° end of the installed
tee fitting.
7.
Install one end of the supplied hydraulic hose (P/N 214-1000-400) to the installed elbow fitting.
8.
Connect the other end of the supplied hydraulic hose to the fitting installed in Port LC of the AutoBoom
valve.
9.
Disconnect the machine’s right raise hose from the elbow fitting in the rod-end of the machine’s right tilt
cylinder.
10.
Remove the machine’s orifice fitting installed in the elbow fitting on the rode-end of the right tilt cylinder.
11.
Install a 1/2” NPT M/M/F branch adapter tee fitting (P/N 333-0012-181) on the machine’s elbow fitting.
12.
Install the machine’s orifice fitting on the opposite end of the installed tee fitting.
13.
Connect the machine’s right raise hose to the orifice fitting.
14.
Install a 9/16” JIC (M) to 1/2” NPT (M) 90° elbow fitting (P/N 333-0012-158) to the 90° end of the installed
tee fitting.
15.
Install one end of the supplied hydraulic hose (P/N 214-1000-400) to the installed elbow fitting.
16.
Connect the other end of the supplied hydraulic hose to the fitting installed in Port RC of the AutoBoom
valve.
Pre-Installation
Post-Installation
Orifice
Fitting
Raise
Hoses
Installed
Tee
Fitting
Содержание AutoBoom RoGator 54 Series
Страница 1: ...AutoBoom Installation Manual RoGator 54 Series 1996 Older ...
Страница 9: ...2 Manual No 016 0230 018 5 Introduction JIC fitting M ORFS fitting SAE O ring fitting ...
Страница 10: ...Chapter 2 6 RoGator x54 Series 1996 Older AutoBoom Installation Manual ...
Страница 20: ...Chapter 3 16 RoGator x54 Series 1996 Older AutoBoom Installation Manual Hydraulic Schematic ...
Страница 37: ...4 Manual No 016 0230 018 33 PowerGlide Plus PowerGlide Plus Hydraulic Schematic ...
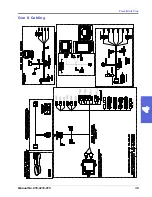
Страница 43: ...4 Manual No 016 0230 018 39 PowerGlide Plus Gen II Cabling ...
Страница 44: ...Chapter 4 40 RoGator x54 Series 1996 Older AutoBoom Installation Manual ...
Страница 45: ...4 Manual No 016 0230 018 41 PowerGlide Plus ...
Страница 46: ...Chapter 4 42 RoGator x54 Series 1996 Older AutoBoom Installation Manual ...
Страница 58: ...Chapter 5 54 RoGator x54 Series 1996 Older AutoBoom Installation Manual UltraGlide Hydraulic Schematic ...
Страница 65: ...5 Manual No 016 0230 018 61 UltraGlide UltraGlide Wiring Schematic Gen I Cabling ...
Страница 66: ...Chapter 5 62 RoGator x54 Series 1996 Older AutoBoom Installation Manual Gen II Cabling ...
Страница 68: ...Chapter 6 64 RoGator x54 Series 1996 Older AutoBoom Installation Manual PowerGlide Plus and UltraGlide Wheels ...
Страница 69: ...6 Manual No 016 0230 018 65 Replacement Parts Sensors ...
Страница 70: ...Chapter 6 66 RoGator x54 Series 1996 Older AutoBoom Installation Manual ...