background image

10

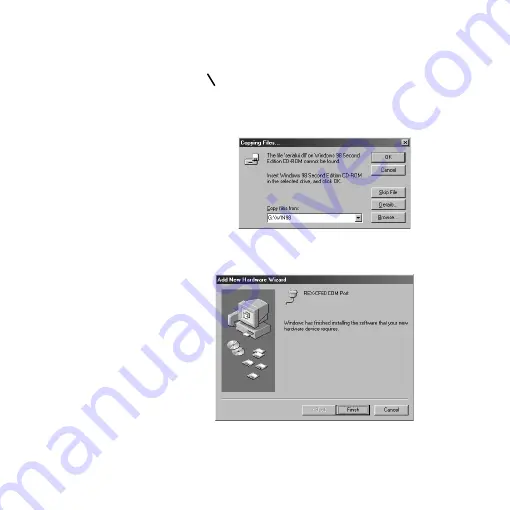
6)If the following message saying “The file xxxx.xxx on Windows 98 Second
   Edition CD-ROM cannot be found”(For the screen below, xxxx.xxx is
   serialui.dll) appears, type in G:  Win98 at the 

[Copy files from]

 and click


[OK]

.(G means your CD-ROM drive letter. If you CD-ROM drive letter

   isn’t G, change G to an appropriate drive letter)

7)The following screen will appear when the driver installation has completed.

You have now completed the driver installation. Proceed to 2-4.

Содержание CF60U

Страница 1: ...RS232C CF Card CF60U User s Manual JAN 2003 Rev 2 1 ...

Страница 2: ...strictions 4 1 4 Pin Assignment 5 1 5 Before installation 6 2 Installation 7 2 1 Connecting the CF60U 7 2 2 Windows 98SE Installation 8 2 3 Windows Me Installation 11 2 4 Confirming Windows 98SE Me Installation 12 2 5 Windows 2000 XP Installation 14 2 6 Confirming Windows 2000 XP Installation 17 ...

Страница 3: ...e program 19 B Visual Basic communication sample program 20 3 2 Installing the bundled sample program 21 3 3 Starting Terminal 23 3 4 FindComNum 25 3 5 Source Files 26 4 Troubleshooting 27 4 1 Windows 98SE Me 27 4 2 Windows 2000 XP 29 5 Registration and Tech Support 31 6 Specifications 32 Appendix 33 ...

Страница 4: ...read the file as well 1 1 Features Just plug in the CF60U into a CF Type II slot and COM port will be available in a snap Runs on Windows CE 3 0 based Pocket PC Handheld PC as well as Windows PC Embedded 16550 compatible UART Power saving design enables to run battery driven PDAs for a long time Max Transfer rate 115 2kbps Runs with 3 3V 5V power supply Standard DB 9 pin Male Can detach the CF60U ...

Страница 5: ... supplier immediately 1 3 System Requirements and Restrictions OS Windows XP 2000 Me 98SE Pocket PC Pocket PC 2002 based on Windows CE 3 0 Handheld PC 2000 based on Windows CE 3 0 PC PDA Pocket PC with CF Type II slot or PC Card Slot Handheld PC with CF Type II slot or PC Card Slot Windows PC with CF Type II slot or PC Card Slot For more information refer to our web site http www ratocsystems com ...

Страница 6: ...4 40 1 2 3 4 5 6 7 8 9 DB 9pin Male Pin Description 1 Data Carrier Detect DCD 2 Receive Data RD 3 Transmit Data TD 4 Data Terminal Ready DTR 5 Signal Ground SG 6 Data Set Ready DSR 7 Request to Send RS 8 Clear to Send CS 9 Ring Indicate RI The pin assignment of the connector is as follows This DB 9pin connector complies with OADG specifications ...

Страница 7: ...A or your PDA doesn t have an eject button stick this pull out sticker as shown below in order to pull CF Cards easily Direction of insert Stick the pull out sticker on the back Serial sticker Using cross cables You need to use the cross cable based on the figure as shown below if you use cross cables Signal Signal DTR DTR DSR DSR DCD DCD RTS RTS CTS CTS TXD TXD RXD RXD GND GND ...

Страница 8: ...i Connect the bundled cable to the CF60U iii If you insert the CF60U into a PC Card Slot you need to attach the CF60U to a CF Type II Adapter and then insert it into a PC Card Slot CF Type II Adapter is sold separately If you insert the CF60U into a CF Card Slot insert the CF60U into the slot If you are a Windows 98SE user proceed to 2 2 If you are a Windows Me user proceed to 2 3 If you are a Win...

Страница 9: ...are a Windows 98SE user follow the steps through 1 After inserting the CF60U the following screen will appear Insert the bundled CD ROM and click Next 2 Select the Search for the best driver for your device Recommended option and click Next ...

Страница 10: ... a check mark at a CD ROM drives option and click Next 4 Confirm the CF60 INF at the CD ROM was found and click Next 5 If the following message requiring you to insert Windows 98 Second Edition CD ROM click OK ...

Страница 11: ...xxx xxx is serialui dll appears type in G Win98 at the Copy files from and click OK G means your CD ROM drive letter If you CD ROM drive letter isn t G change G to an appropriate drive letter 7 The following screen will appear when the driver installation has completed You have now completed the driver installation Proceed to 2 4 ...

Страница 12: ...follow the steps through 1 After inserting the CF60U the following screen will appear 2 Insert the bundled CD ROM and just wait for a while Automatically the following screen will appear Click Finish You have now completed the driver installation Proceed to 2 4 ...

Страница 13: ...tion Follow the steps in order to confirm the driver has copied successfully 1 Right click on My Computer and select Properties Select the Device Manager tab 2 Double click REX CF60COM Port under the Ports COM LPT string to show its properties ...

Страница 14: ...13 3 Check Device status shows This device is working properly 4 Select the Resources tab and Conflicting device list shows No conflicts You have now completed confirming the driver installation ...

Страница 15: ...follow the steps through 1 After inserting the CF60U the following screen will appear If you are a Windows 2000 user click Next If you are a Windows XP user select the Install from a list or specific location Advanced option and click Next Don t install the bundled CD ROM ...

Страница 16: ...a Windows 2000 user Select the Display a list of the known drivers for this device so that I can choose a specific driver option and click Next If you are a Windows XP user select Don t search I will choose the driver to install option and click Next ...

Страница 17: ...andard port types as Manufacturers and Communications port as Models Then click Next 5 The following warning message will appear Click Yes 6 Follow on screen messages and complete the driver installation Proceed to 2 6 to confirm the driver installation ...

Страница 18: ... confirm the driver has copied successfully 1 Right click on My Computer and select Properties Select the Hardware tab and then click the Device Manager button 2 Double clikc Communications port COMn n is a number under the Ports COM LPT string in order to show its properties ...

Страница 19: ...18 3 Check Device status shows This device is working properly 4 Select the Resources tab and Conflicting device list shows No conflicts You have now completed confirming the driver installation ...

Страница 20: ...Win32Com c RS232Ccommunicationsampleprogram usingWin32 Communication API at the VcSamp folder at the Windows folder in the bundled CD ROM In order to run this sample program you need two PCs and connect them with a RS232C cross cable and then run this sample program on one PC and run a communication program such as Hyperterminal on the other PC When this program start the following window will app...

Страница 21: ...e bundled CD ROM In order to run this sample program you need two PCs and connect them with a RS232C cross cable and then run this sample program on one PC and run a communication program such as Hyperterminal on the other PC When this program start the following window will appear You can send receive characters with this program ...

Страница 22: ...have connected your Windows PC to your PDA as ActiveSync in order to install the driver The bundled CD ROM includes a sample program running on Pocket PC 2002 Pocket PC CPU Intel StrongARM SA1110 or Intel PXA 250 You can know the CPU of your PDA by going to Start menu System About ...

Страница 23: ...at the WinCE folder to install the CF60 Application Library The following window will appear Click Yes 3 When the installation has completed the following window will appear Click OK Message on Windows PC Message on PDA ...

Страница 24: ...e program called Terminal will be copied to the following path 3 3 StartingTerminal 1 Run Terminal in the CF60 Application Library Before starting Terminal connect your PDA to your Windows PC with a RS232 cross cable ...

Страница 25: ...ion called FindComNum in the DLL installed into your PDA detects the COM port number assigned to the CF60U automatically Refer to 3 4 for more information on the function 3 The following window will appear Set up commu nication parameters and click OK 4 The following window will appear You can send or receive ASCII strings ...

Страница 26: ...ur PDA when you installed the sample program at Step 3 2 FindComNum BOOL APIENTRY FindComNum PCHAR ComNum CHAR DeviceName ComNum out address of variable to receive a COM port number DeviceName in device name Specify 1 as device name Return value 0 OK 1 Device name set up error 2 Registry key open error 3 COM Port assignment failed 4 The CF60U isn t inserted ...

Страница 27: ...ncludes source files of the dll FindComNum at the RexSerial folder and of the sample program Terminal at the Terminal folder If you make a program open RexSerial VCW or Terminal VCW with eMbedded Visual C 3 0 3 5 Source Files ...

Страница 28: ... Windows 98SE Me If the COM port number of the CF60U was assigned to COM 5 and you want to change the COM port number to COM 2 instead of COM5 follow the steps 1 Open Device Manager and double click REX CF60 COM Port COM5 under the Ports COM LPT string ...

Страница 29: ...box at Use automatic settings 3 Change Basic configuration xxxx at Setting based on Refer to the following table and change the I O address to the COM port number you want COM I O address COM1 3F8h 3FFh COM2 2F8h 3FFh COM3 3E8h 3EFh COM4 2E8h 2EFh ...

Страница 30: ... Windows 2000 XP If the COM port number of the CF60U was assigned to COM 5 and you want to change the COM port number to COM 2 instead of COM5 follow the steps 1 Open Device Manager and double click Communications Port COM5 under the Ports COM LPT string ...

Страница 31: ...30 2 Select the Port Settings tab and click Advanced 2 Select a COM port number you want at COM Port Number and click OK ...

Страница 32: ...d the latest version from our web site Technical Support You can get a Tech support from RATOC at the following Open Monday Friday 9 30A M to 5 00P M PST RATOC Systems International Inc Tech support Address 1933 O Toole Avenue Suite A109 SanJose CA 95131 U S A Phone 408 955 9400 Fax 408 955 9402 E mail int support rexpccard co jp Web http www ratocsystems com english Please include the following i...

Страница 33: ...ications Async Start bit 1bit Data bit 7 8 bit Parity bit Even Odd None Stop bit 1 1 5 2 bit Power Consumption 3 3V 5V 2 2mA at 3 3V without any device connected 8mA at 3 3V with devices connected 1 2mA at 5V without any device connected 11 8mA at 5V with devices connected Operating Requirements Temperature 32 to 131 F 0 to 55 C Relative Humidity 10 to 80 non condensing Size 1 68 in 42 8 mm W x 1 ...

Страница 34: ... may cause harmful interference to radio communications However there is no guarantee that interference will not occur in a particular installation If this equipment does cause harmful interference to radio or television reception which can be determined by turning the equipment off and on the user is encouraged to try to correct the interference by one or more of the following measures 1 Reorient...

Страница 35: ...34 ...

Страница 36: ......

Отзывы: