background image

32

OPERATING 

INSTRUCTIONS

NOTE: 

Before using the tool, read the 

instruction book carefully.
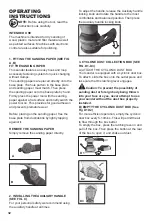
INTENDED USE

The machine is intended for dry sanding of 

wood, plastic, metal and filler material as well 

as painted surfaces. Machines with electronic 

control are also suitable for polishing.

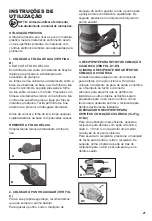
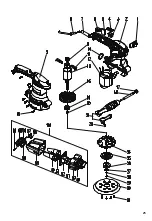
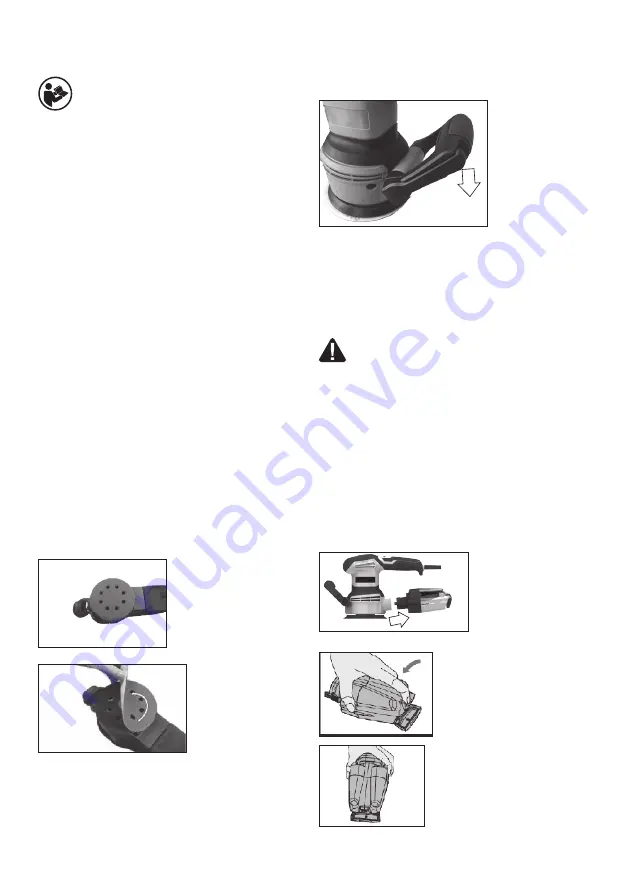
1. FITTING THE SANDING PAPER (SEE FIG 

A, B)

FIT THE SANDING PAPER 

This sander features an easy hook and loop 

accessory fastening system for quick changing 

without clamps.

The sanding papers are placed directly onto the 

base plate. The hole pattern in the base plate 

and sanding paper must match. Then press 

the sanding paper onto the base plate by hand. 

Firmly press the power tool with the sanding 

paper against a flat surface and briefly switch the 

power tool on. This provides for good adhesion 

and prevents premature wear

Before placing on the sanding paper, free the 

base plate from dust/debris by lightly tapping 

against it.

REMOVE THE SANDING PAPER

Simply remove the sanding paper directly.

A

B

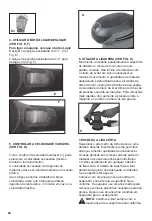
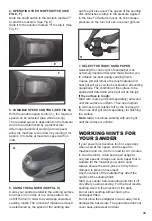
2. INSTALLING THE AUXILIARY HANDLE 

(SEE FIG. C)

For your personal safety we recommend using 

the auxiliary handle at all times.

To adjust the handle, release the Auxiliary handle 

locking knob and rotate the handle to the most 

comfortable and balanced position. Then press 

the Auxiliary handle locking knob.

C

3. CYCLONE DUST COLLECTION BOX (SEE 

FIG. D1-D3)

A) ATTACH THE CYCLONIC DUST BOX 

Your sander is equipped with a cyclonic dust box. 

To attach, slide the box onto the outlet piece and 

take care that the latching lever engages.

Caution: To prevent the possibility of 

sanding dust or foreign body being thrown 

into your face or eyes, never attempt to use 

your sander without the dust box properly 

installed.

B) EMPTY THE CYCLONIC DUST BOX (See 

Fig D1 D2)

For more efficient operation, empty the cyclonic 

dust box every 5-10mins. This will permit the air 

to flow through the box better. 

To empty the box, press the latching lever in and 

pull off the box. Then press the button at the rear 

of the box to open it, and shake out dust.

D1

D2

D3

Содержание LR400NM

Страница 1: ...Lixadeira exc ntrica...

Страница 2: ...Instrucciones en Espa ol Instru es Instructions in English...

Страница 3: ...ido apagado 3 Bolsa para el polvo 4 Sujeci n de la bolsa para el polvo 5 Base del pat n de lijado 6 Carcasa del motor 7 Empu adura 8 Bot n de bloqueo de la empu adura auxiliar No todos los accesorios...

Страница 4: ...o en funci n de los modos en que se utilice la herramienta de acuerdo a los siguientes ejemplos y otras variaciones de uso C mo se utiliza la herramienta y los materiales que se cortan o perforan Si l...

Страница 5: ...nsas a los accidentes b No utilice herramientas el ctricas en atm sferas explosivas por ejemplo en presencia de l quidos gases o polvo inflamables Las herramientas el ctricas crean chispas que pueden...

Страница 6: ...recogida aseg rese de que est n conectados y se utilizan correctamente La recogida de polvo puede disminuir los peligros asociados al polvo 4 Uso y cuidado de las herramientas el ctricas a No fuerce l...

Страница 7: ...vicio a La reparaci n de la herramienta debe realizarla un especialista cualificado utilizando nicamente piezas de recambio id nticas De este modo se garantiza que se mantiene la seguridad de la herra...

Страница 8: ...o dos Utilice protecci n para los ojos Utilice una m scara contra el polvo Doble aislamiento Advertencia Los productos el ctricos no deben tirarse junto a los residuos dom sticos Depos telos en un pu...

Страница 9: ...L PAPEL DE LIJA Quite directamente el papel de lija A B 2 INSTALACI N DE LA EMPU ADURA AUXILIAR VER FIG C Para su seguridad personal recomendamos que utilice siempre la empu adura auxiliar Para ajusta...

Страница 10: ...cada a la herramienta Si desea acelerar el trabajo no presione m s la herramienta en lugar de ello use un grano m s grueso H 7 SELECCIONE EL PAPEL DE LIJA ADECUADO La selecci n del grano correcto del...

Страница 11: ...n ni mantenimiento Todas las partes de la herramienta el ctrica deben enviarse a reparar a un especialista autorizado Nunca utilice agua o detergentes qu micos para limpiar la herramienta L mpiela co...

Страница 12: ...do por uno nuevo de igual o mayor valor seg n nuestro criterio Esta garant a no es v lida por defectos causados como resultado de 1 Mal uso abuso o negligencia 2 Uso profesional 3 Intento de reparaci...

Страница 13: ...13...

Страница 14: ...PES400GH 2 18 1 19 PES400GH 2 19 1 20 PES400GH 2 20 1 21 PES400GH 2 21 1 23 PES400GH 2 23 1 24 PES400GH 2 24 1 25 PES400GH 2 25 1 26 PES400GH 2 26 1 27 PES400GH 2 27 1 28 PES400GH 2 28 1 29 PES400GH 2...

Страница 15: ...t o Ligar desligar 3 Recipiente para detritos 4 Fixador do recipiente para detritos 5 Prato de lixa 6 Caixa do motor 7 Punho auxiliar 8 Man pulo de bloqueio do punho Nem todos os acess rios ilustrados...

Страница 16: ...sentado dependendo da forma como se usa a ferramenta de acordo com os exemplos seguintes e de outras varia es na utiliza o da ferramenta O modo de usar a ferramenta e os materiais que est o a ser cort...

Страница 17: ...erramentas el tricas a bateria sem fio 1 Seguran a da rea de trabalho a Mantenha a rea de trabalho limpa e bem iluminada reas obstru das ou escuras potenciam os acidentes b N o utilize ferramentas el...

Страница 18: ...nto As roupas largas as joias ou os cabelos compridos podem ficar presos nas pe as m veis g Se houver dispositivos extratores do p ou recipientes de recolha certifique se de que estes est o colocados...

Страница 19: ...s pode levar a situa es de perigo 5 Repara o a Certifique se de que as repara es da sua ferramenta el trica s o realizadas por um profissional qualificado e que apenas s o utilizadas pe as de substitu...

Страница 20: ...rote o nos olhos Use uma m scara de prote o contra o p Aviso Isolamento duplo Os res duos dos produtos el tricos n o devem ser eliminados juntamente com os res duos dom sticos Por favor recicle sempre...

Страница 21: ...COLOCAR O PUNHO AUXILIAR VER FIG C Para a sua pr pria seguran a recomendamos que use sempre o punho auxiliar Para ajustar o punho solte o man pulo de bloqueio do punho auxiliar e rode o punho para a p...

Страница 22: ...amento A quantidade de material desbastado determinada pela velocidade do disco de lixar e pelo gr o da folha de lixa usada A velocidade do disco de lixar diminui em fun o da press o exercida na m qui...

Страница 23: ...UTEN O Retire a ficha da tomada antes de levar a cabo qualquer ajuste repara o ou manuten o A ferramenta el trica n o requer lubrifica o adicional nem manuten o Esta ferramenta el trica n o cont m nen...

Страница 24: ...crit rio Esta garantia nula se os defeitos forem causados por 1 M utiliza o abuso ou neglig ncia 2 Utiliza o profissional 3 Repara es anteriores realizadas em centros de assist ncia t cnica n o autor...

Страница 25: ...25...

Страница 26: ...8 PES400GH 2 18 1 19 PES400GH 2 19 1 20 PES400GH 2 20 1 21 PES400GH 2 21 1 23 PES400GH 2 23 1 24 PES400GH 2 24 1 25 PES400GH 2 25 1 26 PES400GH 2 26 1 27 PES400GH 2 27 1 28 PES400GH 2 28 1 29 PES400GH...

Страница 27: ...control 2 On off witch 3 Dust box 4 Dust box clamp 5 Sanding base plate 6 Motor housing 7 Auxiliary handle 8 Auxiliary handle locking knob Not all the accessories illustrated or described are included...

Страница 28: ...ons on how the tool is used How the tool is used and the materials being cut or drilled The tool being in good condition and well maintained The use the correct accessory for the tool and ensuring it...

Страница 29: ...Power tool plugs must match the outlet Never modify the plug in any way Do not use any adapter plugs with earthed grounded power tools Unmodified plugs and matching outlets will reduce risk of electri...

Страница 30: ...does not turn it on and off Any power tool that cannot be controlled with the switch is dangerous and must be repaired c Disconnect the plug from the power source and or the battery pack from the powe...

Страница 31: ...on manual Wear ear protection Wear eye protection Wear dust mask Warning Double insulation Waste electrical products must not be disposed of with household waste Please recycle where facilities exist...

Страница 32: ...nst it REMOVE THE SANDING PAPER Simply remove the sanding paper directly A B 2 INSTALLING THE AUXILIARY HANDLE SEE FIG C For your personal safety we recommend using the auxiliary handle at all times T...

Страница 33: ...ll allow you to achieve the best quality sanding finish Coarse grit will remove the most material and finer grit will give you the best finish in all sanding operations The condition of the surface to...

Страница 34: ...Keep all working controls free of dust Occasionally you may see sparks through the ventilation slots This is normal If the supply cord is damaged it must be replaced by the manufacturer its service a...

Страница 35: ...attempted by unauthorised repair centres 4 Damage caused by foreign objects substances or accident Ehlis S A c Sevilla s n Pol gon Industrial Nord Est 08740 Sant Andreu de la Barca Barcelona Espa a D...

Страница 36: ...36...

Страница 37: ...18 PES400GH 2 18 1 19 PES400GH 2 19 1 20 PES400GH 2 20 1 21 PES400GH 2 21 1 23 PES400GH 2 23 1 24 PES400GH 2 24 1 25 PES400GH 2 25 1 26 PES400GH 2 26 1 27 PES400GH 2 27 1 28 PES400GH 2 28 1 29 PES400...

Страница 38: ......

Страница 39: ......

Страница 40: ......

Отзывы: