


Chapter 6: Using the Web Interface
97
If the Restricted Service Agreement feature is enabled, the Restricted
Service Agreement is displayed when any user logs in to the PXE. Do
either of the following, or you cannot successfully log in to the PXE:
In the web interface, select the checkbox labeled "I understand and
accept the Restricted Service Agreement."
Tip: To select the agreement checkbox using the keyboard, press
the Space bar.
In the CLI, type
y
when the confirmation message "I understand and
accept the Restricted Service Agreement" is displayed.
Setting Up Role-Based Access Control Rules
Role-based access control rules are similar to firewall rules, except they
are applied to members sharing a specific role. This enables you to grant
system permissions to a specific role, based on their IP addresses.
To set up role-based access control rules:
1. Enable the feature. See
Enabling the Feature
(on page 97).
2. Set the default policy. See
Changing the Default Policy
(on page
3. Create rules specifying which addresses to accept and which ones to
discard when the addresses are associated with a specific role. See
Creating Role-Based Access Control Rules
(on page 98).
Changes made do not affect users currently logged in until the next login.
Enabling the Feature
You must enable this access control feature before any relevant rule can
take effect.
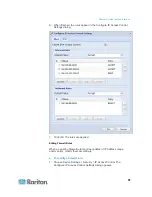
To enable role-based access control rules:
1. Choose Device Settings > Security > Role Based Access Control.
The Configure Role Based Access Control Settings dialog appears.
2. To enable the IPv4 firewall, click the IPv4 tab, and select the "Enable
Role Based Access Control for IPv4" checkbox.
3. To enable the IPv6 firewall, click the IPv6 tab, and select the "Enable
Role Based Access Control for IPv6" checkbox.
4. Click
OK.
Содержание PXE
Страница 1: ...Copyright 2014 Raritan Inc PXE 0C v3 0 E August 2014 255 80 0008 00 Raritan PXE User Guide Release 3 0...
Страница 12: ...Contents xii To Assert and Assertion Timeout 352 To De assert and Deassertion Hysteresis 354 Index 357...
Страница 16: ......
Страница 50: ...Chapter 5 Using the PDU 34 4 Pull up the operating handle until the colorful rectangle or triangle turns RED...
Страница 200: ...Chapter 6 Using the Web Interface 184 10 To print the currently selected topic click the Print this page icon...
Страница 339: ...Appendix A Specifications 323 RS 485 Pin signal definition al 4 5 6 D bi direction al Data 7 8...
Страница 353: ...Appendix D LDAP Configuration Illustration 337 5 Click OK The PX_Admin role is created 6 Click Close to quit the dialog...
Страница 380: ...Index 364 Z Zero U Products 1...
Страница 381: ......


