


638
The model name of a PX3 in-line monitor follows this format: PX-3nnn,
where n is a number, such as PX-3411.
Unlike most of PX3 devices, each inlet of an in-line monitor is connected
to an outlet only, so an inlet's rating/power data is the same as an
outlet's rating/power data.
In This Chapter
Overview .................................................................................................. 638
Safety Instructions .................................................................................. 638
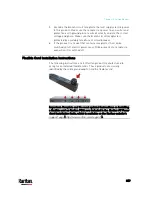
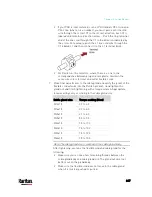
Flexible Cord Installation Instructions ................................................... 639
In-Line Monitor's Web Interface ............................................................. 648
Overview
An in-line monitor is implemented with the same number of inlets and
outlets.
Inlets are located at the side labeled Line.
Outlets are located at the side labeled Load.
An inlet is connected to a power source for receiving electricity, such as
electric distribution panels or branch circuit receptacles. An outlet is
connected to a device that draws power, such as a cooling or IT device.
Safety Instructions
1.
Installation of this product should only be performed by a licensed
electrician.
2.
Make sure the line cord is disconnected from power before
physically mounting or moving the location of this product.
3.
This product is intended to be located in an equipment rack in an
information technology room. In the United States, installation must
comply and be done in accordance with NEC (2011) Article 645
Information Technology Equipment.
4.
This product is designed to be used within an electronic equipment
rack. The metal case of this product is electrically bonded to the line
cord ground wire. A threaded grounding point on the case may be
used as an additional means of protectively grounding this product
and the rack.
Chapter 10 In-Line Monitors
Содержание PX3-3000 series
Страница 5: ......
Страница 18: ...Contents xviii Index 841...
Страница 66: ...Chapter 3 Initial Installation and Configuration 42 Number Device role Master device Slave 1 Slave 2 Slave 3...
Страница 93: ...Chapter 4 Connecting External Equipment Optional 69...
Страница 787: ...Appendix J RADIUS Configuration Illustration 763 Note If your PX3 uses PAP then select PAP...
Страница 788: ...Appendix J RADIUS Configuration Illustration 764 10 Select Standard to the left of the dialog and then click Add...
Страница 789: ...Appendix J RADIUS Configuration Illustration 765 11 Select Filter Id from the list of attributes and click Add...
Страница 792: ...Appendix J RADIUS Configuration Illustration 768 14 The new attribute is added Click OK...
Страница 793: ...Appendix J RADIUS Configuration Illustration 769 15 Click Next to continue...
Страница 823: ...Appendix K Additional PX3 Information 799...
Страница 853: ...Appendix L Integration 829 3 Click OK...


