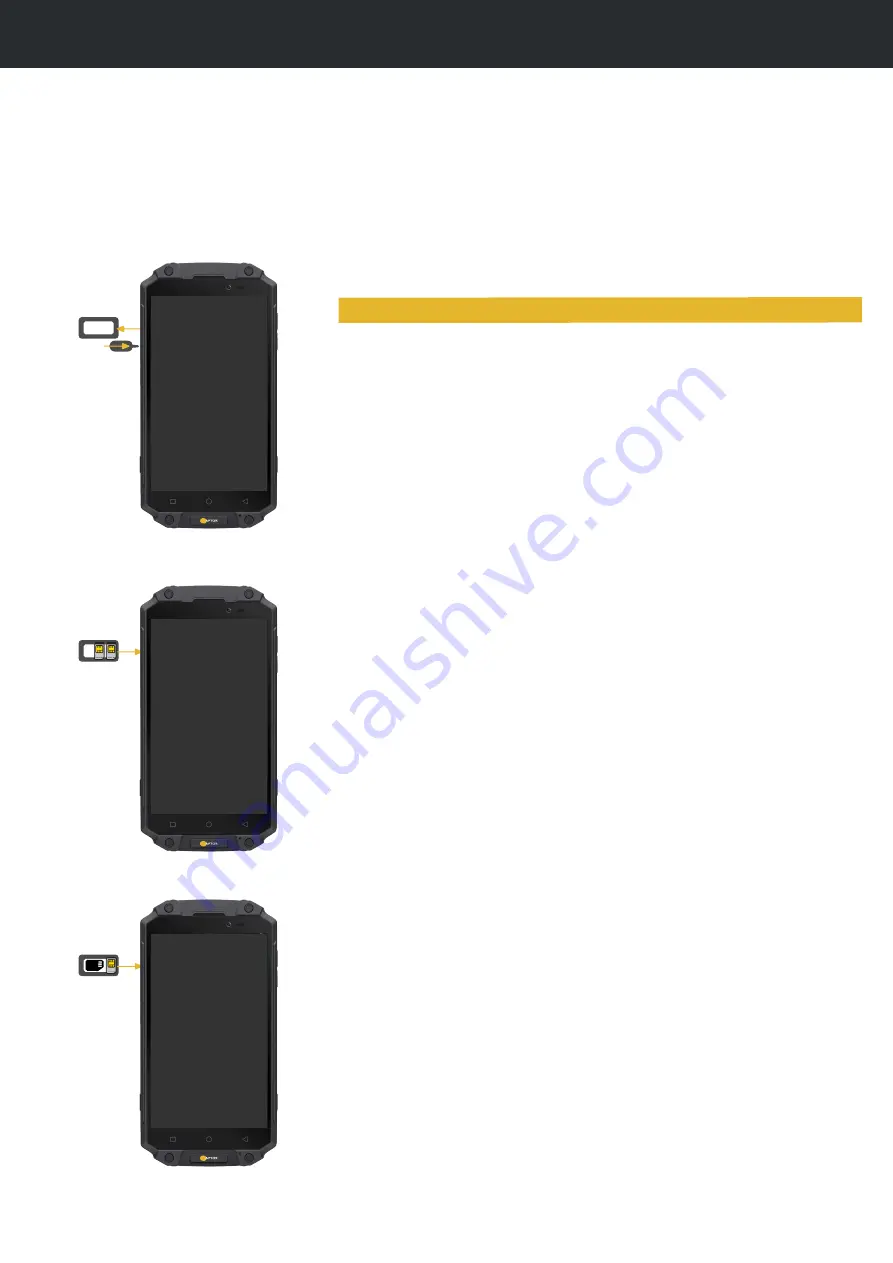
Raptor R5X Скачать руководство пользователя страница 10

BATTERY & CARDS

The R5X has a sealed non-replaceable battery that can only be replaced by the Raptor repair centre. 

Dual SIM cards and Micro-SD storage cards are accessed by removing the battery cover.

The Raptor R5X has a multi-card slot, that will allow you to connect 

multiple SIM and SD Card configurations to the device.

SIM and SD Cards are inserted into the side of the device via a SIM 

tray that pops out.

Raptors use standard SIM card sizes and can be used with a SIM 

card adapters if your SIM is a different size.

To install a SIM or SD card, please use the SIM Tool provided with the 

device to remove the SIM card tray from the device. 

1. Gently insert the SIM Tool into notch on the SIM tray and prise it 

out carefully. Full remove using your fingers.

2. You can now insert SIM and SD cards into the tray. The 

combinations can be:

1x SIM card + microSD card

2x SIM card (dual sim)

1x microSD card on it’s own

Please make sure you have installed the SIM and microSD cards in 

the correct orientation.  

3. Once the cards are placed into the tray as shown to the left simply 

re-insert the tray. back into the slot in the device, being careful not 

to let the cards drop out of their holders.

4. Firmly push the card tray into the device until it is flush with the 

case. This ensures the IP rating for water and dust proofing is 

maintained.

5. The device should recognise any new card inserted and you can 

follow instructions


that


pop


up.

Installing a SIM card

R

1

2

R

1

R

Содержание R5X

Страница 1: ...RAPTOR R5X Quick Start RAPTOR R R...

Страница 2: ...se screws Main screen Power Light sensor External headset Ear phone Volume Volume Menu soft key USB Connector MIC Back soft key Home soft key Front camera Hand strap mount point Fingerprint reader NFC...

Страница 3: ...ccessories are included with every Raptor R5X Power supply Country specific Fast charge power supply OTG cable On the go cable for connecting external peripherals via USB USB Cable USB C cable for cha...

Страница 4: ...h device on or put wake device into out of standby mode Home The Android Home button brings the device to the home screen Menu soft key The Android Menu key brings up the menu feature and will behave...

Страница 5: ...y simply peeling it of Now make sure you clean the screen thoroughly to remove dirt dust and any fluff that will create bubbles in the adhesion Step 3 Peel the underside of the screen protector off be...

Страница 6: ...Raptor R5X device is constantly monitoring for new notifications and status of the device Apps can create there own icons but below are some of the more common ones with their meanings Phone connectio...

Страница 7: ...oing this as Type C USB connectors can be easily damaged if not used correctly Step 3 Plug the other side of the cable into either the USB A socket of the domestic or vehicle charger Please note Only...

Страница 8: ...ensuring you are careful when doing this as Type C USB connectors can be easily damaged if not used correctly Step 3 Plug the other side of the USB cable into a free USB A socket in your PC or laptop...

Страница 9: ...host USB communication via the supplied OTG cable External headset Stereo DIN connector for use with supplied headset MIC It can be used for making phone calls and for listening to music on the devic...

Страница 10: ...m the device 1 Gently insert the SIM Tool into notch on the SIM tray and prise it out carefully Full remove using your fingers 2 You can now insert SIM and SD cards into the tray The combinations can...

Страница 11: ...uses them to not fit correctly If damaged please request spares via the Raptor support portal Prolonged immersion In water is not recommended Whilst your Raptor R5X can be submerged in 1 2M of water f...

Отзывы: