Rangland OH480GY Скачать руководство пользователя страница 10

10

ASSEMBLY INSTRUCTIONS

 Do not store a spare LP-gas cylinder under or near this appliance;

 Never fill the cylinder beyond 80 percent full;

 Place the dust cap on the cylinder valve outlet whenever the cylinder is not

in use. Only install the type of dust cap on the cylinder valve that is provided with

the cylinder valve. Other type of caps or plugs may result in leakage of propane.

A dented, rusted or damaged propane cylinder may be

hazardous and should be checked by your cylinder 

supplier. Never use a propane cylinder with a damaged 

valve connection.

The cylinder must have a listed overfilling prevention 

device. The cylinder must have a connection device 

compatible with the connection for the appliance. The 

cylinder used must include a collar to protect the 

cylinder valve. Never connect an unregulated propane 

cylinder to the heater.

The propane cylinder must be constructed and marked

in accordance with the specifications for LP gas 

cylinders of the U.S. Department of Transportation

(DOT) or the standard for cylinders, spheres and 

tubes for transportation of dangerous goods and 

commission, CAN/CSA-B339.

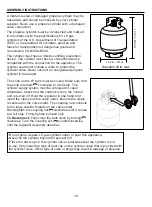
Standard 20 lb. tank

12.2 in. / 31cm

17.9 in. / 45.5cm

The knob on the LP tank must be closed. Make sure that 

the knob is turned       clockwise to a full stop. The 

cylinder supply system must be arranged for vapor 

withdrawal. Check that the control knob on the control

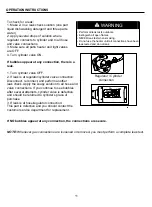
unit is turned off. Hold the regulator in one hand and 

insert the nipple into the valve outlet. Be sure the nipple 

is centered in the valve outlet. The coupling nut connects 

to the large outside threads on the valve outlet. 

Hand-tighten the coupling nut      clockwise until it comes 

to a full stop. Firmly tighten by hand only.

To Disconnect:

 Fully close the tank valve by turning 

clockwise. Turn the coupling nut       counterclockwise 

until the regulator assembly detaches.


Содержание OH480GY

Страница 1: ...mmable vapors and liquids in the vicinity of this or any other appliance An LP cylinder not connected for use shall not be stored in the vicinity of this or any other appliance WARNIN Improper installation adjustment alteration service or maintenance can cause property damage injury or death Read the installation operation and maintenance instructions thoroughly before installing or servicing this...

Страница 2: ...F1 H C E D G I N O I T P I R C S E D T R A P QUANTITY A 1 B 1 D F1 F2 C H G I E Reflector Panel Head Assembly Cylinder Housing Post Gas Hose Base Support Bracket Wheel Kit Regulator 1 1 1 2 3 1 1 F2 K Bucket preassembled 1 K ...

Страница 3: ...llowing symbols shown below are used extensively throughout this manual Always heed these precautions as they are essential when using any mechanical or fueled equipment AA DD EE CC FF BB GG Reflector spacer Qty 3 Washer Φ8 Qty 6 Wrench Qty 1 not actual size HH Wing nut Qty 3 II Stainless steel bolt Qty 4 Bolt M8 x 16 Qty 5 Bolt M6 x 30 Qty 6 M8 nut Qty 2 M6 Flange nut Qty 6 DANGER DANGER DANGER i...

Страница 4: ... WKH XVH RI IXHO JDVHV DQG KHDW SURGXFLQJ SURGXFWV IRU VSHFLILF XVHV RXU ORFDO DXWKRULWLHV FDQ DGYLVH RX DERXW WKHVH I QR ORFDO FRGHV H LVW IROORZ 1DWLRQDO XHO DV RGH 16 Q DQDGD LQVWDOODWLRQ PXVW FRQIRUP WR ORFDO FRGHV I QR ORFDO FRGHV H LVW IROORZ WKH FXUUHQW 1DWLRQDO VWDQGDUGV RI 1 1 DANGER WARN NG R QRW VWRUH RU XVH JDVROLQH RU RWKHU IODPPDEOH YDSRUV DQG OLTXLGV LQ WKH YLFLQLW RI WKLV RU DQ RWK...

Страница 5: ...tore or use propane gas in compliance with local ordinances and codes or with ANS NFPA 58 Turn off propane when not in use WARNING Alert children and adults to the hazards of high surface temperatures Stay away from these surfaces to avoid burning skin or igniting clothing Carefully supervise young children when in the vicinity of the heater Do not hang clothing or any other flammable materials fr...

Страница 6: ...ut EE Bolt M6 x 30 x 6 Hardware Used BB EE CC Hardware Used AA BB 1 Attach wheel assembly I to base H Line up holes in wheel bracket with corresponding holes in base insert two bolts M8 x 16 BB through holes and finger tighten two M8 flange nuts AA Be sure that the wheel assembly is parallel to the base and fully tighten bolts x 2 Bolt M8 x 16 M8 nut x 2 1 H AA BB I Install post onto three support...

Страница 7: ...Unscrew stainless steel bolts DD from head assembly B 6 FF x 3 Reflector spacer Hardware Used DD x 4 Stainless Steel Bolt 6 Insert hose of head assembly B into post F Secure head assembly B to post F with stainless steel bolts DD Note The control knob on head assembly B should be above the decal on post F 4 Load Cylinder Housing onto Post Slide Cylinder Housing down 4 ...

Страница 8: ...tighten after sections are aligned 8 Slide two reflector panels together QVHUW RQH VFUHZ 0 8 DQG VFUHZ RQ FDp QuW ORRVHOy Slide reflector plate onto reflector panels Insert one screw M6 X 8 and screw on cap nut loosely Repeat procedure to complete the assembly of all four sections Fully tighten all of the screws in the rolled edge M6X8 M6 nut M6X8 M6 nut 9 8 6 7 7 8 9 ...

Страница 9: ...31cm in diameter and 17 9 in 45 5cm high Use this heater only with a propane vapor withdrawal supply system See chapter 5 of the standard for storage and handling of liquefied petroleum gas ANS NFPA 58 Your local library or fire department should have this book Storage of an appliance indoors is permissible only if the cylinder is disconnected and removed from the appliance A cylinder must be stor...

Страница 10: ...pane cylinder to the heater The propane cylinder must be constructed and marked in accordance with the specifications for LP gas cylinders of the U S Department of Transportation DOT or the standard for cylinders spheres and tubes for transportation of dangerous goods and commission CAN CSA B339 Standard 20 lb tank 12 2 in 31cm 17 9 in 45 5cm The knob on the LP tank must be closed Make sure that t...

Страница 11: ... check Apply the soapy solution to all hose and valve connections If you continue to see bubbles after several attempts cylinder valve is defective and should be returned to cylinder s place of purchase 3 If leak is at hose regulator connection This part is defective and you should contact the customer service department for replacement If NO bubbles appear at any connection the connections are se...

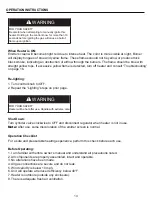
Страница 12: ...side walls as long as 30 percent or more of the horizontal periphery of the enclosure is permanently open Before Turning Gas Supply ON RXU KHDWHU ZDV GHVLJQHG DQG DSSURYHG IRU RXWGRRU XVH RQO R 127 XVH LW LQVLGH D EXLOGLQJ JDUDJH RU DQ RWKHU HQFORVHG DUHD 0DNH VXUH VXUURXQGLQJ DUHDV DUH IUHH RI FRPEXVWLEOH PDWHULDOV JDVROLQH DQG RWKHU IODPPDEOH YDSRUV RU OLTXLGV QVXUH WKDW WKHUH LV QR REVWUXFWLRQ ...

Страница 13: ...fails to remain lit all valves should be closed and a waiting period of at least 5 minutes should pass before attempting to light Lighting 1 Turn on the valve on the gas cylinder 2 Press and turn the control knob to Pilot position anti clockwise 90º Figure 1 3 Holding down the control knob press the igniter button several times until the pilot is ignited Release the control knob 10 seconds after t...

Страница 14: ...low flame is detected turn off heater and consult Troubleshooting on page 16 Re lighting 1 Turn control knob to OFF 2 Repeat the Lighting steps on prior page WARNING FOR YOUR SAFETY Heater will be hot after use Handle with extreme care Before Operating 1 I am familiar with entire owner s manual and understand all precautions noted 2 All components are properly assembled intact and operable 3 No al...

Страница 15: ...eep controls burner and circulating air passageways clean 9 Heater is away from gasoline or other flammable liquids or vapors 10 Heater is away from windows air intake openings sprinklers and other water sources 11 Heater is at least 2 3 feet on top and at least 3 3 feet on sides from combustible materials 12 Heater is on a hard and level surface 13 There are no signs of spider or insect nests 14 ...

Страница 16: ...heck for corroded areas and repair them promptly TIP Use high quality automobile wax to help maintain the appearance of your heater Apply to exterior surfaces from the pole down Do not apply to emitter screen or domes Storage Between uses Turn Control Knob OFF Disconnect LP source Store heater upright in an area sheltered from direct contact with inclement weather such as rain sleet hail snow dust...

Страница 17: ... Control knob fully ON Dirt or film on reflector and burner screen Blockage in burner Remove blockage and clean burner inside and outside Check burner and orifices for blockage Clean reflector and burner screen Outdoor temperature is less than 40ºF and tank is less than 1 4 full Turn cylinder valve OFF and replace cylinder Use a full cylinder Turn control knob to ON Wait until the propane cylinder...

Страница 18: ...tation of the product will the responsibility of the owner and are not covered by this warranty The owner assumes all other risks arising out from the use or misuse of the product The warranty will be void if the product damage or failure is deemed by the Company to be caused by accident alteration misuse abuse incorrect installation or removal or connection to an incorrect power source by the own...

Отзывы: