


25
If a project can not cover all necessary areas to scan without moving the object relative to the surface
with markers, you need to create multiple projects (by number of positions of the object relative to the
markers) and then during the processing load them together to combine.
Markers should be attached as chaotic as possible. Avoid expressed patterns or curves, as this may
provoke incorrect detection of markers. If the new fragment is not correctly oriented in relation to the
model, delete it to create a next scan. When using auxiliary surface, object should not move in relation to
the markers during the scan!
If there are not enough markers on the new scan (less
than three) or the software is unable to joint scan to
already existing ones, an error message is sent and the
scan is considered to be unsuccessful. Also, an error may
occur if the scanner was decalibrated and can not
properly assess the size of the markers.
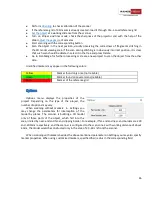
Brightness of the projector light when identifying
markers can be changed. Turn on the illumination mode
Markers
and open the
Brightness settings.
Specify the
brightness value, at which the markers can be clearly seen
on the output from the cameras.
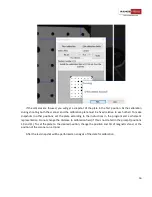
When creating project with markers, it is necessary to
specify the type and size of used markers. Scanner kit
includes black markers with radius of 2.5 mm.
Sequence of actions when scanning with markers:
●
Stick markers on the object or auxiliary surface
●
Prepare the surface of the object to be scanned (if needed)
●
Содержание Smart
Страница 1: ...RangeVision Smart ScanCenter 2016 1 ...