background image

For technical support, contact us at 1-800-565-5321

7209 Installation Guide


|  REV. C1  |  Page

 6

1.2.1

  Attach both panels to the shelf tray with the dividers if needed.

PHASE 1 

– ASSEMBLY

1.2 WORKBENCH ASSEMBLY

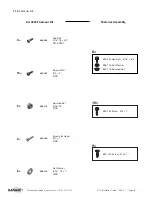
#92-102 Screw   #14 × 1"

HARDWARE USED

TOOLS

q

  Cordless Impact

q

  3/8" Driver Bit

70-800

70-800

40 - 16 × 48

40-504

Содержание 7209

Страница 1: ...INSTALLATION GUIDE 7209 Workbench w Hardwood Top One Shelf Aluminum...

Страница 2: ...tallation q Cordless Impact q Cordless Drill q Tape Measure q Marker q 1 2 Socket q 3 8 Drill Bit q 3 16 Drill Bit q 1 8 Drill Bit q 7 16 Socket q 1 Hole Saw q Knife q Plus Nut Tool q 2 1 Workbench In...

Страница 3: ...tem No Description Qty 40 16 48 Shelf Tray w Slots Black Plywood 1 40 442 L Bracket Right 1 40 443 L Bracket Left 1 40 504 Shelf Divider 15 7 16 6 70 610 Floor Mounting Track Bracket 2 70 800 Universa...

Страница 4: ...ner Assembly 1 1 3 Fastener kits 90 204 Hex Bolt 5 16 3 4 98 116 Flat Washer 94 116 Serrated Nut 8 16 92 102 Screw 14 1 92 140 Screw 10 1 9 8 Hex Bolt 5 16 18 3 4 GR 5 ZINC 90 204 94 116 Serrated Nut...

Страница 5: ...98 106 Flat Washer 94 130 Plus nut 4 for mounting kits only 90 208 Hex Bolt 5 16 1 98 122 Lock Washer 98 116 Flat Washer 94 150 Channel Nut 4 Hex Bolt 5 16 18 1 GR 5 ZINC 90 208 8 90 130 Hex Bolt 1 4...

Страница 6: ...209 Installation Guide REV C1 Page 6 1 2 1 Attach both panels to the shelf tray with the dividers if needed PHASE 1 ASSEMBLY 1 2 WORKBENCH ASSEMBLY 92 102 Screw 14 1 HARDWARE USED 8 TOOLS q Cordless I...

Страница 7: ...ls with the back of the hardwood top flushed against one end of the panels NOTE Pre drill the hardwood using 3 16 drill bit first before screwing the panels to the hardwood to prevent spliting the woo...

Страница 8: ...e drill the hardwood using 1 8 drill bit first before screwing the panels to the hardwood to prevent spliting the wood 1 2 3 Screw the backsplash on the back end of the workbench 92 140 Screw 10 1 HAR...

Страница 9: ...brackets NOTE Do not attach the floor brackets if you do not have the mounting tracks and mounting kits 90 204 Hex Bolt 5 16 3 4 98 116 Flat Washer 94 116 Serrated Nut HARDWARE USED 4 hand tighten the...

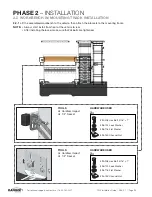
Страница 10: ...For technical support contact us at 1 800 565 5321 7209 Installation Guide REV C1 Page 10 PHASE 2 INSTALLATION 2 1 WORKBENCH INSTALLATION 2 1 1 Sample vehicle package picture with 7209 workbench 7209...

Страница 11: ...stalling the locker make sure that all bolts are tightened 90 208 Hex Bolt 5 16 1 98 122 Lock Washer 98 116 Flat Washer 94 150 Channel Nut HARDWARE USED 2 TOOLS q Cordless Impact q 1 2 Socket 90 208 H...

Страница 12: ...front of the vehicle to rear 2 3 1 Lift the assembled workbench to the vehicle then mark the holes on the L brackets and end panels to the vehicle Align the left and right L brackets to the horizonta...

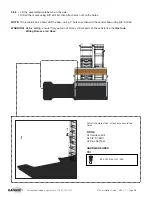
Страница 13: ...ill q 3 8 Drill Bit q Plus Nut Tool WARNING Before drilling ensure that you will not hit any critical parts of the vehicle like the Gas tank Wiring Harness and Hose 2 3 2 Lift the assembled workbench...

Страница 14: ...age 14 90 114 Hex Bolt 1 4 1 98 118 Lock Washer 98 106 Flat Washer 94 130 Plusnut Already Installed HARDWARE USED 4 TOOLS q Cordless Impact q 7 16 Socket 2 3 3 Put back the assembled workbench in plac...

Страница 15: ...15 2 3 4 Attach the end panels to the plusnuts NOTE The number of spacers depends on the gap between the floor and end panel 90 130 Hex Bolt 1 4 2 98 118 Lock Washer 98 106 Flat Washer 98 157 Spacers...

Страница 16: ...us at 1 800 565 5321 7209 Installation Guide REV C1 Page 16 You have successfully installed your 7209 Workbench Thank you for doing business with us For any feedback or suggestions you may have pleas...

Отзывы: