Rangemaster Longstock Deluxe Скачать руководство пользователя страница 6

2

Peculiar smells

When you first use your cooker it may give off an odour. This 

should stop after use.
Before using your cooker for the first time, make sure that all 

packing materials have been removed and then, to dispel 

manufacturing odours, turn all the ovens to 200°C and run for 

at least an hour.
Before using the grill for the first time you should also turn on 

the grill and run for 30 minutes with the grill pan in position, 

pushed fully back and the grill door open.
Make sure the room is well ventilated to the outside air 

(see ‘Ventilation’ below). People with respiratory or allergy 

problems should vacate the area for this brief period.

Ventilation

The use of a cooking appliance results in the production 

of heat and moisture in the room in which it is installed. 

Make sure that the kitchen is well ventilated. Keep natural 

ventilation holes open or install a powered cooker hood that 

vents outside. 
Prolonged intensive use of the appliance may call for 

additional ventilation, for example opening a window, or 

more effective ventilation, for example increasing the level of 

mechanical ventilation where present.

Maintenance

• 

Only a qualified service engineer should service the 

appliance and only approved spare parts should be 

used. It is recommended that this appliance is serviced 

annually. 

• 

Before removing replacing the bulb, turn off the power 

supply and make sure that the oven is cool. 

•  DO NOT

 use cooking vessels on the hotplate that 

overlap the edges.

•  ALWAYS

 allow the cooker to cool and then switch it 

off at the mains before cleaning or carrying out any 

maintenance work, unless specified otherwise in this 

guide.

•  DO NOT

 use the control knobs to manoeuvre the 

cooker.

•  NEVER

 operate the cooker with wet hands. 

•  DO NOT

 use a towel or other bulky cloth in place of a 

glove – it might catch fire if brought into contact with a 

hot surface.

•  DO NOT

 use hotplate protectors, foil or hotplate covers 

of any description. These may affect the safe use of 

your hotplate burners and are potentially hazardous to 

health.

•  NEVER

 heat unopened food containers. Pressure build 

up may make the containers burst and cause injury.

•  DO NOT

 use unstable saucepans. 

ALWAYS

 make sure 

that you position the handles away from the edge of the 

hotplate.

•  NEVER

 leave the hotplate unattended at high heat 

settings. Pans boiling over can cause smoking, 

and greasy spills may catch on fire. Use a deep fat 

thermometer whenever possible to prevent fat 

overheating beyond the smoking point.

• 

Unattended cooking on a hob with fat or oil can be 

dangerous and may result in fire.

•  NEVER

 leave a chip pan unattended. 

ALWAYS

 heat fat 

slowly, and watch as it heats. Deep fry pans should be 

only one third full of fat. 

•  NEVER 

try to move a pan of hot fat, especially a deep 

fat fryer. Wait until the fat is cool. Filling the pan too full 

of fat can cause spill over when food is added. If you use 

a combination of oils or fats in frying, stir them together 

before heating, or as the fats melt.

• 

Foods for frying should be as dry as possible. Frost on 

frozen foods or moisture on fresh foods can cause hot 

fat to bubble up and over the sides of the pan. Carefully 

watch for spills or overheating of foods when frying at 

high or medium high temperatures.

•  DO NOT

 use the top of the flue (the slots along the back 

of the cooker) for warming plates, dishes, drying tea 

towels or softening butter.

•  DO NOT

 use water on grease fires and never pick up 

a flaming pan. Turn the controls off and then smother 

a flaming pan on a surface unit by covering the pan 

completely with a well fitting lid or baking tray. If 

available, use a multi-purpose dry chemical or foam-

type fire extinguisher.

•  DO NOT

 modify this appliance. This appliance is not 

intended to be operated by means of external timer or 

separated remote-control system.

• 

If flammable materials are stored in the drawer, oven(s) 

or grill(s) it may explode and result in fire or property 

damage.

•  ALWAYS

 allow any cookware to cool before cleaning.

Содержание Longstock Deluxe

Страница 1: ...Built from experience U111001 01 USER GUIDE INSTALLATION INSTRUCTIONS Longstock Deluxe 90 Induction ...

Страница 2: ...book Twitter message or Instagram comment 4 We cannot guarantee your kitchen will be professionally photographed 4 Any photographs received and professional photographs taken will belong to AGA Rangemaster plc with full usage rights E OE Simply snap and share a picture of your kitchen and tag MyRangemaster for the chance to win 200 of Rangemaster cookware If selected we will also send a photograph...

Страница 3: ...ting the Ovens 13 Accessories 14 Optional Extras main oven 14 3 3 Button clock 16 4 Cooking tips 18 5 Cooking Table 19 6 Cleaning your cooker 20 Hob 20 Grills 21 Control panel and doors 21 Ovens 22 Cleaning table 23 7 Troubleshooting 24 8 Installation 26 Dear Installer 26 Safety Requirements and Regulations 26 Provision of Ventilation 26 Location of Cooker 26 Positioning the Cooker 27 Moving the C...

Страница 4: ...ii ...

Страница 5: ...ng the appliance DO NOT use a steam cleaner on your cooker ALWAYS keep combustible materials e g curtains and flammable liquids a safe distance away from your cooker DO NOT spray aerosols in the vicinity of the cooker while it is on Electrical connection safety The electrical installation must be installed in accordance with all relevant British Standards Codes of Practice BS7671 Or with the relev...

Страница 6: ... protectors foil or hotplate covers of any description These may affect the safe use of your hotplate burners and are potentially hazardous to health NEVER heat unopened food containers Pressure build up may make the containers burst and cause injury DO NOT use unstable saucepans ALWAYS make sure that you position the handles away from the edge of the hotplate NEVER leave the hotplate unattended a...

Страница 7: ...expose a portion of the surface unit to direct contact and may result in the ignition of clothing Only certain types of glass glass ceramic earthenware or other glazed containers are suitable for use on the warming zone others may break because of the sudden change in temperature Only certain types of stainless steel enamelled steel or cast iron cookware with enamelled bases are suitable for induc...

Страница 8: ...should be washed after use in order to prevent it from becoming scratched or dirty However you should clean the hob with caution as some cleaners can produce noxious fumes if applied to a hot surface DO NOT leave the hob unattended Care should be taken to not allow your cookware to boil dry It will damage your cookware and Induction Glass Hob After use switch off the hob element by its control DO ...

Страница 9: ... may be necessary during cooking to wipe away any moisture with a soft cloth This will also help to prevent soiling and discolouration of the oven exterior by cooking vapours Fig 1 7 Cleaning Isolate the electricity supply before carrying out any thorough cleaning Allow the cooker to cool The cooker should be kept clean at all times as a build up in fats and other food stuff could result in a fire...

Страница 10: ...m or ceramic are not suitable for use on an induction hob The kind of pan you use and the quantity of food affects the setting required Higher settings are required for larger quantities of food Pots and pans should have thick smooth flat bottoms Fig 2 2 This allows the maximum heat transfer from the hob to the pan making cooking quick and energy efficient Never use a round bottomed wok even with ...

Страница 11: ... following induction hob functions Pan detector H Residual heat indicator Child lock L1 L2 L3 Low temperature setting P Power boost setting Pan Detector n n IMPORTANT After use switch off the hob element by its control and DO NOT RELY on the pan detector If a cooking area is switched on and there is no pan in place or if the pan is too small for the cooking area then no heat will be generated The ...

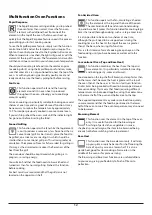
Страница 12: ...etc at an optimal simmer The maximum time this setting can be used is 2 hours To increase the heat just turn the control knob to the required level The maximum times for all other power levels are shown in Table 2 2 Power Boost Setting P All of the induction cooking zones have Power Boost available activated by turning the control knob clockwise until P is shown on the hob control display Power Bo...

Страница 13: ...nobs counter clockwise to cancel the function and return to normal operation n n DO NOT turn the two left hand knobs individually to heat the griddle This can cause excessive temperatures and damage the coating on the griddle Overheat Function This function identifies when the temperature of the pan rises rapidly and works to maintain a safe level of pan temperature It should not interfere with no...

Страница 14: ...ber and preheat the appropriate part s of the grill for two minutes The grill trivet can be removed and the food placed on it while you are waiting for the grill to preheat n n DO NOT leave the grill on for more than a few moments without the grill pan underneath it otherwise the knobs may become hot Once the grill has preheated take the grill pan out again and put the trivet back in place with th...

Страница 15: ...browning element and base heat can be used in the latter part of the cooking process to fine tune the results to your particular requirements Use fanned grilling for all your grilling needs and defrost to safely thaw small items of frozen food Table 2 3 gives a summary of the multifunction modes The multifunction oven has many varied uses We suggest you keep a careful eye on your cooking until you...

Страница 16: ...od needs to be watched and turned less than for normal grilling Preheat this function before cooking For best results we recommend that the grill pan is not located on the uppermost shelf Fan Assisted Oven This function operates the fan circulating air heated by the elements at the top and the base of the oven The combination of fan and conventional cooking top and base heat makes this function id...

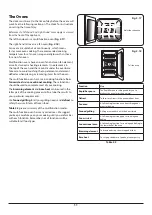
Страница 17: ...the Ovens Multifunction Ovens The multifunction oven has two controls a function selector and a temperature setting knob Fig 2 19 Turn the function selector control to a cooking function Turn the oven temperature knob to the temperature required Fig 2 20 The oven heating light will glow until the oven has reached the temperature you selected It will then cycle on and off during cooking When cookin...

Страница 18: ...g shelves Fig 2 26 and a plate warming shelf Fig 2 27 When using the tall oven you can cook on all four shelves at the same time but make sure that they are well spaced out to allow the hot air to circulate Optional Extras main oven The Handyrack The Handyrack Fig 2 28 fits to the left hand oven door only Food cooking on it is easy to attend to because it is accessible when the door is open The ma...

Страница 19: ...ont of the runner onto the same rung Push to clip under the bottom rung Fig 2 32 The front of the shelf runners can be identified by the bracket Fig 2 34 Ensure that the shelf runners are fitted in the same position on each side Fig 2 33 To fit the glide out shelf Check the shelf runners are secure before fitting the glide out shelf Hook the front of the glide out oven shelf onto the runners as sh...

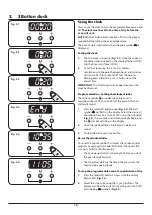
Страница 20: ...Press the mode M button once Fig 3 2 The bell symbol will flash on the display Select the desired countdown from 00 01h to 23 59h using the button Fig 3 3 The countdown will automatically begin and the symbol will show in the display 2 Once the specified time has elapsed an alarm will sound 3 To stop the alarm press any button Re set the minute minder To re set the minute minder first select the m...

Страница 21: ...rrent time will be displayed along with the word AUTO Fig 3 9 3 Set the oven to the required cooking temperature 4 During the cook period the cook symbol is illuminated in the display 5 When cooking is finished an alarm will sound Press any button to stop the alarm and return to manual cooking If the alarm is not stopped it will stop automatically after 7 minutes AUTO is showing but you want to re...

Страница 22: ...food in the oven to be timed n n DO NOT use a timed oven that is already warm n n DO NOT use the timed oven if the adjoining oven is already warm Whole poultry must be thoroughly defrosted before being placed in the oven Check that meat and poultry are fully cooked before serving General oven tips The wire shelves should always be pushed firmly to the back of the oven Baking trays with food cookin...

Страница 23: ...en 160 C 150 C for remainder Do not forget to include the weight of the stuffing For fresh or frozen prepacked poultry follow instructions on the pack Thoroughly thaw frozen poultry before cooking Casserole 140 150 C 130 C 140 C 2 4 hours according to recipe Yorkshire Pudding 220 C 210 C Large tins 30 35 minutes individual 10 20 minutes Cake Very rich fruit Christmas wedding etc Fruit 180 mm tin F...

Страница 24: ...t and wipe the area surrounding the hot zone with a clean paper towel If a spill other than a sugary substance is on the hot zone do not clean until the unit has completely cooled down and then follow the instructions below Cleaning Burned on Spills If you accidentally melt anything on the surface or if you spill foods with a high sugar content preserves tomato sauce fruit juice etc remove the spi...

Страница 25: ...side clips Fig 6 4 For safety push the side rails back into the grill chamber If you need to remove the side rails to allow cleaning of the grill chamber you can unhook them from the grill chamber sides Fig 6 5 and wipe the sides clean with a soft cloth and mild detergent n n DO NOT put the side runners in a dishwasher Once you have finished hook the side rails back onto the sides of the chamber T...

Страница 26: ...ing the Cooker section under Installation Cook Clean Panels The ovens have side Cook Clean panels which have been coated with a special enamel that partly cleans itself This does not stop all marks on the lining but helps to reduce the amount of manual cleaning needed These panels work better above 200 C If you do most of your cooking below this temperature occasionally remove the panels and wipe ...

Страница 27: ...Sides and plinth Painted surface Hot soapy water soft cloth Splashback rear grille Enamel or stainless steel Hot soapy water soft cloth Cream cleaner with care if necessary Control panel Paint enamel or stainless steel Warm soapy water Do not use abrasive cleaners on lettering Control knobs handles trims Plastic chrome copper or lacquered brass Warm soapy water soft cloth Brass Brass polish Oven d...

Страница 28: ...failure In the event of a failure in the electrical supply remember to reset the clock so that the timed oven continues to operate The cooling fan The induction hob incorporates a cooling fan This cooling fan is active when either the grill or the oven s are on Under certain conditions the cooling fan may remain active when the grill or oven s are switched off This is normal and the fan will switc...

Страница 29: ...m be prepared to turn it round during cooking If two shelves are used check that space has been left for the heat to circulate When a baking tray is put into the oven make sure that it is placed centrally on the shelf Check that the door seal is not damaged and that the door catch is adjusted so that the door is held firmly against the seal A dish of water when placed on the shelf should be the sa...

Страница 30: ...pliance Serial Number Installer s Telephone Number Installer s Company Safety Requirements and Regulations n n This cooker must be installed in accordance with the relevant instructions in this booklet with the relevant national and local regulations and with the local electricity supply companies requirements n n The appliance must be installed in accordance with the regulations in force and only...

Страница 31: ...im which is fitted to the cooker hob Surfaces of furniture and walls at the sides and rear of the appliance should be heat splash and steam resistant Certain types of vinyl or laminate kitchen furniture are particularly prone to heat damage and discolouration We cannot accept responsibility for damage caused by normal use of the cooker to any material that de laminates or discolours at temperature...

Страница 32: ...he oven Fig 8 6 Carefully push the cooker backwards off the base tray Remove the base tray Position the cooker close to its final position leaving just enough space to get behind it Fig 8 7 n n Do not use the door handles or control knobs to manoeuvre the cooker Fitting the Stability Bracket We recommend using a stability bracket first attach the bracket location device to the rear of the cooker F...

Страница 33: ...front bottom corners of the cooker To set the front turn the feet bases to raise or lower Electrical Connection This appliance must be installed by a qualified electrician in accordance with all relevant British Standards Codes of Practice in particular BS7671 Or with the relevant national and local regulations The cable size and type should be suitable for the Electrical Load of the appliance and...

Страница 34: ...tart to turn and that the ovens heat up Final Fitting Fitting the 2 piece Plinth Fit the inner plinth to the bottom front of the cooker using the 4 screws provided Fig 8 13 Fit the outer plinth 2 screws 1 each end to the inner plinth The height of the outer plinth can be adjusted by sliding it up or down via the slotted hole Fig 8 14 Customer Care Installer Please complete your details in this gui...

Страница 35: ... 1 2 5 3 4 INDUCTION UNIT HOB DISPLAY Earth N 6 N 4 L 2 L 3 On Terminal Block On Terminal Block On Terminal Block w br w br w br w br w br Code Description 1 Left hand front element 2 Left hand back element 3 Right hand back element 4 Right hand front element 5 Centre element Code Colour w br White or brown ...

Страница 36: ... element inner pair B6 Left hand multi function oven fan element C Clock Code Description D1 Right hand fan oven thermostat D2 Right hand fan oven control D3 Right hand fan oven element D4 Right hand fan oven fan F1 F2 Cooling fan G H Oven light switch Oven light s I Thermal cut out Grill neon Grill front switch B5 B2a Multi function oven thermostat front switch I1 Multi function oven neon Classic...

Страница 37: ...y saving tips Oven energy saving tips Use cookware with a flat base Cook meals together if possible Use the correct size cookware Keep the pre heating time short Use cookware with a lid Do not lengthen cooking time Minimise the amount of liquid or fat Do not open the oven door during the cooking period When liquid starts boiling reduce the setting Do not forget to turn the appliance off at the end...

Страница 38: ...nergy Consumption ECElectric cooking Wh kg 176 Zone 3 Ø cm 21 Heating Technology Energy Consumption ECElectric cooking Wh kg 180 Zone 4 Ø cm 18 Heating Technology Energy Consumption ECElectric cooking Wh kg 169 Zone 5 Ø cm 14 5 Heating Technology Energy Consumption ECElectric cooking Wh kg 183 Zone 6 Ø cm Heating Technology Energy Consumption ECElectric cooking Wh kg Energy Consumption ECElectric ...

Страница 39: ...gy class A Right hand Efficiency Fuel type Electric Cavity type Fanned Power conventional Power forced air convection 2 5 Volume Litres 67 Energy consumption electricity conventional kWh cycle Energy consumption electricity forced air convection kWh cycle 0 8 Energy efficiency index conventional Energy efficiency index forced air convection 96 2 Energy class A Additional Information The oven compl...

Страница 40: ...36 NOTE ...

Страница 41: ...37 NOTE ...

Страница 42: ...38 NOTE ...

Страница 43: ...ed by persons or organisations other than those authorised to act on behalf of AGA Rangemaster Exceptions Items not included under the free 1 year guarantee include pan supports griddles wok rings baking trays grill pans trivets filters light bulbs and other consumable accessories Any damage caused other than through normal use Breakdowns associated with cooking spillage Cosmetic deterioration dee...

Страница 44: ...of any particular appliance Clarence Street Royal Leamington Spa Warwickshire CV31 2AD England Consumer Services 44 0 1926 457628 Fax 44 0 1926 450526 E mail consumers agarangemaster co uk www rangemaster co uk For UK Trade Enquiries Tel 44 0 115 946 4000 Fax 44 0 115 973 6602 E mail sales agarangemaster co uk For ROI Enquiries Tel 1850 302 502 Rangemaster is a trading name of AGA Rangemaster Limi...

Отзывы: