background image

5

• 

The inside door face is constructed with 

toughened safety glass. Take care NOT 

to scratch the surface when cleaning the 

glass panel.

• 

Accidental damage may cause the door 

glass panel to fracture.

• 

Keep oven vent ducts unobstructed.

• 

DO NOT

 use harsh abrasive cleaners or 

sharp metal scrapers to clean the oven 

door glass since they can scratch the 

surface, which may result in shattering of 

the glass. 

• 

Make sure the shelves are pushed firmly 

to the back of the oven. 

DO NOT

 close the 

door against the oven shelves.

• 

DO NOT

 use aluminium foil to cover 

shelves, linings or the oven roof.

• 

When the oven is on, 

DO NOT

 leave the 

oven door open for longer than necessary, 

otherwise the control knobs may become 

very hot.

• 

DO NOT

 use the timed oven if the 

adjoining oven is already warm.

• 

DO NOT

 place warm food in the oven to be 

timed.

• 

DO NOT

 use a timed oven that is already 

warm.

• 

Use dry oven gloves when applicable – 

using damp gloves might result in steam 

burns when you touch a hot surface. 

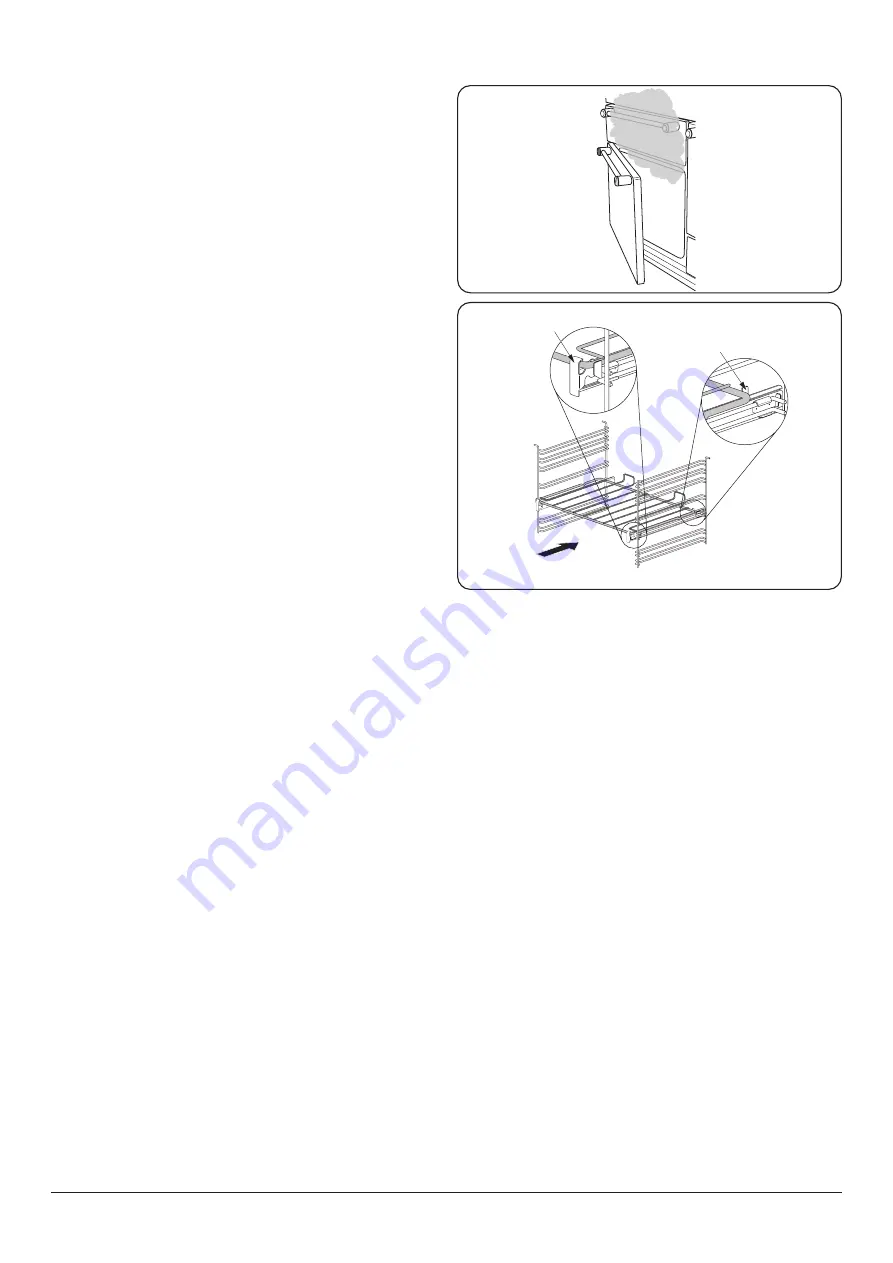
Oven Shelves

To fit the glide-out shelf, hook the front of the 

shelf onto the runners as shown (

Fig. 1.4

). The 

rear of the shelf should rest on the runners, in 

front of the rear stop (

Fig. 1.4

). 

Standard oven shelves can be fitted by lining 

up the shelf with a groove in the oven ladders. 

Push the shelf back until the ends hit the shelf 

stop. Lift the front so the shelf clears the stops, 

then lower the front so the shelf is level and 

push it fully back.

FRONT

Rear stop

Front 

bracket

ArtNo.324-0001 Steam burst

Fig. 1.3


Fig. 1.4


Содержание INC110DFFRP

Страница 1: ...Infusion Classic 110 Dual Fuel U111266 02a USER GUIDE INSTALLATION INSTRUCTIONS...

Страница 2: ...acted via e mail Facebook Twitter message or Instagram comment 4 We cannot guarantee your kitchen will be professionally photographed 4 Any photographs received and professional photographs taken will...

Страница 3: ...11 3 Accessories 12 4 3 button clock 13 5 Cooking Tips 15 6 Cooking Table 16 7 Cleaning your cooker 17 Essential information 17 Hotplate burners 17 The Griddle optional 18 Glide out Grill 18 Ovens 19...

Страница 4: ...ii...

Страница 5: ...lease refer to the oven shelf installation in the Accessories section WARNING The appliance and its accessible parts become hot during use and will retain heat even after you have stopped cooking Care...

Страница 6: ...ble clamp Minimum temperature rating T105 Read the instructions before installing or using this appliance Gas Connection Safety This cooker is a Class 2 Subclass 1 appliance This appliance can be conv...

Страница 7: ...0 minutes with the grill pan in position pushed fully back and the grill door open Make sure the room is well ventilated to the outside air see Ventilation below People with respiratory or allergy pro...

Страница 8: ...t when the oven door is opened Fig 1 3 When opening the oven stand well back and allow any steam to disperse DO NOT use hotplate protectors foil or hotplate covers of any description These may affect...

Страница 9: ...necessary otherwise the control knobs may become very hot DO NOT use the timed oven if the adjoining oven is already warm DO NOT place warm food in the oven to be timed DO NOT use a timed oven that i...

Страница 10: ...burner while another burner is on otherwise an electric shock could result Grill Glide out Grill Care n WARNING UNATTENDED COOKING UNDER THE GRILL CAN BE DANGEROUS AND MAY RESULT IN FIRE When using t...

Страница 11: ...n oven F Storage drawer Hotplate Burners The drawing by each of the central knobs indicates which burner that knob controls Each burner has a Flame Supervision Device FSD that prevents the flow of gas...

Страница 12: ...mats are NOT recommended Fig 2 6 They will reduce burner performance and could damage the pan supports You should also avoid using unstable and misshapen pans that may tilt easily and pans with a very...

Страница 13: ...ble n Do not put it on any other burner it is not designed to fit in any of the other cooker wells Remove the left hand pan support Position the griddle plate over the well Check that it is securely l...

Страница 14: ...wise The neon indicator light by the grill control will come on For best results slide the carriage back into the grill chamber The grill trivet can be removed and the food placed on it while you are...

Страница 15: ...e Fan Oven The right hand oven is a fan oven that circulates hot air continuously which means faster more even cooking The recommended cooking temperatures for a fan oven are generally lower than a co...

Страница 16: ...onto the runners as shown Fig 3 4 The rear of the shelf should rest on the runners in front of the rear stop Fig 3 4 The glide out shelf and runners can be easily removed or repositioned To remove the...

Страница 17: ...n clock Minute Minder Setting the minute minder Note The cook symbol remains visible during normal operation Note The cook symbol remains visible during normal operation Note The cook symbol remains v...

Страница 18: ...on ArtNo 306 0001 3 button clock Alarm will sound when cooking has finished press any button to stop the alarm If the alarm is not stopped it will stop automatically after 7 minutes Set the length of...

Страница 19: ...aced level with the front edge of the oven s wire shelves Other containers should be placed centrally Keep all trays and containers away from the back of the oven as overbrowning of the food may occur...

Страница 20: ...0 C 150 C for remainder Do not forget to include the weight of the stuffing For fresh or frozen pre packed poultry follow instructions on the pack Thoroughly thaw frozen poultry before cooking Cassero...

Страница 21: ...eaning n DO NOT put the burner heads in a dishwasher Make sure they are absolutely dry before replacing them The Single Ring Burners When refitting the burner head make sure that the notch lines up wi...

Страница 22: ...leaning as follows Remove the grill pan support frame by pulling the grill pan forward Lift the grill pan clear of the support frame The support frame is held to the side rails by two clips on each si...

Страница 23: ...with a special enamel that partly cleans itself This does not stop all marks on the lining but helps to reduce the amount of manual cleaning needed The Cook Clean panels work better above 200 C If you...

Страница 24: ...oth supermarket Sides and plinth Painted surface Hot soapy water soft cloth Splashback rear grille Enamel or stainless steel Hot soapy water soft cloth Cream cleaner with care if necessary Control pan...

Страница 25: ...re in the electrical supply remember to reset the clock to make sure that the timed oven continues to operate Food is cooking too slowly too quickly or burning Cooking times may differ from your previ...

Страница 26: ...on of the hinge to set the hinge position Fig 8 6 Retighten the hinge screws Grill The fascia gets hot when I use the oven or grill The cooker is cooled by a fan If the fascia becomes excessively hot...

Страница 27: ...Use regulations The relevant Building IET regulations In the Republic of Ireland the cooker must be installed in accordance with The installation must be carried out by a competent person and install...

Страница 28: ...lity claim NOTE An appliance for use on LPG must not be installed in a room or internal space below ground level e g in a basement Conversion This appliance is supplied set for G20 20mbar Cat II2H3 A...

Страница 29: ...er hob Surfaces of furniture and walls at the sides and rear of the appliance should be heat splash and steam resistant Certain types of vinyl or laminate kitchen furniture are particularly prone to h...

Страница 30: ...ndles or control knobs to manoeuvre the cooker Fitting the Stability Bracket or Chain Unless otherwise stated a cooker using a flexible gas connector must be secured with a suitable stability device S...

Страница 31: ...ooker If in doubt contact your supplier The rear cover boxes limit the position of the supply point Because the height of the cooker can be adjusted and each connection is different it is difficult to...

Страница 32: ...tage label on the cooker through a suitable cooker control unit incorporating a double pole switch having a contact separation of at least 3mm in all poles n The cooker MUST NOT be connected to an ord...

Страница 33: ...the plinth adjusting it to your desired height Fig 9 17 Final Checks Hotplate Check Check each burner in turn refer to the Hotplate Burners section at the front of the instructions Grill Check Turn on...

Страница 34: ...t diagram are for single phase The ratings are for 230V 50Hz Code Description X01 Grill Front Switch X02 Grill Energy Regulator X03 Left Hand Grill Element X04 Right Hand Grill Element X05 Left Hand O...

Страница 35: ...ate Bypass Screw Natural Gas 20 mb L P Gas Injector Injector Wok burner 62 4 0kW 148 4 0 kW 291 g h 103 Rapide Large Burner 40 3 0 kW 134 3 0 kW 218 g h 87 Semi Rapide Medium Burner 32 1 7kW 109 1 7 k...

Страница 36: ...s burners 6 Auxiliary Small Burner EE gas burner Semi Rapide Medium Burner EE gas burner 58 Semi Rapide Medium Burner EE gas burner 58 Rapide Large Burner EE gas burner 56 Rapide Large Burner EE gas b...

Страница 37: ...ectric Cavity type Fanned Power conventional kW Power forced air convection kW 2 5 Volume Litres 79 Energy consumption electricity conventional kWh cycle Energy consumption electricity forced air conv...

Страница 38: ...34 NOTE...

Страница 39: ...by persons or organisations other than those authorised to act on behalf of AGA Rangemaster Exceptions Items not included under the free 1 year guarantee include pan supports griddles wok rings bakin...

Страница 40: ...cular appliance Clarence Street Royal Leamington Spa Warwickshire CV31 2AD England Consumer Services 44 0 1926 457628 Fax 44 0 1926 450526 E mail consumers agarangemaster co uk www rangemaster co uk F...

Отзывы: