


INSTALLATION
Check the appliance is electrically safe and gas sound when you have finished.
22
Retaining
screw
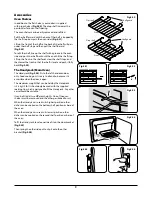
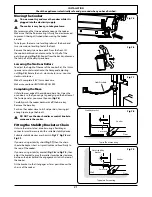
Repositioning the Cooker Following
Connection
If you need to move the cooker once it has been connected
then you need to unplug it and, having gripped under the
fascia panel and lifted the front of the cooker slightly
(Fig.7.7)
, you need to check behind the cooker to make sure
that the gas hose is not caught.
As you progress, make sure that both the electricity cable and
gas hose always have sufficient slack to allow the cooker to
move.
With a stability chain fitted, release it as you ease the cooker out.
Do not forget to refit it when you replace the cooker.
When you replace the cooker, again check behind to make
sure that the electricity cable and gas hose are not caught or
trapped.
Conversion to Another Gas
If the appliance is to be converted to another gas do the
conversion at this point. See the conversion section of these
instructions.
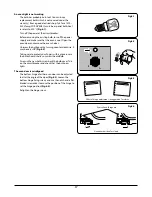
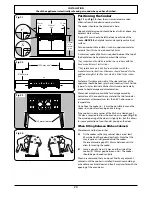
Levelling
You are recommended to use a spirit level on a shelf in one of
the ovens to check for level.
Place the cooker in its intended position taking care not to
twist it within the gap between the kitchen units as damage
may occur to the cooker or the units.
The front feet and rear rollers can be adjusted to level the
cooker.
To adjust the height of the rear of the cooker use a 13 mm
spanner or socket wrench to turn the adjusting nuts at the
front bottom corners of the cooker.
To set the front turn the feet bases to raise or lower.
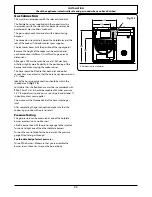
Fitting the Handrail
Using the 2 mm Allen key supplied, loosen the 2 retaining
screws in the base and side of the handrail support. Fit the
handrail support onto the locating bosses on the fascia
(Fig.7.10)
.
Note:
The handle support should face upwards.
Push the support back against the fascia and tighten the
2 retaining screws. Check that each support is secure.
Locate the handrail onto the support tabs. Using the 2.5 mm
Allen key supplied, tighten the 2 retaining screws in the
bottom of each end of the handrail to secure
(Fig.7.11)
.
Retaining screw
Retaining screw
Fig.7.10
Fig.7.11
Содержание Elite SE 110 Dual Fuel
Страница 1: ...Britain s No 1 Range Cooker USER GUIDE INSTALLATION INSTRUCTIONS Elise SE 110 Dual Fuel...
Страница 4: ...iv...
Страница 33: ...29 Notes...
Страница 34: ...30 Notes...


