29
INSTALLATION
Check the ap pli ance is electrically safe and gas sound when you have fi nished.
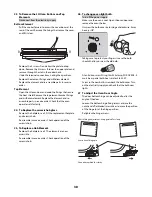
Fit the Handles
Remove the 4mm Allen screws from the doors with the
hexagon key tool. Use the screws to fi t the door handles.
The handles should be above the fi xings.
Remove the 4mm Allen screws from the top corners of
the fascia and fi x the front handrail in position.
Fitting the splash back (optional)
Remove the two fi xing screws (3mm hexagonal socket
head) and nuts that pass through the top of the rear fl ue
grille. Hold the splash back in position. From the rear refi t
the 2 fi xing screws and nuts.
Fitting a stability bracket
A stability bracket or chain (not supplied by with the
cooker) should be fi tted when the cooker is connected
to a fl exible gas supply.
When fi tting a stability bracket read these instructions
together with the leafl et supplied with the bracket.
1. Place the cooker in its intended position and level it.
2. Draw a pencil line 100mm from the front edge of the
levelling feet.
3. Mark the centre line for the bracket by measuring
550mm from the left hand side of the cooker.
4. Lower the front roller and move the cooker forward.
5. Measure back from the pencil line 550mm to locate
the front edge of the bracket. Fix the bracket to the
fl oor.
6. Measure the height from fl oor level to engagement
edge in back of cooker. Add 3mm to this dimension
and assemble the stability bracket to this height. (i.e.
from fl oor level to underside of the top member) and
ensure the bracket does not foul the oven burner
assembly.
Содержание Classic 110 Deluxe Duel Fuel
Страница 1: ...Classic Deluxe 110 Dual Fuel Users Guide Installation Service Instructions U108810 03...
Страница 41: ...41...
Страница 42: ...42...
Страница 43: ...43...
Страница 44: ...040506...


