3
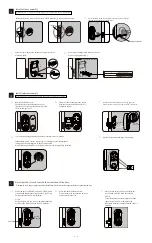
Install exterior assembly
A
Before installation, make sure the latch is fully retracted (in the unlocked position) .
Route the cable below the latch and insert the cylinder tailpiece
through the horizontal slot in the latch.
B
2 / 6
4
Install interior assembly
Insert the cable connector to the socket.
Push the connector in firmly until it is
completed seated.
B
Rotate the thumbturn and keep it facing upwards.
Make sure the latch is still fully retracted (unlocked).
C
5
While the door is OPENED and UNLOCKED (latch
retracted and thumbturn facing upwards ), load 3 AA
batteries into the battery compartment.
NOTE:
For best results, use new, non-rechargeable Alkaline
batteries only. Do not mix old and new batteries.
Reset the lock to teach the lock the orientation of the door.
A
Press and hold the Reset button.
Do not release the reset button until you
completed the next step.
B
C
Test operation using backup key and thumbturn for smooth rotation.
If thumbturn doesn’t rotate, repeat step 4C, making sure the thumbturn in
facing upwards, and tailpiece in horizontal position.
Do not put the physical key in the lock before the lock is completely installed.
D
IMPORTANT:
Always run this step after installation. The motor will not operate before completing the step.
Place the 4th battery and keep holding the
reset button, until the latch bolt extend.
NOTE:
If the latch doesn’t extend within 10 seconds,
repeat step 4C and 5A, making sure the
thumbturn is always vertical and latch always
retracted.
IMPORTANT:
Do not load batteries until lock is completely installed.
IMPORTANT: Do not insert the physical key before and during installation.
Remove the battery cover.
Locate the slot at the bottom and use your
fingernail or a flat head screwdriver to pry the
cover up and pull it off.
A
Secure the interior assembly with screws K.
E
K
D
Secure the mounting plate with the screws J.
Do not overtighten screws.
J
keep parallel to door edge
Horizontal
unlocked
Send the cable through the bottom horizontal slot in the
mounting plate.
C
E
unlocked
G
F
tailpiece horizontal
Facing
Upwards
Facing
Upwards
Unlocked


