background image

Manual-9

Device Selection

After 

Polling

, the 

Device Selection

 window displays any

connected RW 232 units, as well as Offline versions of all
Rane RW 232 products.

The quickest way to get to the RW 232 Device Edit screen,

if not already displayed, is to click the 

Device 

button on the

far right side of the toolbar. When pressed, a list of the first
fifteen connected devices appears. Click one of the devices—
either an offline device or an actual device—and the selected
device’s edit screen appears. The selected device name is
displayed at the top within the title bar.

Alternatively, after 

Polling

, the same device list appears in

the 

Device Selection

 window. Select the connected or offline

device from the list and click 

OK

. The connected unit’s

Device Address 

is displayed within brackets [ ] to the left of

the device name. Double-clicking on the device name is
equivalent to selecting the device and clicking 

OK

.

If the installation changes by adding more RW 232 units,

choose 

Device > Select

, and the 

Poll 

button to make the

computer recognize currently connected units.

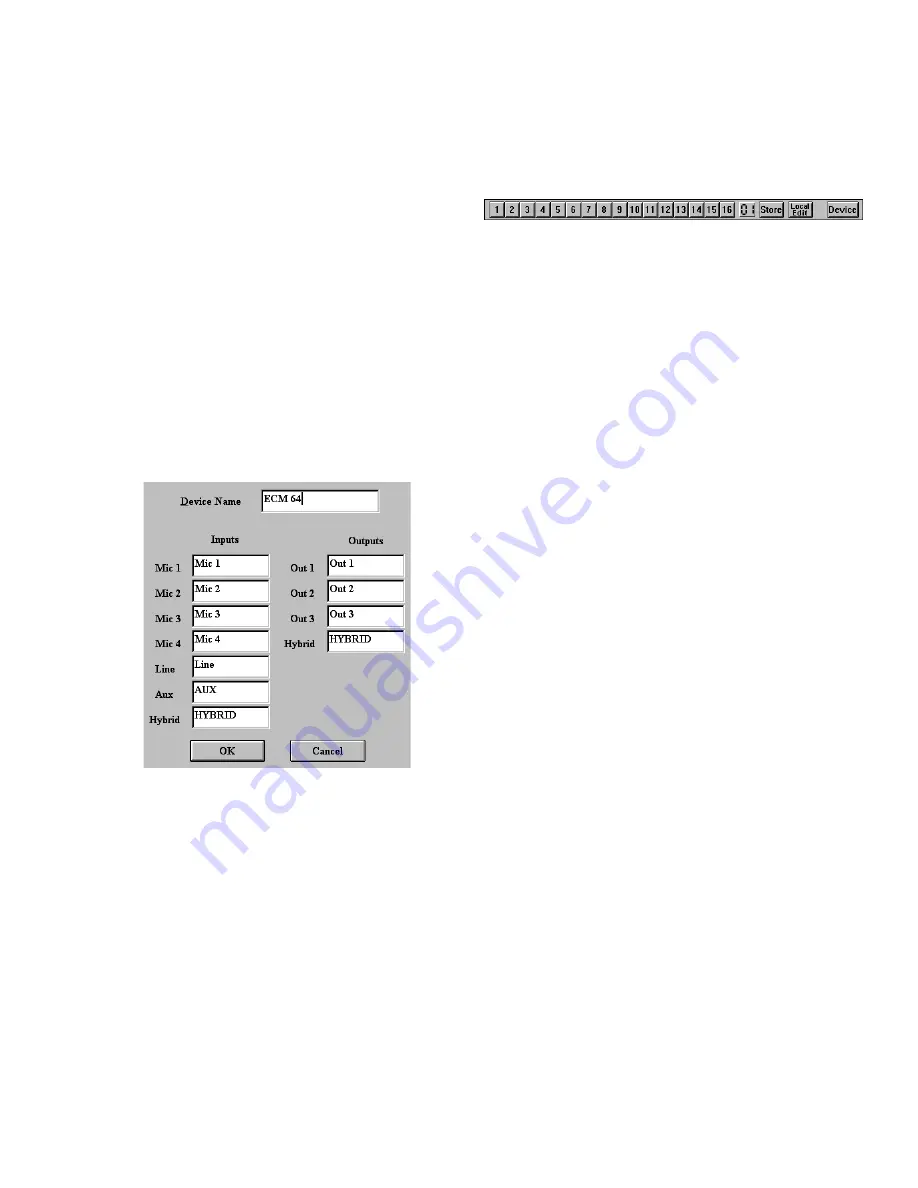
ECM 64e Devices can also be given custom names,

tailored to your installation. Simply choose 

Device > Name

Device

, and the following screen appears.

Memory names are stored in the computer, not in the ECM

64e, along with other installation-specific information. Select

System > Save Job File

 to support multiple installations.

Returning to Device Edit from the Site Control panel

requires a password. 

Right-click on the title bar to Select

Device Edit (password required), or Exit the program.

If more than 16 Memories are needed, they can be saved to

disk and recalled later.

Memory Selection Toolbar

All of Rane’s RW 232 products have 16 

programmable

Memories with one 

working 

Memory called Memory 0.

Recalling a Memory replaces the working Memory with the
selected Memory. The selected Memory is then displayed next
to the Store button. 

All control changes are made to working

Memory

, not to the selected Memory. The selected Memory

flashes whenever working Memory does not match it. To save
these settings in one of the 16 Memories, simply click Store,
and the Memory number key. After Storing, clicking any
Memory number instantly recalls it. The 16 Memories are
stored within the units non-volatile Memory, and recalled by:
Selecting a Memory using RaneWare,

      or from a control system by

a.  Sending a Program channel from memory command, 

or

b.  Sending a Program all channels from memory on all

devices command

Recalling settings allows the room controller to make routing
changes without affecting the input and output levels. There
are three separate Memory recall options that are available to a
room controller:
a.  Recall all
b.  Recall Input settings only
c.  Recall Output settings only

See 

Program channel from memory

 on page Manual-17

in the 

Device Control Language

.

Saving & Printing

From the 

Device 

menu, both memories and names can be

saved and retrieved to and from a file. To save both memories
and names, select 

Device > Backup Memories to File

.

Retrieval of Memories and Names are performed separately.
This allows you to create systems that operate the same but
have separate Names. To retrieve Memories from a file select

Device > Restore Memories from File

. To retrieve Names

from a file select 

Device > Restore names from File

.

A printout report of Mic Mix, Out 1 through Out 3, Hybrid,

AEC and stored phone numbers per memory is available under

Device > Print Device Report

.

Device, Input and Output Names Dialog

Memory & Security

ECM 64e can operate all the time through a computer if a

system controller is not installed. To preserve Memory
security with a computer operator, the software can be locked
(under 

Device

), and a system password can be assigned (under

System > Change Password

).

The default password is “

please

”.

Memories can be customized with names, through 

System

> Site Control Panel Setup

.

The Site Control Panel is all an operator needs to recall

Memories. If only a few presets are required, blanking an entry
in the Site Control Panel Setup removes the screen button. A
password is not required to use this screen.

Содержание ECM 64e

Страница 1: ...SS switch to 1 by setting all switches off down except switch one labeled 1 on the chassis the right most switch If there is more than one unit refer to Setting the Device Address on page Manual 7 to...

Страница 2: ...ECM 64e has been placed in Auto Answer and will accept an incoming call when the number of rings matches the set ring count LEVEL meter Selectively displays any one of the inputs or outputs by using...

Страница 3: ...acks magically appear when the DH 1e is installed included with the ECM 64eAD The PHONE jack connects to a standard two wire POTS telephone This connection is disconnected when the ECM 64e is Off Hook...

Страница 4: ...nce Out 1 is used for the AEC Reference Mics cannot be sent to Out 1 for local speech reinforcement If Mics are sent to both the AEC Input and the AEC Reference the AEC will not perform properly The M...

Страница 5: ...Manual 5 Wiring Digram for Typical ECM 64eAD Installation AP1 C64 RaneWare Screens...

Страница 6: ...t line to the telephone company s CO Central Office This line should not be shared by others as this may cause ground loops ECM 64e Connection Overview Balanced Euroblock audio connections are used th...

Страница 7: ...Address The Device Address is set using a binary code which may be determined using the following table our Windows Address Calculator program or by adding the place values 1 15 silk screened on the...

Страница 8: ...dware Manual RaneWare can be fully demonstrated and operated without any unit attached called offline A RaneWare CD ROM comes with each unit RaneWare is a single program with different windows capable...

Страница 9: ...Memory not to the selected Memory The selected Memory flashes whenever working Memory does not match it To save these settings in one of the 16 Memories simply click Store and the Memory number key Af...

Страница 10: ...by subtracting the room loudspeaker audio from audio received by the room microphones This is accomplished by routing the room loudspeaker audio to the AEC Reference REF and room microphones to the AE...

Страница 11: ...Answer and Ring Detect Auto Disconnect Off Hook status DTMF Dialing with six programmable speed numbers DTMF Decoding See Opstat page Manual 19 You can check the status of the digital hybrid in Devic...

Страница 12: ...olling for units in RaneWare under Device Poll The unit should be found quickly Check that the COM port selected in RaneWare under Setup System Setup is the one on your computer that is con nected to...

Страница 13: ...ller opera tion DH 1e Digital Hybrid The DH 1e Digital Hybrid allows audio conferencing over a standard POTS 2 wire phone line A 32 millisecond Line Echo Canceller is utilized to remove line echo caus...

Страница 14: ...informs you he only has enough audio budget for 2 ECM 82As Before telling your client there is no way here is a solution Since the ECM 64e has 4 Mic Inputs use these for the speech reinforcement mics...

Страница 15: ...Manual 15 ECM 64e and Larger ECS Installation...

Страница 16: ...On 0 Off 8 08 AEC In Mic Mix 1 0 byte 1 On 0 Off 9 09 AEC In Line 1 0 byte 1 On 0 Off 10 0A AEC In Aux 1 0 byte 1 On 0 Off 11 0B AEC Ref Mix In Out1 Ext 0 1 2 byte 0 Mix In 1 Out 1 2 Ext 12 0C AEC Ref...

Страница 17: ...33 Phone Level 0 to 31 byte 15 to 16 dB 52 34 Noise Level 0 to 31 byte 15 to 16 dB Output 3 Parameters Index Hex Name System Parameters Encoding Method 53 35 Output Mute 1 0 byte 1 Mute 54 36 Output L...

Страница 18: ...X Overflow 09 RW232 Parity Error 0A Not Ready 0B Flash Error Send data to channel 81 hex Transmit ADDR header FB XX FB XX where XX ADDR See Note 9 Get DT Get ID Transmit 00 XX where XX number of data...

Страница 19: ...ecksum Get COMSTAT Mute Output 87 hex Transmit ADDR header FB XX FB XX where XX ADDR See Note 9 Get DT Get ID Transmit 00 03 where 03 number of data bytes to follow including checksum Transmit 87 comm...

Страница 20: ...1 20 39 14 27 DTMF Number 2 40 59 28 3BDTMF Number 3 60 79 3C 4FDTMF Number 4 80 99 50 63 DTMF Number 5 100 119 64 77 DTMF Number 6 A within the DTMF number inserts a 500 millisecond delay A non digi...

Страница 21: ...Hybrid Command 92 hex Transmit ADDR header FB XX FB XX where XX ADDR See Note 9 Get DT Get ID Transmit 00 XX where XX number of data bytes to follow including checksum Transmit 92 command code Transm...

Страница 22: ...data bytes to follow including checksum Transmit 00 command code Transmit FE checksum Get Data From Channel 01 hex Transmit ADDR header FB XX FB XX where XX ADDR See Note 9 Get DT Get ID Transmit 00...

Страница 23: ...ecksum Get Hardware Revision Get Software Revision x10 Get Checksum for both revisions Get COMSTAT Get MRP Table 0B hex Transmit ADDR header FB XX FB XX where XX ADDR See Note 9 Get DT Get ID Transmit...

Страница 24: ...lize hardware handshaking via DTR DSR The beginning of a message always takes the form FB xx FB xx where xx ADDR Note When FB appears in the body of the message it is always repeated Input port 9 pin...

Страница 25: ...the one byte Command and any Data int CmdToPacket BYTE Buff int MsgLen BYTE L_MSB MsgLen 1 8 0xFF Grab MSB of Size BYTE L_LSB MsgLen 1 0xFF Grab LSB of Size FBs is the number of 0xFB bytes in the mes...

Страница 26: ...n your equipment If this equipment is causing problems contact Rane Corporation 10802 47th Avenue West Mukilteo WA 98275 425 355 6000 for repair and warranty information The Telephone Company may inst...

Отзывы: