


Manual-5
Two Paging Sources
with No CP R1 Remote Control
When using both paging inputs but not the CP R1 remote
you do need to plug in and set the configuration adapter, (the
short piece of wire with the phone plug and stripped wires
included with the CP 62.) This adapter tells the CP 62 where
one of the paging sources needs to go. The front panel
PAGING ZONE ASSIGN switch (see Front Panel, balloon
#6) routes one paging source and the configuration adapter
routes the other.
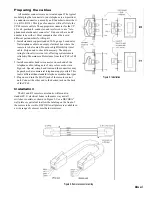
SETTING THE CONFIGURATION ADAPTER:
To page only in ZONE 1 twist the black and green wires
together.
To page only in ZONE 2 twist the black and red wires
together.
To page in BOTH Zones twist all three (black, red, and
green) together.
Ignore the cowardly yellow wire, it serves no purpose.
CP R1 Zone Assign Remote
Control
When installing the R1 Remote, locate it next to the
paging source. This lets the user select the zones where the
page is to be heard. The R1 connects to the REMOTE ZONE
ASSIGN jack next to the paging inputs on the rear of the
CP 62.
CP R1 with One Paging Source:
Either Mic or Phone/Line
The front panel PAGING ZONE ASSIGN switch (see
Front Panel, balloon #6) lets you assign the paging signal to
ZONE 1, BOTH or ZONE 2. Similarly, the CP R1 remote lets
you assign one of the Paging Sources to either or both Zones.
Which signal is controlled from the front panel PAGING
ZONE ASSIGN switch and which is controlled via the rear
panel REMOTE ZONE ASSIGN connector (Rear Panel,
balloon #15) is determined by the rear panel PAGING
INPUTS ASSIGN switch (see Rear Panel, balloon #4). The
rear panel switch controls the front panel switch and the rear
panel connector.
To use only one paging signal and control it from the
front panel of the CP 62: set the rear panel PAGING INPUTS
ASSIGN switch to PHONE to control the PHONE/LINE
signal from the front panel of the CP 62, or to MIC to control
the MIC signal from the front panel.
Use the CP R1 remote to control one paging source from
another location. In this scenario, set the rear panel PAGING
INPUTS ASSIGN switch to MIC to control the XLR MIC
signal via the remote or set the switch to PHONE/LINE to
control the PHONE/LINE signal from the CP R1 remote.
CP R1 with Two Paging Sources:
Both Mic and Phone/Line)
When using both paging sources, the rear panel PAGING
INPUTS ASSIGN switch controls two functions (see Rear
Panel, balloon #4). Which signal is controlled from the front
panel PAGING ZONE ASSIGN switch (see Front Panel,
ballon #6) and which signal is controlled by the REMOTE
ZONE ASSIGN connector (Rear Panel, balloon #15, the place
you plug in the CP R1 remote.)
To use the CP R1 remote to control the XLR MIC signal
set the rear panel PAGING INPUTS ASSIGN switch to the
MIC position. To control the PHONE/LINE signal, set the
PAGING INPUTS ASSIGN switch to the PHONE/LINE
position.