background image

4

TND

 750 Quick Start Guide

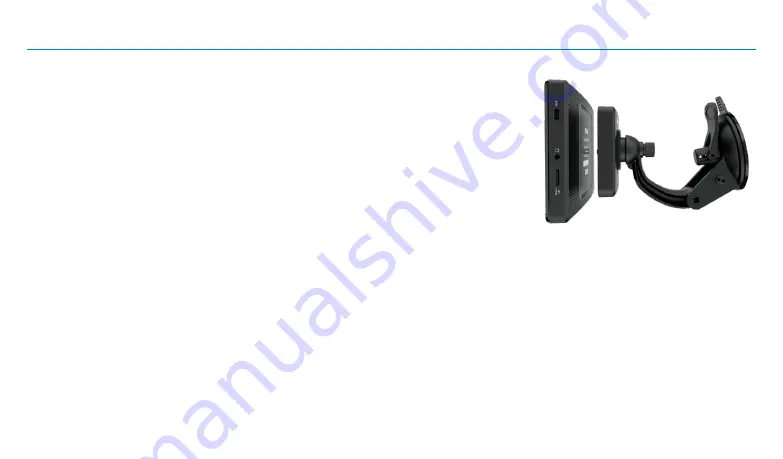
Install the Mount

NOTE: 

Follow all local laws and regulations governing the placement of the mount.


 1.  Select an area with a line of sight to the sky and GPS satellites.

  2.  Clean and dry the mounting area.
  3.  Remove the suction cup protective film.
  4.  Attach the two pieces of the mount together and lock into place.
  5.  Adjust the angle of the mount.
  6.  Pull the suction cup lever up to release suction.
  7.  Plug the power cord into the mount and the vehicle's 12-volt power source.
  8.  Place and hold the mount suction cup against the mounting surface.
  9.  Press the suction cup lever down until it snaps into place.
10.  Snap the tablet onto the mount.
11.  Adjust the tablet so that it can be easily seen and  


does not block the driver's line of sight.

Содержание TND 750

Страница 1: ...QUICK START GUIDE ...

Страница 2: ... uncontrolled environment SAR compliance for using the equipment in close proximity to the human body has been evaluated at 0mm This equipment must not be co located or operating in conjunction with any other antenna or transmitter End users and installers must be provide with antenna installation instructions and consider removing the no collocation statement Caution Any changes or modifications ...

Страница 3: ...ation check all safety related equipment to ensure that it operates without interference from the device its cables or any other accessories Connect the vehicle charger to a 12V outlet only The device can also be charged using a standard Micro USB charger Device Do not use sharp edged objects on the device touch screen The device is not waterproof and is not protected against water damage Protect ...

Страница 4: ...3 TND 750 Quick Start Guide Your TND 750 Box Contents 1 TND 750 Unit 2 Smart mount 3 Bracket with suction cup 4 Vehicle charger 5 Micro USB cable 6 Anti glare screen protector 3 2 1 4 5 6 ...

Страница 5: ...h the two pieces of the mount together and lock into place 5 Adjust the angle of the mount 6 Pull the suction cup lever up to release suction 7 Plug the power cord into the mount and the vehicle s 12 volt power source 8 Place and hold the mount suction cup against the mounting surface 9 Press the suction cup lever down until it snaps into place 10 Snap the tablet onto the mount 11 Adjust the table...

Страница 6: ...5 TND 750 Quick Start Guide Your TND 750 DC in power AUX out TND 750 Smart Mount Micro USB TND 750 Home Power Volume Down Up Micro SD card AUX Port ...

Страница 7: ...ce with Rand McNally for updates and support NOTE You will be required to register your device in order to receive new updates Transferring User Information from Previous Device To move or export user data from a previous Rand McNally TND device to a new Rand McNally TND device please visit the following website for specific instructions randmcnally com tnd750 support ...

Страница 8: ...d displays connection strength 4 Bluetooth indicator Opens Bluetooth settings and shows connectivity states 5 Volume indicator Opens volume control 6 Brightness indicator Opens brightness control 7 System update Indicates if a system update is available Opens to initiate download 8 Current time Displays current time 9 Battery power indicator Displays current battery state ...

Страница 9: ...r tools 2 Rand Navigation Show location on the map and view navigation instructions 3 Guided Search Choose a destination by History Address Book Points of Interest or Searching 4 DriverConnect Record view and track duty status through your device Also includes hours of service timers vehicle inspection reports and more 4 2 1 3 ...

Страница 10: ... holding down the power button for 5 seconds or until you see the Power Off screen 2 Press Power Off 3 Once the unit has shut down press and hold the power button for 2 to 4 seconds to turn it back on If the unit is unresponsive and you don t see the power down button appear on the screen hold down the power button for 10 to 15 seconds and the device will turn off completely Once the unit has shut...

Страница 11: ...i connected services 4 Zoom in out 5 Return to current location 6 Virtual dashboard 7 Current street name upcoming intersection or current location 8 Local time and Elevation 9 Settings General Truck Info Route Map and Warnings 10 Hide display screen information and controls Rand Navigation 5 1 2 3 4 6 7 8 9 10 ...

Страница 12: ...Tap the option button to be changed 5 Enter new settings 6 Tap to save changes On the left tap on an option On the left tap on an option On the right enter settings for the option On the right enter settings for the option 1 Tap Settings 2 Tap Truck Info or Warnings tab 3 Tap and to view options 4 Tap the option button to be changed 5 Enter new settings 6 Tap to save changes ...

Страница 13: ... interest Address searches should include either a city or postal code Avoid using punctuations Avoid using street prefixes and suffixes 2 Route to a New location 3 Plan a multi stop trip or record a trail 4 Return to a previous location 5 Access the Address book 6 Route to a Point of Interest POI 7 Return Home 8 Route to Work 1 2 3 4 5 8 7 6 ...

Страница 14: ...eet name Tap the street name to select 6 Enter the house number Tap the address to select Tips You can also route to a new location by City center Intersection Coordinates or choose Address Postal Code View recent destinations by tapping Where to Guided Search History View recent cities by tapping Where to Guided Search New location Address View saved locations by tapping Where to Guided Search Ad...

Страница 15: ...las 5 Begin route to destination 6 Reorder locations 7 Modify Route avoids review Route details Overview and Save to My trips 8 Add a location 9 Review route details 10 Compare the primary and alternate route s and choose one 11 Start route To manage via points Tap Where to Guided Search My trips Multi stop trips You can add multiple destinations in a multi stop trip 2 1 3 4 5 7 8 6 9 10 11 ...

Страница 16: ...om in out 8 Current speed Note Turns red for speed warnings 9 Posted speed limit Tap to open a Tell Rand about speed limits 10 Volume control 11 Virtual dashboard 12 Current street name upcoming intersection or current location 13 Arrival time remaining time remaining distance or other options 14 Settings General Truck Info Route Map and Warnings 15 Hide display screen information and controls Ran...

Страница 17: ...t the maneuver Junction View closes and the previous window displays 1 Signs to follow for the next maneuver 3 Exit to follow for the next maneuver 4 Number and direction of lanes for the next maneuver 5 Distance to the upcoming maneuver Distance decreases as you approach the maneuver 6 Lane assist arrows 7 Dismiss Junction View 1 2 3 4 5 6 ...

Страница 18: ...active route tap Route Options Search Add a Stop Guided Search POIs Search for a POI 1 Near your truck 2 In a particular city 3 Along your route 4 Near your destination POI Categories 5 Select a category 6 Search your custom POIs 7 Find popular truck friendly POIs 1 2 5 6 7 3 4 ...

Страница 19: ...19 TND 750 Quick Start Guide Rand Navigation POIs continued 8 Tap location to select 9 Search by name 10 Search by available services 11 Search Nearby My destination or Along route 8 9 10 11 ...

Страница 20: ... 1 Tap Truck Tools Status Mileage Fuel 2 Tap the Status tab to view timers odometer readings and average speed 3 Tap on a field to change or reset the number 4 Tap the Mileage tab to view a list of mileage logs by quarter 5 Tap on a quarter to view individual logs ...

Страница 21: ...1 Tap Truck Tools Status Mileage Fuel 2 Tap the Fuel tab to view a list of fuel logs by quarter 3 Tap on a quarter to view individual logs 4 Tap Add Fuel to record the date location and cost of fuel purchase 5 Tap on a field to make changes 6 Tap Save ...

Страница 22: ...able the appropriate slider to view fuel prices weather and traffic on the map Tap the Wi Fi connection settings button to view details and settings for fuel weather and traffic Tap the Fuel tab to view sort and filter a list of prices as well as modify preferences Tap the Weather tab to view weather conditions and modify weather layer preferences Tap the Traffic tab to view a traffic flow and inc...

Страница 23: ... McNally Website randmcnally com tnd750 Support randmcnally com support Accessories store randmcnally com Facebook facebook com randmcnally Customer Support Call toll free 1 877 446 4863 E mail support randmcnally com Questions about using TND 750 Our team is ready to help ...

Страница 24: ... the software incorporated in the Product Alter remove or obscure any copyright notice trademark notice or proprietary legend from the Product This license will terminate automatically if User fails to comply with any of the terms of this license and in such case User agrees to immediately stop using the Product Rand McNally may revise or update the Product at its sole discretion but it is not obl...

Страница 25: ...of any kind or character including but not limited to attorney s fees arising out of or in connection with any use or possession by the User of this Product These terms and conditions constitute the entire agreement between Rand McNally and its licensors and suppliers and the User pertaining to the subject matter hereof and supersedes in their entirety any and all written or oral agreements previo...

Страница 26: ...rovement process and reserves the right to provide enhancements that may not be reflected in the pictures and specifications in this manual The information contained herein may be changed at any time without prior notification Neither this manual nor any parts thereof may be reproduced for any purpose whatsoever without the express written consent of Rand McNally nor may it be transmitted in any f...

Страница 27: ...Support randmcnally com support 1 877 446 4863 TND750QSG_032420_v001 ...

Отзывы: