background image

12

DashCam 500 User Manual

Using the DashCam

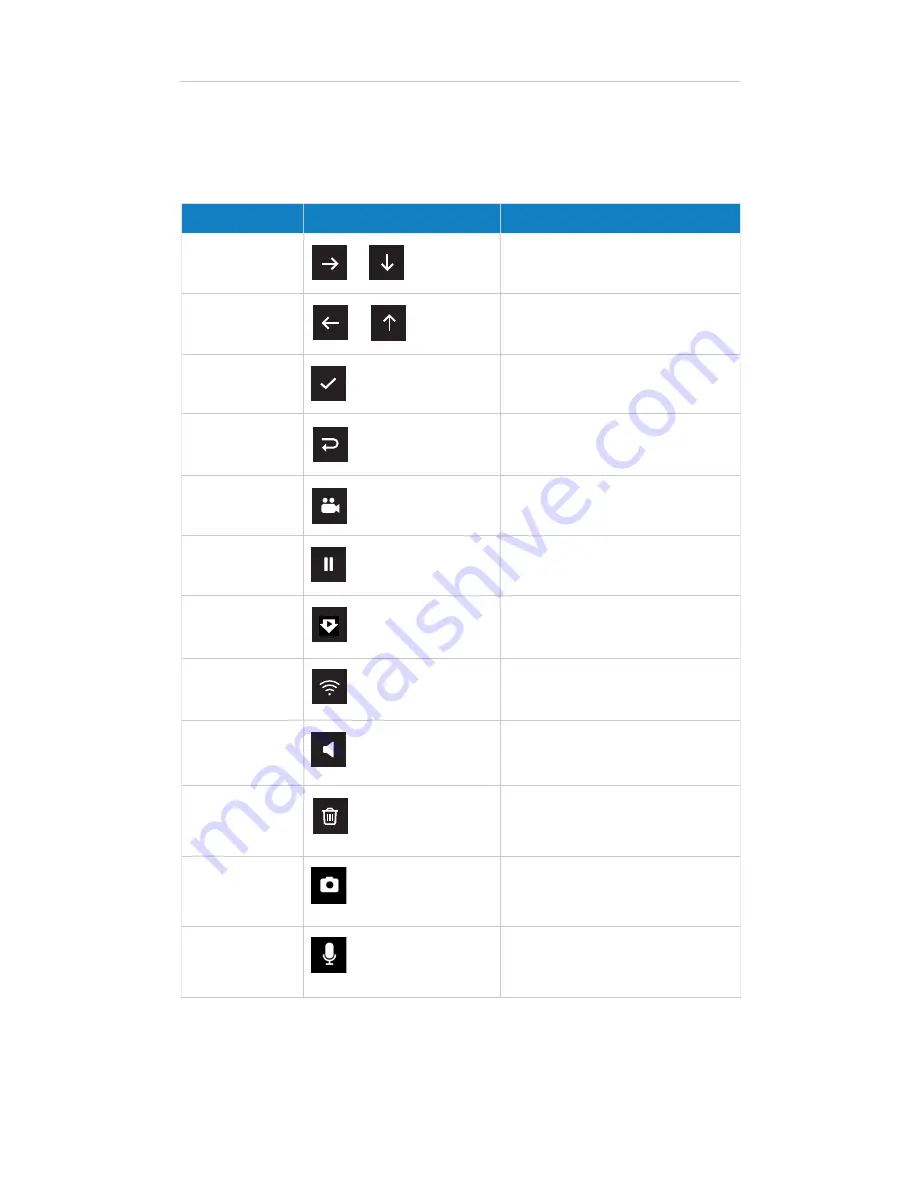
Button Name

Icon

Description

Next

Moves to the next option.

Previous

Moves to the previous option.

Select

Selects the option, video, or picture, 

and opens a new screen.

Back

Returns to the previous page.

Record Video

Begins recording video.

Pause

Stops recording video.  

Or, stops playback.

Flashback Video

Creates a Flashback video using 

VideoKeeper.

WiFi

Turns Wi-Fi on and off.
When turning on, displays the Wi-Fi 
Information screen.

Sound

Turns sound on and off.
A slash through the icon indicates 
sound is off.

Delete

Deletes a video or image.

Camera

Takes pictures from the  

DashCam app.

Microphone

Enables or disables the audio stream

from the DashCam app.

Press one of the four buttons to select an option. Some common 
options are shown below:

Содержание DashCam 500

Страница 1: ...DashCam 500 User Manual ...

Страница 2: ...rn On Off 7 Install the Companion App 7 Pair the Camera with your Phone 8 Format the Memory Card 9 Using the DashCam 10 Home Screen 10 Dynamic Buttons 11 Power Button 13 Wi Fi 13 Live Feed 14 Gallery 15 Photo 16 Settings 16 Using the App 19 Live Feed 19 Videos 21 Photos 22 MapShots 22 Download and Share Videos and Photos 23 Settings 25 Flashback Videos 26 Use on DashCam 26 Use in App 27 Warnings E...

Страница 3: ...triggered by a G Sensor With the flashback feature one to three minutes of video preceding the press of a button will ensure that a video of something that happened in the past is saved almost like flashing back to the past View a live video feed on the DashCam or on a smartphone via the companion app Pause record and delete videos on the DashCam or remotely through the app Use the app s Gallery s...

Страница 4: ...4 DashCam 500 User Manual What s in the Box 1080p HD DashCam with large 3 screen for high quality video Easy to use clip in suction cup mount with quick release and GPS 16GB memory card Micro USB cable ...

Страница 5: ...re using it you can do this in the camera Refer to the Format the Memory Card section Attach the Suction Cup and Mount to Window The DashCam connects to a separate suction cup mount There are two tabs on the mount that connect into the top of the DashCam These tabs on the side of the mount can be squeezed to insert or release the mount from the camera There is only one way the suction cup mount ca...

Страница 6: ...ottom of the screen Remember the camera does not have a touch screen so in order to move around the screen you need to use the buttons at the bottom of the camera Connect a USB Cable for Power The DashCam is powered by an internal battery and can be recharged using a micro USB cable Connect the USB cable to the port in the top left corner of the DashCam or to the connector on the end of the lock k...

Страница 7: ...ss of the Power button will turn the camera on Install the Companion App The DashCam 500 can be controlled by a companion app on either an iOS or Android device You can also use the app to view the live video feed To download the app On an iOS device 1 Open the App Store on your smartphone 2 Search for Rand McNally DashCam Select and install the app On an Android Device 1 Open the Google Play stor...

Страница 8: ...s hotspot from your phone s Wi Fi settings page App Settings 2 1 Press the Wi Fi dynamic button on the DashCam to enable or disable Wi Fi 2 The Wi Fi screen opens and you can view the network name and pairing code password to use to connect your phone 3 Go to your phones settings to select the Rand McNally Wi Fi network 4 Press the Back dynamic button to return to the DashCam 500 home screen 1 ...

Страница 9: ...namic buttons on the DashCam or use the Rand McNally DashCam app on your smartphone to format the SD card From the DashCam 1 Navigate to the Settings screen 2 Use the up and down arrows to highlight Format TF Card 3 Press Select 4 Select OK From the app 1 Connect your phone to the DashCam Wi Fi network 2 Tap Settings in the app 3 Tap Format SD Card 4 Tap OK ...

Страница 10: ...unctionality on the DashCam All functions can be performed either on the DashCam using the dynamic buttons or from within the companion app Home Screen When you power on the DashCam it immediately begins recording and displays the live view screen To access the Home screen press Back If you are recording video the Home screen displays REC and a red dot in the top right corner The Home screen is sh...

Страница 11: ...m features four dynamic buttons located below the screen Use these buttons to navigate and make selections The menu icon will have a glow behind the icon to indicate which menu item you can select Note The DashCam 500 does not have a touchscreen Dynamic Button Bar Controls ...

Страница 12: ...tops recording video Or stops playback Flashback Video Creates a Flashback video using VideoKeeper WiFi Turns Wi Fi on and off When turning on displays the Wi Fi Information screen Sound Turns sound on and off A slash through the icon indicates sound is off Delete Deletes a video or image Camera Takes pictures from the DashCam app Microphone Enables or disables the audio stream from the DashCam ap...

Страница 13: ... off turns the DashCam on Wi Fi The DashCam 500 uses Wi Fi to communicate with the companion app When Wi Fi is on the Wi Fi icon appears in the dynamic icons at the bottom of the Home screen Press the Wi Fi button to turn it off Press again to turn it on When you turn Wi Fi back on the Wi Fi Information screen displays This screen contains the Wi Fi network name and password Press Back to return t...

Страница 14: ...f the screen showing that the Flashback video is being recorded 4 Press the Sound button to toggle sound on and off 5 Press Back to return to the Home screen IMPORTANT When Loop recording is turned on the DashCam 500 will continuously record video Eventually the SD will get filled with videos However when this happens the DashCam will automatically overwrite the oldest videos to make room for the ...

Страница 15: ... the Next and Previous buttons to find a video and press Select to open the video for playback The video begins to play as soon as you open it 3 Press Pause to stop playback 4 Press the 1x button to change the playback speed Options are 1x normal speed 2x 4x 8x 5 Press the Delete button to delete the video Press Yes to confirm or Cancel to keep it instead 6 Press Back at any time to return to the ...

Страница 16: ...e and press Select to view it 3 Press the Delete button to delete the picture Press Yes to confirm or Cancel to keep it instead 4 Press Back at any time to return to the previous screen Settings The DashCam 500 is highly customizable You can change Wi Fi camera resolution recording options G Sensor and other functions from the DashCam s Settings screen Press Next until Settings is highlighted then...

Страница 17: ...me on your phone Time zone select Sets the time zone for your DashCam Daylight Savings Time On Off Determines whether the DashCam time adjusts for Daylight Savings Time Screen time off 30 seconds 1 minute Always on Sets the length of time to wait before shutting off the display screen on the DashCam The DashCam continues to record even if the display screen turns off Photo capture On Off Allows yo...

Страница 18: ...y to begin recording automatically when the DashCam detects movement or an impact to the vehicle Memory card storage Displays the storage used and available on the SD card Format SD card OK Cancel Select OK to format the SD card which erases ALL video and photos Reset settings none Select to reset all DashCam settings to the factory defaults Installation guide Provides a quick start tutorial on sc...

Страница 19: ...unctions The button icons and button names are the same on the DashCam and the DashCam companion app Live Feed You can watch the live camera feed from the app When you watch on your phone the Live Feed and the dynamic buttons on the camera become disabled They become enabled again when you exit the live feed on your phone Rotating the phone to a horizontal position allows you to fill the screen wi...

Страница 20: ...ve feed and return to the home screen 3 Tap the Microphone Icon to enable or disable the audio stream 4 Tap Pause to pause recording 5 Tap Record Video to start recording again 6 Tap the camera to take a picture 7 Tap the Flashback icon to begin recording a Flashback video The Recording message displays in the app when you are recording a Flashback video 7 5 6 2 3 7 4 ...

Страница 21: ...e On an IOS Apple device the categories are show at the bottom of the screen 3 Tap a video to begin playback 4 Tap the Play Pause button to control playback 5 Tap Download Share or Delete to manage the video See the Download and Share Video section for more details Note When viewing a video from the camera on the companion app it may take a few seconds before the video begins to play 2 3 4 5 1 ...

Страница 22: ...een 2 Tap an image to view it 3 Tap Download Share or Delete to manage the image See the Download and Share Video section for more details MapShots With MapShots you can view your drive on a map at the same time you replay the video MapShots is only available after you have downloaded the video to your phone via the DashCam companion app 1 ...

Страница 23: ...am 500 allows you to download any video or photo to your phone You can also share any downloaded video or photo over text email or social media To download 1 Tap the video or photo you want to download 2 Tap Download 3 The app displays a progress bar while your downloading 1 2 3 ...

Страница 24: ...OT need to be connected to the DashCam to view download in the app To share a video 1 Look for the blue Downloaded icon next to a video 2 When you open the video only the Share and Delete options are available Tap Share 3 Sharing options display These options are unique to your phone 4 Tap Delete to delete the video from your phone This will NOT delete the video from the camera Using the App 1 2 4...

Страница 25: ...1 Tap the setting 2 Tap the setting to change and make a new selection 3 Tap Back to return to the Home screen Note The settings access from the app are the same as the settings access from the DashCam See the table in the previous chapter for details on the DashCam s settings 1 2 3 ...

Страница 26: ... video preceding the selection The length of video is dependent on the loop recording length you previously set for the DashCam Videos recorded with the Flashback button will not be deleted automatically or overwritten Use on DashCam To begin creating a Flashback video 1 While in Live Feed press the button under the Flashback icon 2 The RECORDING message displays 1 2 ...

Страница 27: ... Live Feed to use Flashback video 1 Tap the start Flashback Video icon 2 The Recording message displays Note The video including video recorded prior to the time you pressed the button will be protected and saved in the Flashback Video gallery 1 2 Enjoy your DashCam 500 ...

Страница 28: ...ts licensors Rand McNally grants User a limited license for use of this product and the software incorporated in the product for its normal operation By using the product User acknowledges that the content of this document and the product are the property of Rand McNally and its licensors and are protected by U S copyright trademark and patent laws and international treaties THE USER MAY NOT Use t...

Страница 29: ...t of misuse or abuse of the product or as a result of unauthorized alterations or repairs 3 if the serial number has been altered defaced or removed or 4 if the owner of the product resides outside of the U S A or Canada Caution Rand McNally makes no warranty as to the accuracy of completeness of the information in the product and disclaims any and all express implied or statutory warranties inclu...

Отзывы: