


11
OPERATION
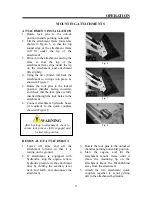
MOUNTING ATTACHMENTS
ATTACHMENT INSTALLATION
1.
Rotate lock pins to the unlock
position (handle pointing outwards).
2.
Tilt the attachment frame forward as
shown in Figure 6, so that the top
round edge of the attachment frame
will fit under the lip of the
attachment.
3.
Drive into the attachment, raising the
arms so that the top of the
attachment frame slips under the lip
on the attachment, and attachment
lifts slightly.
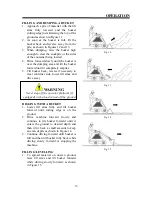
4.
Using the tilt cylinder, roll back the
attachment so it drops into place, as
shown in Figure 7.
5.
Rotate the lock pins to the locked
position (handles facing inwards),
and check that the lock pins are fully
inserted through the lock holes in the
attachment.
6.
Connect attachment hydraulic hoses
(if required) to the quick couplers
shown in Figure 8.
WARNING
After hook-up to attachment, check to
ensure lock pins are fully engaged and
locked into position
REMOVAL OF ATTACHMENT
1.
Lower lift arms and tilt the
attachment forward so that it is
resting on the ground.
2.
If attachment is equipped with
hydraulics, stop the engine, relieve
hydraulic pressure in the attachment
lines by shifting the auxiliary lever
back and forth, and disconnect the
attachment.
Fig. 6
Fig. 7
Fig. 8
3.
Rotate the lock pins to the unlocked
(handles pointing outwards) position.
4.
Start the engine, and tilt the
attachment mount frame until it
clears the mounting lip on the
attachment. Back the Walk-Behind
away from the attachment.
5.
Attach the two attachment quick
couplers together to avoid getting
dirt in the attachment hydraulics.


