background image


16 


IV. MAINTENANCE 

HYDRAULIC SYSTEM MAINTENANCE 


HYDRAULIC OIL LEVEL CHECK  

1.


Ensure that the Mini-Skid is standing 
level,  the lift arms are down and the 
tilt cylinder is closed. 

2.


Remove  the  oil  cap,  and  check  the 
level.    If  oil  is  apparent,  the  level  is 
satisfactory. 

3.


If necessary add the proper type and 
grade of oil. 


NOTE:


These  units  are  equipped  with  a  low 

hydraulic  warning  indicator.    Do  not  operate  if 
this indicator is lit.


CHANGING HYDRAULIC OIL 

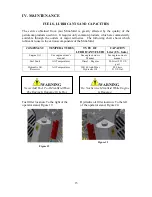
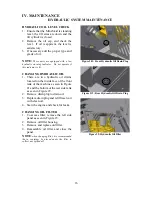
1.


There  are  two  hydraulic  oil  drains 
located on the inside face of the front 
tank of the machine as seen in Figure 
21 and the bottom of the rear side tank 
as seen in Figure 22. 

2.


Remove drain plug to drain oil. 

3.


Replace drain plug and refill reservoir 
with clean oil. 

4.


Start the engine and check for leaks. 


CHANGING OIL FILTER 

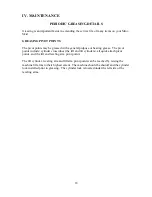
1.


To access filter, remove the left side 
panel as seen in Figure 23. 

2.


Remove oil filter housing. 

3.


Remove and replace old filter. 

4.


Reassemble  oil  filter  and  close  the 
panel. 

NOTE

when changing filter, it is recommended 

that  a  container  be  placed  under


the  filter  to 

collect any spilled oil. 


Figure 201: Front Hydraulic Oil Drain Plug 


Figure 212: Rear Hydraulic Oil Drain Plug 


Figure 22: Hydraulic Oil Filter 


Содержание 3300

Страница 1: ..._________________________________________ OPERATOR S MANUAL ________________________________________________ RAMROD Equipment A Division of Leon s Mfg Company Inc Canada P O Box 5002 135 York Road East Yorkton Saskatchewan S3N 3Z4 Phone 800 667 1581 Fax 306 782 1884 Email sales ramrodequip com Website www ramrodequip com ...

Страница 2: ...This page intentionally left blank ...

Страница 3: ...erence to right hand and left hand used throughout this Manual refers to the position when operating the machine facing forward For any additional information required please refer to your RAMROD Dealer Copyright 2008 Ramrod Equipment Corporation All rights reserved No part of this book may be reproduced or transmitted by any means electronic or mechanical including photocopying recording or by an...

Страница 4: ...anty to a designated service shop In no event shall the Buyer be entitled to recover for incidental or consequential damages such as but not limited to rental of replacement equipment loss of profits and loss of Mini Skid fluids and lubricants This warranty does not extend to Mini Skid components such as but not limited to engine tires batteries hydraulic hydrostatic components which are manufactu...

Страница 5: ...Owner Dealer Address Address Model Serial No Date Engine Serial No Hour Meter Reading Item Remarks Check engine oil Check hydraulic oil level Check radiator coolant level Check battery fluid level Check tension of engine belts Check air cleaner hoses connections Grease lubricate all pivot points Grease lubricate control lever cross Shafts and linkages Check all wheel bolts for tightness 90 ft lbs ...

Страница 6: ...This page intentionally left blank ...

Страница 7: ..._________________ Owner s Type of Business ________________________________ _______________________________ Owners Address Dealers Address ________________________________ _______________________________ Date Mini Skid Sold Date Mini Skid Delivered OPTIONS ACCESSORIES BUCKETS 31 inch 787 mm 36 inch 914 mm 42 inch 1067 mm 44 inch 1118 mm RAMROD COPY Please forward to RAMROD EQUIPMENT P O Box 5002 1...

Страница 8: ...This page intentionally left blank ...

Страница 9: ...erial Number ________________________________ _______________________________ Name of Owner Name of Dealer ________________________________ Owner s Type of Business ________________________________ _______________________________ Owners Address Dealers Address ________________________________ _______________________________ Date Mini Skid Sold Date Mini Skid Delivered OPTIONS ACCESSORIES BUCKETS 3...

Страница 10: ...This page intentionally left blank ...

Страница 11: ...rial Number ________________________________ _______________________________ Name of Owner Name of Dealer ________________________________ Owner s Type of Business ________________________________ _______________________________ Owners Address Dealers Address ________________________________ _______________________________ Date Mini Skid Sold Date Mini Skid Delivered OPTIONS ACCESSORIES BUCKETS 31...

Страница 12: ...This page intentionally left blank ...

Страница 13: ...NG PROCEDURE GASOLINE ENGINE 7 SHUT OFF PROCEDURE GASOLINE ENGINE 8 STARTING PROCEDURE DIESEL ENGINE 8 SHUT OFF PROCEDURE DIESEL ENGINE 8 MOUNTING ATTACHMENTS 9 OPERATIONAL PROCEDURE 10 IV MAINTENANCE 14 ENGINE MAINTENANCE 14 BATTERY MAINTENANCE 14 FUELS LUBRICANTS AND CAPACITIES 15 HYDRAULIC SYSTEM MAINTENANCE 16 FINAL DRIVE MAINTENANCE 17 PERIODIC GREASING DETAILS 18 PERIODIC MAINTENANCE AND SER...

Страница 14: ... This Decal Advised Of Actions or Danger Which Can Cause Personal Injury Wear Ear Protection When Engine Is Running The Sound Pressure Level Is 102 DB for A Weighted level 88 DB For C Weighted Level IMPORTANT This Decal Identifies Procedures Which Must Be Followed to Prevent Damage Top The Mini Skid Do Not Use The Mini Skid During A Thunderstorm Or When There Is A Chance Of A Lightning Strike SAFE...

Страница 15: ...A RAISED POSITION ALWAYS CARRY LOADS CLOSE TO THE GROUND DO NOT STEP OFF PLATFORM WITH THE LOAD RAISED TO AVOID FREE FALL OF LOAD WHEN LOWERING LIFT ARMS DO NOT PUSH LIFT ARM LEVER FULLY FORWARD DO NOT EXCEED RATED LOAD CAPACITY ALWAYS LOWER THE BUCKET AND SHUT OFF THE ENGINE BEFORE LEAVING THE MACHINE AVOID PARKING ON A SLOPE IF IT IS NECESSARY PARK ACROSS THE GRADE GROUND THE BUCKET AND BLOCK TH...

Страница 16: ...ons Engine Temperature Indicator Light If Equipped Indicator will illuminate if the engine temperate becomes too hot Shut off the engine immediately Throttle Control Idle When the throttle is in this position machine is at idle Hour Meter Tachometer Gas The hour meter records total machine hours The hour meter accumulates whenever the key is not in the OFF position During operation engine speed RP...

Страница 17: ...a spin turn or Skid Steer move one lever forward and one lever backward the same amount The TASKMASTER features single handed steering For normal operation the most comfortable hand position is to operate the two steering levers with the palm of the right hand with the fingers gripping the grip handle Flexing the fingers will allow forward travel and simply rotating the palm will allow normal stee...

Страница 18: ...7 gallons per minute oil flow to the auxiliary circuit This allows the operator to select the speed of the attachment These are push pull knobs Pulling the knob up turns the oil flow on to the attachment circuit Pushing the knob down turns the oil flow off Thus for attachments where 7 GMP is desired grapples dozer blades backhoes etc pull either one of the control knobs up For attachments where 14...

Страница 19: ...s so that both handles are pointing towards the center of the machine as shown in Figure 4 This will allow the springs to push the pins downwards through the mounting holes in the attachment and secure it to the unit WARNING The design of the quick attach system is such that attachments can be lifted and carried without the lock pins being engaged Before using any attachment check to be sure that ...

Страница 20: ... nuts and bolts safety shields and decals for possible failure or looseness 6 Check that all controls are in the neutral position WARNING Do Not Move Any Of The Control Levers Unless Standing With Both Feet On The Platform And Holding The Grip Handles STARTING PROCEDURE GASOLINE ENGINE 1 Push the throttle lever down slightly 2 Turn the ignition switch to ON and then through to the START position I...

Страница 21: ...d for a few seconds 3 Turn key clockwise to the Start position to crank engine 4 Once engine starts release key 5 Set throttle lever to idling speed to allow engine to warm up 6 If engine fails to start after cranking 10 seconds repeat steps 2 and 3 allowing a longer Preheat period 7 To restart a warm engine turn key clockwise to start SHUT OFF PROCEDURE DIESEL ENGINE 1 Park the Mini Skid on level...

Страница 22: ... the lock pins are fully inserted through the lock holes in the attachment 6 Connect attachment hydraulic hoses if required to the quick couplers as shown in Figure 7 WARNING After Hook Up To Attachment Check To be Sure Lock Pins Are Fully Engaged and Locked Into Position REMOVAL OF ATTACHMENT 1 Lower lift arms and tilt forward on the attachment so that the attachment is resting on the ground 2 If...

Страница 23: ...tion of the Mini Skid Keep the work area small and as level as possible 4 Decrease cycle time by SKID turning rather than backing up using a slow turn then going forward 5 When driving on slopes keep the heaviest end of the Mini Skid upward When driving on a slope with an empty bucket back up the slope in reverse and drive down a slope forward as in Figure 8 When driving on a slope with a load dri...

Страница 24: ...and Gradual When Maneuvering With Lift Arms Raised Do Not Cross Obstructions With Arms Raised All New Operators Must Work The Machine In A Safe Open Area To Become Familiar With Its Operating Characteristics WARNING Never Step Off The Operator Platform With The Load Raised DIGGING WITH A BUCKET 1 Lower lift arms fully and tilt bucket forward until cutting edge is on the ground 2 Drive Machine forw...

Страница 25: ...o empty the bucket TRANSPORTING THE MINI SKID Important Never Tow The Mini Skid Damage May Result When the machine is transported on a truck or trailer proper ramps must be used for loading A Mini Skid with an empty bucket or no attachment should be driven backwards up a ramp onto the trailer or forward down a ramp as shown in Figure 18 After the Mini Skid is driven onto the transporting vehicle l...

Страница 26: ...t cylinders of the Mini Skid Lock the support in place using the bolt that attached it to the leveling arm Ensure the machine is shut off before performing any work on the Mini Skid After completing work on the Mini Skid remove the support device from the lift cylinder and replace it on the leveling arm Important Never Lower The Lift Arms With The Support Device In Place Damage To The Lift Cylinde...

Страница 27: ...odic Maintenance and Service Schedule in your Manual To access the engine compartment remove louvered side panels or back panel as required BATTERY MAINTENANCE The battery is located within the engine compartment NOTE Check the battery hold down bracket for tightness Do not over tighten Remove any acid corrosion from the battery terminals and cables with a baking soda and water solution Coat the t...

Страница 28: ...S TYPE OF LUBRICANT FLUID CAPACITY Liter US Gals Engine Oil See engine owner s manual See engine owners Manual See engine owner s manual Fuel Tank All Temperatures Diesel Regular 20 Liter 5 25 US gal Hydraulic Oil Reservoir All Temperatures ISO 46 Anti Wear Hydraulic Oil 80 Liters 21 US Gal WARNING Never Add Fuel To A Mini Skid When The Engine Is Running Or Is Hot Fuel filler location To the right...

Страница 29: ...cated on the inside face of the front tank of the machine as seen in Figure 21 and the bottom of the rear side tank as seen in Figure 22 2 Remove drain plug to drain oil 3 Replace drain plug and refill reservoir with clean oil 4 Start the engine and check for leaks CHANGING OIL FILTER 1 To access filter remove the left side panel as seen in Figure 23 2 Remove oil filter housing 3 Remove and replac...

Страница 30: ...r 2 Loosen the locking nut towards unit front and adjust the tensioning nut to the desired tension level as seen in Figure 25 Figure 25 Track tensioning system NOTE A 180 lb person stepping on top of the track should give no more than 1 of flex mid span between the tension wheels and drive sprocket 3 Tighten the locking nut and replace the tension cover ...

Страница 31: ...ease The pivot points include cylinder cross tubes the lift and tilt cylinders all quick attach pivot points and the lift and leveling arm pivot points The lift cylinder leveling arm and lift arm pivot points can be reached by raising the machine lift arms to their highest extent The machine should be shutoff and the cylinder lock installed prior to greasing The cylinder lock is located under the ...

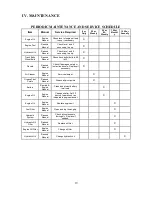
Страница 32: ...damaged safety or instruction decals Replace if necessary X Air Cleaner Engine Manual Service element X Grease Pivot Points Ramrod Manual Grease all pivot points X Battery Ramrod Engine Manual Clean and protect battery terminals X Engine Oil Engine Manual Change oil after first 20 hours of operation or as indicated in engine manual X Engine Oil Engine Manual Replace engine oil X Fuel Filter Engine...

Страница 33: ... system Tighten all fittings and connections Replace oil filter Warm up hydraulic oil when too cold See your RAMROD Dealer Erratic or no output on transmission Hydraulic oil too heavy Hydraulic oil level too low Drive coupling between engine and pump broken Use proper viscosity oil Check oil level Add is necessary Check couplings replace if necessary Loss of hydraulic oil flow from gear pump Reser...

Отзывы: