RAK WisGate Edge Lite RAK7258 Скачать руководство пользователя страница 2

Documentation Center

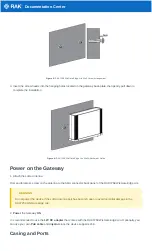
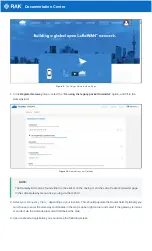
Figure 3: RAK7258 WisGate Edge Lite Wall Screw Arrangement

3. Insert the screw heads into the hanging holes located on the gateway back-plate, then gently pull down to

complete the installation

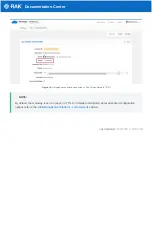
Figure 4: RAK7258 WisGate Edge Lite Wall Attachment Guide

Power on the Gateway

1. Attach the LoRa Antenna

First and foremost, screw on the antenna to the SMA connector back panel of the RAK7258 WisGate Edge Lite

 WARNING

Do not power the device if the LoRa Antenna port has been left open to avoid potential damage in the
RAK7258 WisGate Edge Lite.

2. Power the Gateway ON

It is recommended to use the 12V DC adapter that comes with the RAK7258 WisGate Edge Lite. Optionally, you
can use your own PoE cable and injector since the device supports PoE.
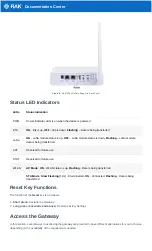
Casing and Ports

Содержание WisGate Edge Lite RAK7258

Страница 1: ...ckage Figure 1 RAK7258 Package Contents Product Configuration Wall Mounting Guide 1 Use a 5 millimeter drill bit to drill 2 holes on a wall Follow the dimensions on the image as a guideline for spacin...

Страница 2: ...eway 1 Attach the LoRa Antenna First and foremost screw on the antenna to the SMA connector back panel of the RAK7258 WisGate Edge Lite WARNING Do not power the device if the LoRa Antenna port has bee...

Страница 3: ...atives for you to choose depending on the availability of the requirements needed LEDs Status Indication PWR Power Indicator LED is on when the device is powered ETH ON link is up OFF link is down Fla...

Страница 4: ...Password root Figure 6 Web User Interface Log in WAN Port DHCP IP When DHCP Server is in the network where the gateway WAN interface is located the WAN interface can automatically get the IP address...

Страница 5: ...can change the default settings below if you wish details in the User Manual Figure 8 Connect through Ethernet Settings Connecting to The Things Network TTN The Things Network is about enabling low p...

Страница 6: ...sticker on the casing or via the LoRa Packet Forwarder page in the LoRa Gateway menu once you log via the Web UI 2 Select your Frequency Plan depending on your location This should populate the Router...

Страница 7: ...ully connected to The Things Network TTN NOTE By default the Gateway is set to connect to TTN For detailed information about advanced configuration options refer to the WEB Management Platform LoRa Ne...

Отзывы: