INSTALLATION AND OPERATING INSTRUCTIONS
MODEL UC205 (
Please save for future reference.
)
INTRODUCTION
Your Undersink Water Filter contains a Block Activated Carbon Cartridge (CF2) that reduces chlorine 90%, objectionable taste,
odour, colour and filters sediment, dirt, rust and algae. The cartridge lasts up to 6 months or 1000 US gal / 3785L.
Installation Caution; Do not
use on water that is microbiologically unsafe or of unknown quality without adequate disinfection
before or after the unit. For effective disinfection install a Rainfresh UV Disinfection System.If water pressure surges or will at
any time exceed the 100 psi maximum, a pressure regulator must be installed before the filter (recommended regulator setting is
75 psi 517 kPa or less) along with a water hammer arrestor to prevent potentially damaging shocks caused by water hammer.
Note: For cold water use only
INSTALLATION
(Tools required: pipe cutter, 2 adjustable wrenches, Phillips screwdriver)
System and installation shall comply with state and local regulations.
1. Turn off water supply and drain pipes.
2. Remove sump (520) from head (2501) by turning it 1/8th turn to left, then pulling away from head. Remove CF2 cartridge by
twisting and gently pulling away from head boss, remove plastic wrap from cartridge and replace onto head boss. Replace
sump onto head and turn 1/8th turn to right fully to stop (lock position).
3. Choose and mark spots on ½" cold water pipe and farther up on 3/8" faucet supply
tube where you will cut.
Note:
If cold water pipe is ½" straight to faucet then
you will require a 5/8" x 3/8" compression union (available at most plumbing
outlets) in place of 3/8" x 3/8" compression union supplied.
4. Mount bracket (1504) on wall under sink. Hang filter unit in bracket with vent
button at back and make sure tubes (1506) will reach from pipe marks to filter
inlet and outlet.
Note:
Make sure that filter unit has 3" clearance above and
below.
Making the Water Line Connections
5. Using a tube cutter cut ½" copper pipe and 3/8" copper or plastic supply tube at
marked locations and remove burrs so cuts are smooth. Remove ½" nut and
brass sleeve from valve (1503) and slide over ½" pipe. Slide valve onto pipe
until it bottoms with 3/8" arm facing filter and tighten securely with wrench
while holding body of valve with another wrench.
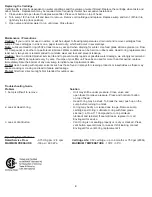
6. Install one 24" tube (1506) onto 3/8" thread of valve (1503) using brass nut
(720-0), plastic sleeve (721-1) and tube insert (722-0). Slide nut and sleeve
onto 24" tube and place insert into end of tube. Hold tube all the way into
fitting and tighten by hand. Then, holding body of fitting with one wrench,
tighten nut securely with another wrench (See Fig. 2).
7. Install 3/8" union (1507) onto other 24" tube (1506) using nut and plastic
sleeve on union and tube insert (722-0). (See Fig.2). Tighten securely.
8. Now connect open end of union to 3/8" copper supply tube using nut and
brass sleeve on union and tighten securely (See Fig. 2). You do not need a
tube insert for this connection.
Note:
If 3/8" supply tube is plastic use
remaining plastic sleeve (721-1) and tube insert (722-0) with union and tighten
securely (see Fig. 2).
Connecting the Tubes to the Filter
9. Connect tube coming from valve (1503) to inlet fitting of filter on side of filter
with arrow running into filter head (see Fig. 3). Now connect tube from union to
outlet fitting of filter on side of filter with arrow running out of filter head (see
Fig.3).
10. Make sure filter is assembled. Open valve and faucet. Turn on water supply
and check for leaks with water running and stopped. Carefully retighten any
leaking fittings. It is a good idea to check the unit a few times for slow leaks
shortly after installation. Allow water to run for 10 minutes to flush unit then
close faucet and allow unit to sit overnight to condition.
In the morning flush the unit briefly before beginning service.
Your filter is now in operation.
Fig. 2
Fig. 3


