3.
STARTING UP
- Reconnect QCA cartridge on the head below the inlet fitting (left of unit) and QLV cartridge on the other head (right of unit). To
connect cartridge, turn it to the right until it stops turning and the lock marks on the cartridge and head line up (lock position). The
cartridge is now locked in place.
- Turn the faucet handle to ON position.
- Turn saddle valve clockwise. After some free rotations, the needle on the valve will start to pierce the pipe. Continue to rotate the
handle until it can go no further. You have now pierced the pipe, but the valve is closed. Now turn handle counter clockwise all the
way to open and start water flow.
- Close faucet and check all connections for leaks. Carefully re-tighten any leaking fittings. It is a good idea to check the unit a few
times for slow leaks shortly after installation.
Flushing and conditioning
: Allow water to flow from the faucet for 10 minutes to flush unit before beginning service.
YOUR UNIT IS NOW IN OPERATION.
NOTE:
Some carbon fines may persist for several days and the water may also
appear milky because of trapped air bubbles coming out of the unit. These are
harmless and frequent running of the unit will clear them more quickly.
Running the unit for extended periods of time will NOT help.
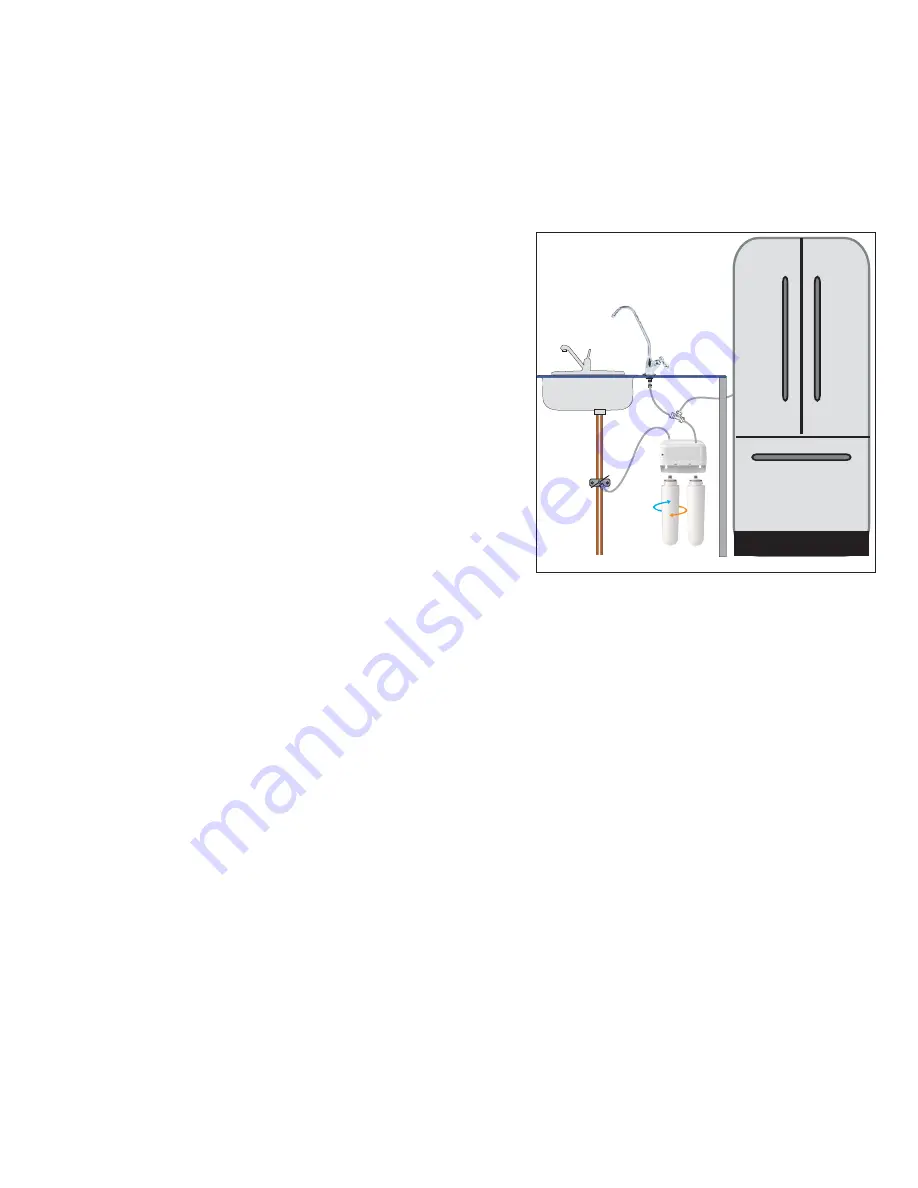
CONNECTING THE SYSTEM TO THE FRIDGE (Model QS2K only)
If you also wish to enjoy filtered water from your fridge water dispenser, then:
- Measure and check the remaining 1/4” tubing to ensure that it is long
enough to connect the filter unit to your fridge. Note: If your fridge is
farther away, you may require additional ¼” tubing (not included).
- Shut the water off by turning the handle on the saddle valve clockwise until
stop.
- Open the faucet to release water pressure.
- Cut the tube, connecting the faucet with the outlet fitting, at the center,
making sure that your cut is straight. Caution: Do not cut the tube at an angle
as that can cause a leak.
- Connect the open ends of the tubing now to the ¼” union tee (2612)
included with the unit.
- Now connect the open end of the union tee (2612) to your fridge using the
1/4” tubing.
SETTING THE RAINFRESH FILTER LIFE MONITOR (Models QS2 and QS2K only)
Press and hold black monitor button for 10 seconds. The orange LED will glow and after first 5 seconds it will blink 4 times and turn off.
Continue to hold the black button for another 5 seconds. The orange LED will glow again once and then turn off. Now release button
as the monitor has been reset.
The monitor tracks both gallons and time used. When either 250 gallons or 4 months has expired the orange LED will blink every 5
seconds advising you to replace the cartridge. The LED will continue to blink until monitor is reset as above. Note: Extensive sediment
may cause more frequent filter cartridge replacement.
Monitor Battery
- After approx 2 years yellow LED will blink every 5 seconds advising you to change battery.
To replace battery
- remove head cover insert (2718) by gently pulling away the insert from the head. Insert new battery (2545) into
battery slot between contacts with + side out and reattach cover insert to head assembly.
To Test Battery
– With faucet off, press the black button for two seconds or less. If the orange LED lights up then power is on and
monitor is working. If LED does not light then battery is expired and must be replaced. NOTE: If faucet is on and water is running, LED
will not light if button is pressed.
REPLACING FILTER CARTRIDGES
For best results, the QCA and QLV filter cartridges must both be replaced after 250 gallons (950 liters approx) or 4 months whichever
comes first. This will be signaled by the orange LED blinking every 5 seconds.
Note:
Filter cartridge life depends on water quality. Excessive fine sediment can substantially reduce the filter cartridge life. This will be
signaled by a sudden drop in water flow or no flow from the faucet before the 4 month life is up. If your water has excessive sediment,
we recommend installing a Rainfresh whole-house water filter available from the same retailer where you purchased this unit. Call
Rainfresh for assistance in locating a retailer and product selection.
To replace filter cartridges
- simply hold the cartridge and turn about 1/4 turn left and lower it away from head while holding it
vertically to retain water. Empty the old cartridge in the kitchen sink by holding it upside down and discard. Use a dry absorbent cloth
or a paper towel to wipe off any water that may fall on the cabinet floor. To install new filter cartridge, turn it to the right until it stops
turning and the lock marks on the cartridge and head line up (lock position). The cartridge is now locked in place.
MAINTENANCE / PRECAUTIONS
1) Do not subject unit to freezing temperatures at any time.
2) Do not clean housing with organic solvents such as those found in sprays for cleaning products or insecticides as these may cause
cracking or crazing and lead to failure and leakage.
3) Replace filter cartridges every 4 months or as soon as the LED comes on.
Fig. 6


