2
INSTALLATION
1.
Unpack the filter system. Remove the wing nuts on the case and keep aside.
Remove the tubing and mounting screw packages from the case.
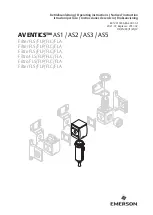
2.
Now remove both black sumps (520B) by turning 1/8 turn to left, then pulling
away from head (2501). Remove cartridge
models AC10G05N & MB10G01N by gently
pulling away from head boss. Place the
cartridges aside in a safe place until final
assembly.
3.
Locate best position for mounting unit on a
wall near the combi-oven where it can be
easily accessed for changing filters and
other maintenance.
NOTE:
Leave minimum of 5 inches clearance below sumps to allow removal of
cartridge for replacement.
Move the membrane housing down so that mounting
hole is accessible. Now lift the unit close to the mounting
location and mark the 2 top and bottom mounting holes.
Depending on the mounting wall, you may need to pre-
drill a hole or use appropriate anchors or different screws.
Now mount the unit on the wall.
4.
Remove the shrink wrap from the 2 pre-filters and re-attach them to the unit.
5.
Re-attach the sumps and lock into position.
WARNING: TO AVOID
CATASTROPHIC FAILURE, THE SUMP MUST BE TURNED FULLY TO LOCK
POSITION
6.
Using the 3/8” tube provided, connect the water supply to the inlet of the unit.
7.
Using the ¼” tubing provided, connect the drain port to an air-gap drain and the tank port to the
valve on the storage tank. You can stand the tank on the floor anywhere near the unit (not more
than 8 feet away). You may also rest it on an appropriate wall bracket or shelf.
8.
Turn off the combi-oven to which the filter system is going to be attached.
9.
Connect the outlet port of the unit to the appropriate feed water connection on the combi-oven.
Mounting hole