Rain Bird CP-075 Скачать руководство пользователя страница 15

15

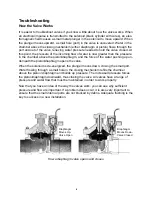
Disassembling the valve for cleaning or part replacement
— Disassembly Procedure B

A removable actuator makes piston-type valves easy to access for maintenance.
Should you need to clean the valve or replace a part, the actuator is removable follow-
ing these procedures:

1. Shut off the water at the master shut off valve.
2. Using a pair of adjustable pliers clamped in the area of the valve indicated in the

illustration (next page), unscrew the actuator counterclockwise.

3. To inspect the piston seals or replace the piston, gently pull piston from the bottom

to pull it out of valve.

4. To remove solenoid, hold gray flow ring and twist counter-clockwise to unscrew.

To reassemble the valve actuator assembly, screw it into the valve body in a clock-
wise direction until the actuator body contacts the valve body.

 Caution:

 Do no over

tighten as this may cause damage to the actuator. Do not use any pipe dope or tape
on the actuator threads. The bleed ports (holes) just above the threads can become
clogged and prevent operation.

Two types of Repair kits are available, the SRK-1 Solenoid Replacement Kit and the
PRK-100 Piston Replacement Kit.

Ref.


Part Description


Part No.


1

Solenoid Assembly

(SRK-1) B40602

2

O-Ring

3

Piston Repair Kit (Santoprene)

(PRK-100) B40642

4

Piston

5

Piston Spring
Piston Retainer
Piston Sleeve

6

Filter

7

Upper Bonnet O-Ring

8

Lower Bonnet O-Ring

9

Cap, Cover & Piston Assembly

210067

10

Cap & Cover Assembly

203661

11

Gasket

12

Piston Vacuum Breaker

13

Sealing Washer

14

Body

Please see the parts diagram on the next page.

Содержание CP-075

Страница 1: ...es are an essential part of any sprinkler system They are the link be tween the brains of the system the timer and the sprinkler heads to turn the water on and off B BIRD IRD R RAIN AIN Customer Suppo...

Страница 2: ...t of sprinklers When the valve is turned on either by hand or in response to an electronic signal from the timer all the sprinklers piped to that particular valve go on In most cases there are several...

Страница 3: ...e backflow protection Anti siphon valves must be installed at least 6 above the highest sprinkler head on the line in order for the backflow de vice to work properly Both automatic and manual versions...

Страница 4: ...as such may suffer severe dam age if installed where constant pressure is placed on the outlet sprinkler side of the valve The manual version is not suitable for use in a continuous open position as...

Страница 5: ...inking water source a separate backflow prevention device is required to prevent potential contamination should fertil izers or toxic chemicals in the water be siphoned backwards through the lines If...

Страница 6: ...use In freezing climates your next step will be to install a manual drain valve so that the water can be drained from the pipes between the zone valves and the shut off valve Install Schedule 40 PVC t...

Страница 7: ...ore installing the valves Test and flush each line before sprinklers are attached Most valves have a flush mode which allows a little extra water through the valve to clean it out Turn black SOLENOID...

Страница 8: ...Rain Bird timers and other timers that have a power output sufficient to activate the valve Your Rain Bird valve offers some simple fea tures you should be familiar with Note Some valves have only pa...

Страница 9: ...and the force of the water pushing up un derneath the piston diaphragm opens the valve When the solenoid is de energized the plunger moves down closing the small port Water flowing through a small hol...

Страница 10: ...alve doesn t work go on to step 2 D B No power between timer and valves Check by pressing the Manual Start button of the timer and advance to the desired station Attach a circuit tester voltmeter to t...

Страница 11: ...m seat for dirt or damage Replace diaphragm if damaged Remove piston and check for debris that may be restricting movement See Valve Disassembling Procedure B If piston is damaged replace with PRK 100...

Страница 12: ...tape or tighten with such force as to crack plastic valve body C Leaking between bonnet and body Check that diaphragm washer is properly in place Tighten bonnet screws Not applicable D Leaking under...

Страница 13: ...l bleed port near the solenoid 6 Rinse dirt off if necessary or use a wire to gently dislodge dirt from the bleed port 7 Install new diaphragm if necessary Do not forget to replace the spring Some new...

Страница 14: ...nce or other advice on installation contact our customer service team at 1 800 RAIN BIRD SOLENOID BONNET SCREWS BLEED SCREW BONNET DIAPHRAGM KIT Spring Diaphragm Body Seal May be combined as one piece...

Страница 15: ...eassemble the valve actuator assembly screw it into the valve body in a clock wise direction until the actuator body contacts the valve body Caution Do no over tighten as this may cause damage to the...

Страница 16: ...ble for Rain Bird valves If your local Rain Bird dealer does not carry the part you need ask if it can be ordered or call our toll free Technical Services hotline for dealer referral or factory direct...

Отзывы: