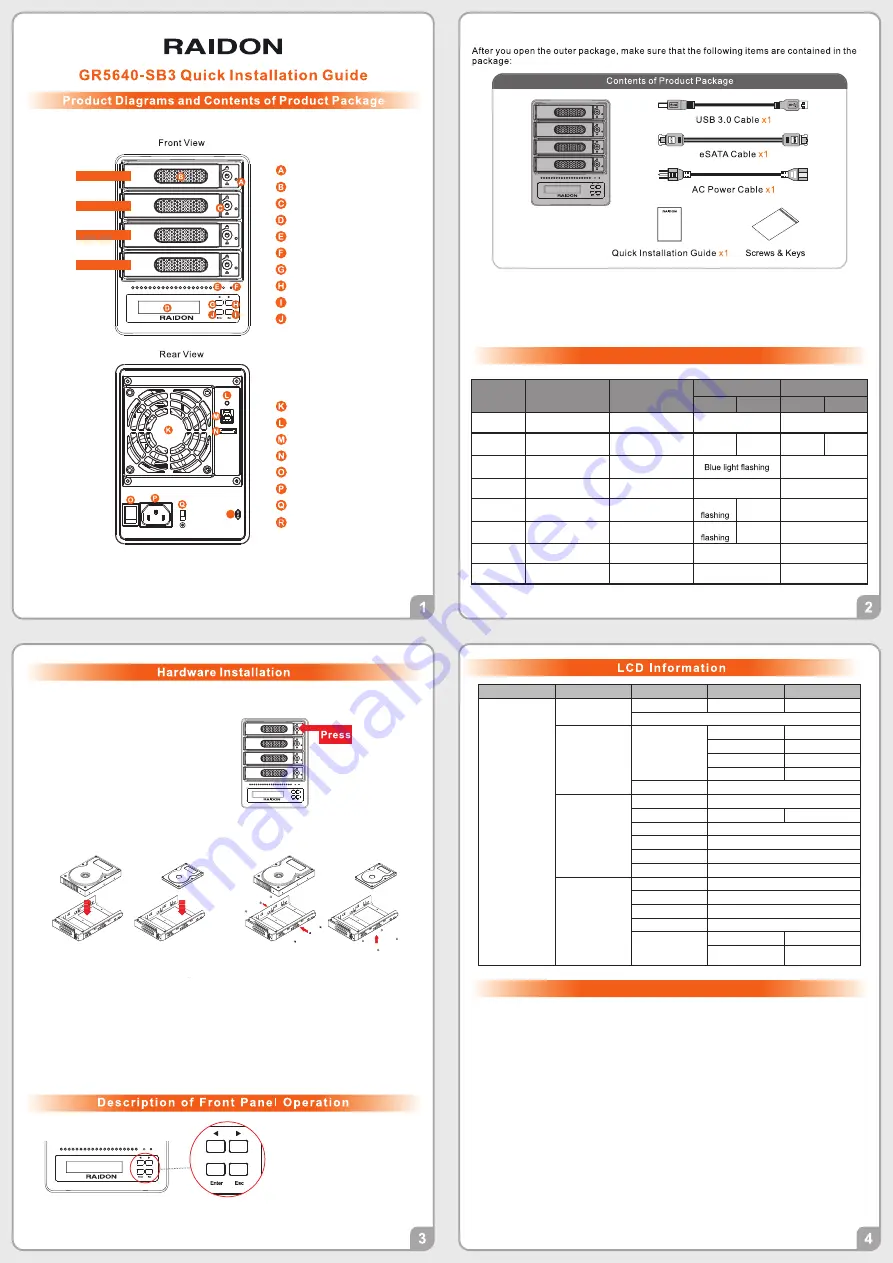
Drive position(1)
Drive position(2)
Drive position(3)
Drive position(4)
HDD access light
HDD enclosure handle
HDD tray key lock
LCM display
System status light
Power status light
UP button
DOWN button
ENTER button
ESC button
Fan
Mute button
USB3.0 interface
eSATA interface
Power switch
Power socket
Fan speed switch
Anti-theft lock
Step 2 Use the key included in the accessory
kit and inserted into the key access
opening to eject the removable drive
tray latch and extract the removable
drive tray.
Step 1 Place the system on a stable surface. Ensure that it is well ventilated without blockage
tothe vent and kept away from areas near water and damage prone areas.
Step 4 When the hard drive installation has been completed, insert the hard drive tray into
the system horizontally and secure the latch into place.
Step 5 Connect the AC power cable to the GR5640-SB3, and then plug the AC power to the
wall socket. Boot-up the unit.
Step 6 Set the storage mode using the LCD and buttons on the front (please refer to section
5 for front panel and LCD information).
Step 7 Connect the cable to the PC and the GR5640-SB3 port.
Step 8 After boot-up, your operating system will automatically detect the storage capacity
of your hard drives. Please follow the operating system instructions to configure and
format your drives. The formatted drives can be configured for the RAID setup.
Step 3 Mount your hard drives onto the removable drive tray and secure it with the screws
included in the accessory kit to avoid any damage to the hard drive due to accidental
movements.
Enter: Enter to next level or Confirm
Esc: Back to next level or Cancel
Up / Down: Select Items
Users can set the RAID mode using the LCD and buttons on the front. The default is JBOD mode. Using
“Quick Setup” function, users can change the RAID mode to RAID 0 or RAID 5 quickly.
Please refer to LCD Information as below for other setting.
V1.0 (Mar. 2018)
Please check the product and accessories for any defect or missing parts. If you have any
questions, please contact your product supplier.
Please visit the official website - Download page (http://www.raidon.com.tw/RAIDON2016/
download.php) to download drivers and other related resources.
˙
˙
GR5640-SB3 Device
x1
Thank you for choosing this
RAIDON
product.
The information provided in this manual was checked before publication, but the actual product
specifications may have changed before shipping; Latest product specifications and updates can be found at
www.RAIDON.com.tw
or through your sales representative. No separate notifications will be provided by
our company.
If you have any questions about RAIDON products or would like to receive the latest product information,
instruction manuals, or firmware, please contact
for assistance.
All product-related content in this manual are copyrighted by RAIDON TECHNOLOGY, INC.
R
The Indication of HDD Status
Constant
Power LED
Larm LED
HDD LED
Buzzer
RAID
JBOD
RAID
JBOD
No HDD
Blue light always on
— —
— —
— —
HDD Failed Blue light always on
— —
Red light
always on
— —
YES
— —
Access
Blue light always on
— —
— —
Disk Idle
Blue light always on
— —
Blue light always on
— —
Rebuilding -
Source
Blue light always on
— —
Blue light
— —
— —
Rebuilding -
Target
Blue light always on
— —
Red light
— —
— —
Fan Failed
Blue light always on
Red light always on
Blue light always on
YES
Over Temp
Blue light always on
Red light always on
Blue light always on
YES
Important Notice
When connected to the computer system, it’s prohibited to remove, insert or swap the hard drive
while data transfer is being performed.
It’s prohibited to change the positioning of the drives once the initial installation has been completed
as the changes made to the drive positions may destroy the RAID formation.
Whenever turning off or unplugging the GR5640-SB3 from your computer system becomes
necessary, always remember to safely remove it from your operating system first.
When the fan speed switch is set to "Auto", the fan will run at full speed to accelerate the heat
dissipation if the temperature inside the machine exceeds 50 (±10%)°C.
It is highly recommended for users to back up important data contained within the GR5640-SB3 unit
on a regular basis or whenever the user feels necessary to a remote or a separate storage device.
RAIDON will not be responsible for any lost of data caused during the use of the unit or the
recovery of the data lost.
1.
2.
3.
4.
5.
Level 0
Level 1
Level 2
Level 3
Level 4
External 4BAY
HARDWARE
RAID
Quick Setup
Create One RAID
RAID 0/ RAID 5
Select Disk
Delete All RAID
Disk Manager
Identify Disk
Disk 1
Check Disk LED
Disk 2
Check Disk LED
Disk 3
Check Disk LED
Disk 4
Check Disk LED
Show Disk Info
< Disk Info >
RAID Manager
Identify RAID
Select RAID
Create RAID
RAID 0 / RAID 5
Select Disk
Delete RAID
Select RAID
RAID Info
― ―
Change RAID Pwd
< Password >
for RAID Setup
Rebuilding Priority
Highest/High/Medium/Low/Lowest
System Manager
System Info
Firmware Version
Changhe Password
< Password >
for System Info
Logout From Menu
< Y or N >
Alarm Control
Mute the Buzzer
Hardware Monitor
Temp. Monitor
< Temp. >
Fan Monitor
< Fan Speed /
Fan Level >


