RAIDAGE v7Age220-SAU Скачать руководство пользователя страница 18

SAFE(RAID1)

The  SAFE  storage  policy  stores  all  data  in  duplicate  on  separate  drives  to  protect 
against  data  loss  due  to  drive  failure.  One  drive  mirrors  the  other  at  all  times, 
equivalent  to  RAID  1.  Every  write  operation  goes  to  both  drives.  SAFE  provides 
the  highest  level  of  data  protection  for  critical  data  that  you  cannot  afford  to  lose  if 
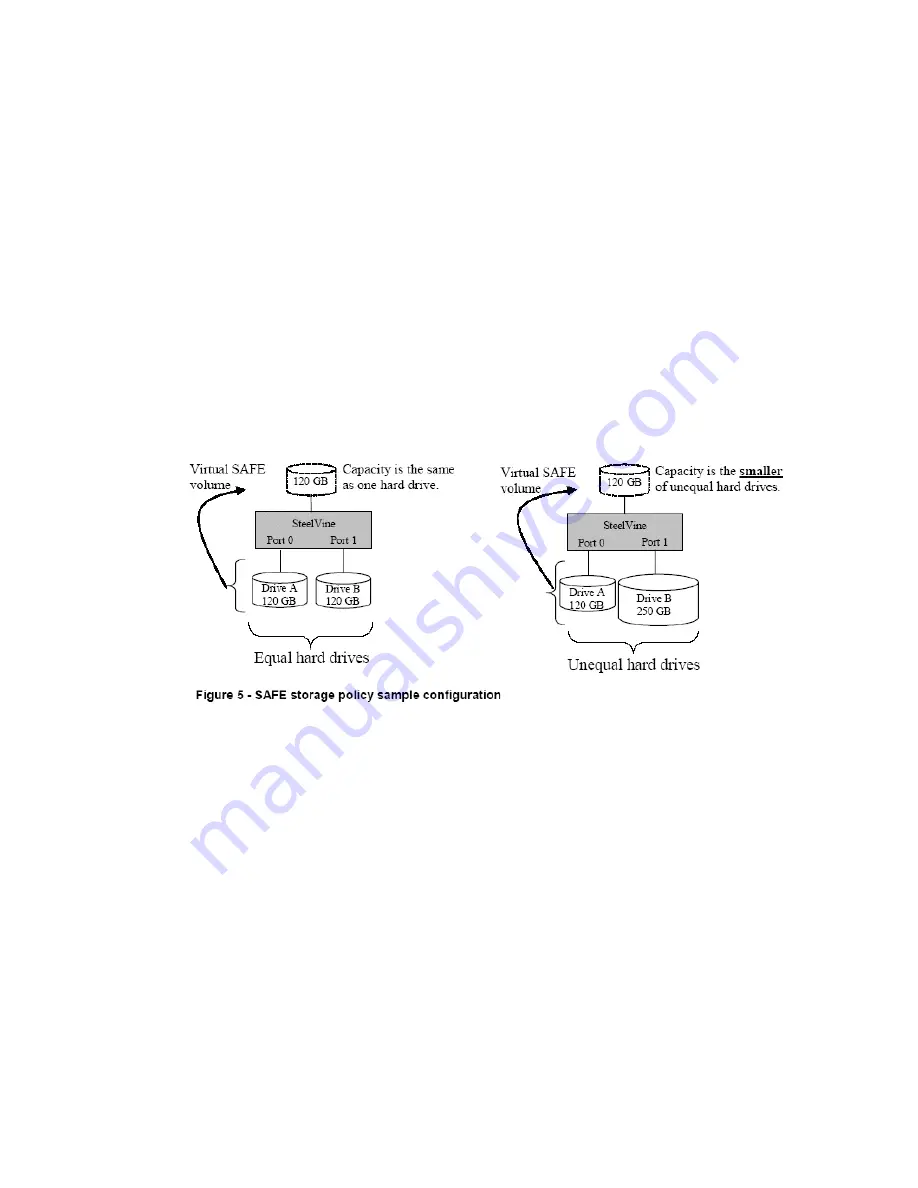
a  hard  drive  fails,  but  halves  the  amount  of  storage  capacity  because  all  data 
must  be  stored  twice.  The  resulting  storage  capacity  of  the  virtual  SAFE  volume 
will  be  equivalent  to  the  size  of  one  hard  drive  (if  both  drives  are  the  same)  or  the 
smaller  of  the  two  drives  (if  they  are  different). 
If  one  drive  fails,  the  SAFE  volume  is  still  usable,  but  it  is  in  a  vulnerable  state 
because  its  mirrored  hard  drive  is  inaccessible.  When  the  offline  drive  comes 
back  online,  the  appliance  begins  a  rebuild  process  immediately  to  restore  data 
redundancy.  A  message  box  appears  in  the  GUI  to  notify  you  that  a  rebuild  is  in 
progress. 
Although  the  volume  remains  available  during  the  rebuild  process,  the  volume  is 
susceptible  to  data  loss  through  damage  to  the  remaining  drive  until  redundancy 
is  restored  at  the  end  of  the  rebuild  and  verification  process.  Host  access  takes 
precedence  over  the  rebuild  process.  If  you  continue  to  use  the  SAFE  volume 
during  the  rebuild,  the  rebuild  process  will  take  a  longer  time  to  complete,  and  the 
host  data  transfer  performance  will  also  be  affected. 

4.4  Support  system  Windows  98SE/ME/2000/XP&  Mac  os  9.0  or  above 
version
4.4.1  System  Expansion  for  Windows 
Overview 

This  appendix  describes  the  procedures  needed  with  Microsoft  Windows  for 
expanding  file  systems  that  have  been  created  on  volumes  that  have  increased  in 
size,  while  preserving  all  of  your  existing  data.  After  you  have  added  more  hard 
disk  drives  to  increase  the  storage  capacity  of  a  BIG  volume,  you  must  use  the 
supplemental  procedure  described  below  to  allow  the  expanded  capacity  to  be 
recognized  by  the  Windows  file  system. 
A  command-line  utility  named  "Disk  part.  exe"  ("Disk  Partition")  enables  you  to 
manage  hard  disk  partitions  and  volumes.  This  utility  is  included  as  part  of 
Windows  XP  Professional  Edition,  Windows  2003  Server  and  Windows  Vista.  For 
Windows  2000  or  Windows  XP  Home  Edition,  you  must  download  the  "disk  part" 
utility  from  Microsoft's  website. 
Additional  third-party  products  (such  as  Norton  Partition  Magic)  are  available  to 

17

Содержание v7Age220-SAU

Страница 1: ...v7Age220 SAU ...

Страница 2: ...titioning Volumes 2 2 eSATA interface 3 NOTE 4 Features 4 1 High speed exterinal storage solution USB2 0 480Mb s ESATA 3 0Gb s 4 2 Seriel ATA HDD 4 3 Four Working Mode 4 4 Support system Windows 98SE ME 2000 XP Mac os 9 0 or above version 4 4 1 System Expansion for Windows 4 4 2 System Expansion for Macintosh 4 4 3 System Expansion for Linux 4 4 3 System Expansion for Linux 5 Package contents ...

Страница 3: ...Front Back 1 Product Introduction SATA HDD 2 TO USB 2 0 ESATA 3 0G interface 2 ...

Страница 4: ...e doorknob and the installation will be completed This step will be presented in terms of following graphs Note Sway from side to side the lock at the instructed point which you could open the doorknob to install unload the hard disk In contrast when you sway from side to side the lock at the instructed point you might not open it ...

Страница 5: ...ends blue light and has long lasting lightening which indicates the hard disk connection is correct Hard disk LED sends the pink light and does not stop glittering which indicates the hard disk performing wrong data transmission Hard disk LED sends red light and does not stop glittering which indicates the hard disk connecting error If you select the USB port connection to a computer host USB LED ...

Страница 6: ... glitters with purple light while the HDD2 LED glitters by alternate blue red lights HDD1 LED presents blue light and HDD2 LED continues lightening by alternate blues red lights when data transmission finishing RAID1 JBOD BIG The HDD1 and the HDD2 LED glitter by alternate blue red lights LED presents blue light when self checking finishing HDD2 LED continues lightening by alternate blue blue light...

Страница 7: ...art recovering and return the losing data 2 1 USB Interface 2 1 1 JBOD MODE The two drives were connected to the products HDD1 and HDD2 Connector USB Power Cable were connected Opening the power switch pulling MODE switch to JBOD and press RESET switch after a few seconds the computer will automatically capture USB devices and increased 2 drives If not drive there then the hard disk drive manageme...

Страница 8: ...e Delete disk segmentation Click Segmentation additional disks followed by a clew to operate 2 1 2 BIG MODE The two drives were connected to the products HDD1 and HDD2 Connector USB Power Cable were connected Opening the power switch pulling MODE switch to BIG and press RESET switch after a few seconds the computer will automatically capture USB devices Click My Computer right clicking pop up menu...

Страница 9: ...ive there then the hard disk drive management will re zoning which format At the moment you can Operate the disk Re zoning which drives formatted as follows All information will be eliminated when Format hard drives Click My Computer right clicking pop up menu click Options manage pop up computer management plan was pop up as follow Click Disks Management plan Right pop up the additional disks H m...

Страница 10: ...the hard disk drive management will re zoning which format At the moment you can Operate the disk Re zoning which drives formatted as follows All information will be eliminated when Format hard drives Click My Computer right clicking pop up menu click Options manage pop up computer management plan was pop up as follow Click Disks Management plan Right pop up The additional disks H and the addition...

Страница 11: ...S Windows Important Before reconfiguring a volume back up your data and delete previously defined SteelVine Storage Reference Design partitions If no hard disk drives are connected to the SteelVine Storage Processor the SteelVine Processor device the Not Initialized disk with no capacity allocated to it will appear Do not initialize or modify that device 1 Right click the My Computer icon on your ...

Страница 12: ...nd select Revert to Basic Disk Within a few seconds the disk should be marked as a Basic disk If a disk is marked Not Initialized right click the disk icon and select Initialize Disk An additional dialog box appears allowing you to select which disks to initialize Uncheck the SteelVine Processor Disk item and click OK Within a few seconds the selected disk s should be marked as a Basic disk 3 Righ...

Страница 13: ...6 Specify the partition size By default the partition occupies the entire volume Click Next 7 Assign a drive letter or mount path and click Next 12 ...

Страница 14: ...isk 8 0 GB Config Disk Media will appear Do not remove or modify that partition After you configure and partition the new volumes restore the backed up data to the new configuration 1 Launch Disk Utility from the Application Utilities folder 2 Select a configured disk and click the Partition tab This procedure illustrates the BIG Storage Policy configuration which concatenates the capacity of all ...

Страница 15: ...D0 FAST RAID1 SAFE use the machine must press the button after the RESET hand and can distinguish the change MODE BIG JBOD RAID0 FAST RAID1 SAFE 3 If you require faster speed of data reading and writing data of reading and written speed RAID0 FAST MODE will be suggested to use 4 If you require having higher data security RAID1 SAFE MODE will be suggested to use 5 If you require having a bigger har...

Страница 16: ... a daisy chained hierarchy structure you can increase the total storage capacity of your system 4 3 Four Working Mode BIG JBOD RAID0 FAST RAID1 SAFE You can configure the 1328 SIL5744 to use any of the following Storage Policies to map the appliance s physical hard drives to virtual drives that are visible to the host computer The virtual drives are called volumes in the GUI The host operating sys...

Страница 17: ...e drive is presented drive 0 No such limitation if using a USB host connection JBOD storage policy is available in the SteelVine Manager for a standalone non cascaded Storage Processor or the top level node of a cascaded configuration but not for subordinate nodes Even though you can use the switch to select JBOD mode In a JBOD configuration the SteelVine Storage Reference Design directly exposes ...

Страница 18: ... the remaining drive until redundancy is restored at the end of the rebuild and verification process Host access takes precedence over the rebuild process If you continue to use the SAFE volume during the rebuild the rebuild process will take a longer time to complete and the host data transfer performance will also be affected 4 4 Support system Windows 98SE ME 2000 XP Mac os 9 0 or above version...

Страница 19: ...in the SteelVine Manager GUI 1 Open a command prompt window by clicking Start Run then entering cmd 2 At a command prompt type diskpart 5 Type extend 6 Type exit to quit Diskpart exe The volume size will be updated to reflect the expanded physical storage capacity while maintaining all of the existing data that is stored on the volume 3 Type list volume to display the existing volumes on the compu...

Страница 20: ...c OS X The following example illustrates a hard disk growing from a JBOD to a BIG Storage Policy A software tool named VolumeWorks from SubrosaSoft available from http www subrosasoft com OSXSoftware index php main_page product_info products_id 6 can be used to grow the partition that was created in JBOD Storage Policy to a BIG Storage Policy disk SubrosaSoft VolumeWorks easily organizes your hard...

Страница 21: ... procedures needed with Linux for expanding file systems that have been created on volumes that have increased in size while preserving all of your existing data After you have added more hard disk drives to increase the storage capacity of a BIG volume you must use the supplemental procedure described below to allow the expanded capacity to be recognized by Linux The following example illustrates...

Страница 22: ...geometry for dev hdc 0 000 800000 000 megabytes Disk label type msdos Minor Start End Type Filesystem Flags 1 0 063 400000 000 primary ext2 3 Use the resize command extend the size of volume 1 listed above parted resize 1 0 063 400000 4 Type print to verify the resize of volume 1 parted print Disk geometry for dev hdc 0 000 800000 000 megabytes Disk label type msdos Minor Start End Type Filesystem...

Отзывы: