background image

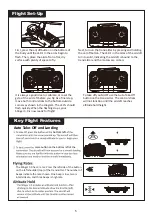
First, press the on/off bu�on on the bo�om of 

the body un�l the LED’s in the arms begin to 

flash. Then, place the aircra� on a flat, dry 

surface with plenty of space to fly.

Flight Set-Up

5

To take off you MUST use the Auto Take-Off 

bu�on on the transmi�er. The control s�cks 

will not func�on un�l the aircra� reaches 

al�tude hold height.

Next, turn on the transmi�er by pressing and holding 

the on/off bu�on. The LED’s in the arms of the aircra�

turn to solid, indica�ng the aircra� is bound to the

transmi�er and the motors are armed.

It is always a good idea to calibrate, or reset the 

gyro of the aircra� before you fly. As a final step, 

move both control s�cks to the bo�om outside 

corners as shown in the diagram. The LED’s should 

flash quickly. When the flashing stops, your 

S�nger 3.0 is now ready for flight!

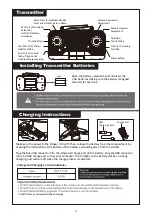
The S�nger 3.0 has 3 rates. Press the le� side of the bu�on

on the le� shoulder (top) of the transmi�er. The number of 

beeps indicate the rate chosen. One beep is low, two is 

intermideate, and three beeps is high rate.

Key Flight Features

Auto Take-Off and Landing

bo�om le�

same bu�on on the bo�om le� of the

Содержание STINGER 3.0

Страница 1: ...INSTRUCTION MANUAL Specifications...

Страница 2: ...afe ights when indoors or in low sunlight environments Plus the S nger 3 0 now arrives in a hard sided quality travel type case with so foam packing to keep the unit and components safe during travel...

Страница 3: ...ment and insert the 3 AA ba eries making sure the polarity is aligned correctly for each one Make sure the power to the S nger 3 0 is o Then release the ba ery from the compartment by pressing the ind...

Страница 4: ...in the carry case make sure to fold the arms as shown in the diagram B 3 0 The transmi er s cks are located in compartments at the bo om of the transmi er as shown To install press t the smaller end o...

Страница 5: ...d indica ng the aircra is bound to the transmi er and the motors are armed It is always a good idea to calibrate or reset the gyro of the aircra before you y As a nal step move both control s cks to t...

Страница 6: ...it is facing press the One Key Return bu on again to exit this mode NOTE The pilot will s ll need to land the aircra either manually or by using Auto Land 3 0 bo om of short press the right side of th...

Страница 7: ...e to the le and to the right for the aircra to move to the right Trim Forward Backward Trim Left Right Forward Backward Yaw spin Left or Right Move Aircraft Left or Right If you nd that while in a sta...

Страница 8: ...rt the device as needed WiFi and App Instructions Android 8 Phone Holder Installation Emergency Stop Collision Avoidance If the aircra is ying out of control and the auto land feature does not work to...

Страница 9: ...e Control View Switching Master Mode Picture in Picture Palm Control Flight Headless Mode Tracking Mode Menu Speed Take Picture Video Airplane Mode Entertainment Album 3D Mode 1 2 3 4 5 6 7 8 9 10 11...

Страница 10: ...Orange Black 2ea Replacement Arm A w Blue LED Motor Gearbox Replacement Arm A w Red LED Motor Gearbox Replacement Arm B w Blue LED Motor Gearbox Replacement Arm B w Red LED Motor Gearbox Prop Shaft Se...

Страница 11: ...from many outside sources and could result in a momentary loss of control can damage unprotected electronics Make sure to keep all chemicals small parts and anything electrical out of the reach of chi...

Страница 12: ...warranty claim Service or replacement decisions are at the sole discretion of Rage R C Proof of purchase is required for all warranty claims SERVICE OR REPLACEMENT AS PROVIDED UNDER THIS WARRANTY IS...

Отзывы: