background image

Port

IP address

Port IP

Keep active TCP connection

Code page

Printer

09:30:00

Mon 02.01.2023

Precision

Weighing

John Smith

Control codes

Receipt printer speed

Printouts

TCP Client

0.0.0.0

9100

1250

0

Port

None

COM 1

COM 2

USB

Tcp Client

USB Free Link

0.000000

Supplementary unit
Gross
Tare
Product 

Liquid 1

0.000000 g
0.000000 g

Vibrations

3%

Temperature

Air Density

1.158 kg/m3

Air Preasure

980.1 hPa

Air Humidity

45%

19°C

09:30:00

Mon 02.01.2023

Precision

Weighing

g

0

Max

John Smith

DWA

Adjustment

Operators

Profiles

Database

Communication

Scheduled tasks

Ambient

conditions

Miscellaneous

Administrator

panel

Peripherals

Update

About

09:30:00

Mon 02.01.2023

Precision

Weighing

John Smith

Parameters

13

Wybrać Urządzenia. 

Select Peripherals.

Computer

Printer

Barcode scanner

RCloud

Ambient conditions module

Peripherals

09:30:00

Mon 02.01.2023

Precision

Weighing

John Smith

Port

IP address

Port IP

Keep active TCP connection

Code page

Printer

09:30:00

Mon 02.01.2023

Precision

Weighing

John Smith

Control codes

Receipt printer speed

Printouts

TCP Client

0.0.0.0

9100

1250

0

16

14

Wybrać Drukarkę.

Select Printer.

Wybrać Adres IP.

Select IP address.

Port

IP address

Port IP

Keep active TCP connection

Code page

Printer

09:30:00

Mon 02.01.2023

Precision

Weighing

John Smith

Control codes

Receipt printer speed

Printouts

TCP Client

0.0.0.0

9100

1250

0

IP address

010.010.003.086

1 2 3

4 5 6

7 8 9

0

-

.

17

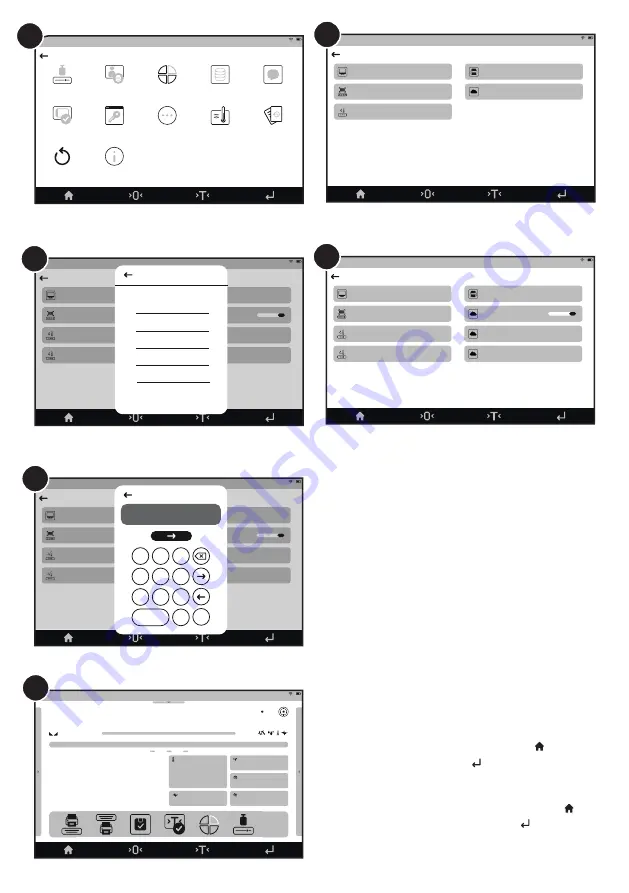
Wpisać adres IP otrzymany po połączeniu drukarki  
z siecią Wi-Fi

® 

(patrz 4.2.5.). Następnie wpisać: Port: 9100,  

Utrzymuj aktywne połączenie TCP: Nie, Strona kodowa 
(domyślne): 1250; Kody sterujące: brak; Prędkość drukarki 
paragonowej: 0, Wydruk: pominąć. Należy zwrócić uwagę na 
poprawne wpisanie adresu IP, zwłaszcza w przypadku uzyskania 
adresów IP takich jak 192.168.3.6 lub 10.10.2.86. Podane przykłady 
należy wpisać, wypełniając brakujące pola zerami.  
Poprawny zapis: 192.168.003.006 i 010.010.002.086.

Enter the IP address obtained after connecting the printer 
with the Wi-Fi® network (see 4.2.5.). Then enter: Port: 9100, 
Keep TCP connection active: No; Code page (default): 1250; 
Control codes: none; Receipt printer speed: 0, Print: skip. Care 
should be taken to enter the IP address correctly, especially 
when using IP addresses such as 192.168.3.6 or 10.10.2.86. The 
examples given should be entered by filling in the missing fields 
with zeros. Correct notation: 192.168.003.006 i 010.010.002.086.

Wybrać port: TCP Client.

Select port: TCP Client.

Powrócić do głównego ekranu poprzez wybranie przycisku     . 
Sprawdzić poprawność komunikacji za pomocą     (Print).  
Po spełnieniu warunków zatwierdzenia wyniku drukarka  
powinna wydrukować wydruk. 

Return to the main screen by selecting the button     .  
Verify correct communication with     (Print) button.  
Once the conditions for validating the result have been met,  
the printer should print a printout. 

18

15

Содержание RTP-RU80

Страница 1: ...p Guide Radwag Thermal Receipt Printer RTP UEW80 RTP RU80 Aby wy wietli pe n instrukcj obs ugi przejd do strony internetowej lub zeskanuj kod QR To view the complete User Manual go to the website or s...

Страница 2: ...no ci od kraju The plug type may vary by country Tylko w modelu RTP UEW80 Only on RTP UEW80 model Tylko w modelu RTP RU80 Only on RTP RU80 model Wi Fi is a registered trademark of Wi Fi Alliance 1 CON...

Страница 3: ...ck once on the button in the control panel Aby wydrukowa list mo liwych operacji kliknij raz przycisk w panelu sterowania 3 To carry out the self test switch the printer off and on by holding down the...

Страница 4: ...do strony konfiguruj cej po czenie z Wi Fi 4 After pressing the REFRESH button select the Wi Fi network to which the scale and printer will be connected in the login window Then select the SUBMIT butt...

Страница 5: ...in Working mode Last adjustment 21 01 2022 14 46 22 Software version LL2 0 S qt14 Weighing firmware version 1 0 0 Light Dark 2 1 Wysun menu g rne Wybra Ustawienia w menu g rnym Pull up the top menu S...

Страница 6: ...2 q w e r t y u i o p l k j h g f d s a z 123 a x English c v b n m Password 09 30 00 Mon 02 01 2023 Precision Weighing John Smith 9 Wpisa has o do sieci Wi Fi i nacisn Enter the password for the Wi F...

Страница 7: ...Mon 02 01 2023 Precision Weighing John Smith Control codes Receipt printer speed Printouts TCP Client 0 0 0 0 9100 1250 0 IP address 010 010 003 086 1 2 3 4 5 6 7 8 9 0 17 Wpisa adresIPotrzymanypopo...

Страница 8: ...awienia w dolnym menu Communication WiFi Status Network configuration MAC address Not connected 00 16 59 8B 8C 6C Wybra Komunikacj Communication COM 1 Ethernet WiFi Select Settings in the bottom menu...

Страница 9: ...sn tak aby wr ci do ustawie Once connected press to return to settings Parameters Workind modes Communication Peripherals Printouts 10 Wybra Urz dzenia Select Peripherals Peripherals Computer Printer...

Страница 10: ...bra Port 9100 Timeout 0 Enter the IP address obtained after connecting the printer to the Wi Fi network see 4 2 5 Then select Port 9100 Timeout 0 Powr ci do ustawie drukarki ekran 12 Wybra Strona kodo...

Страница 11: ...i zatwierdzi za pomoc F2 Use F1 to go to Wi Fi and confirm with F2 Za pomoc F1 wybra TAK i zatwierdzi za pomoc F2 Use F1 to select YES and confirm with F2 5 Za pomoc F1 przej do Wybierz sie i zatwier...

Страница 12: ...4 keys next to the scale display allow you to enter a password consisting of capital letters and alphanumeric characters only Wybra kilkukrotnie F4 aby powr ci do Ustawie Select F4 several times to re...

Страница 13: ...2 17 U ywaj c F1 F3 i F2 wpisa adres IP otrzymany po po czeniu drukarki z sieci Wi Fi i zatwierdzi Nale y zwr ci uwag na poprawne wpisanie adresu IP zw aszcza w przypadku uzyskania adres w IP takich j...

Страница 14: ...ton Use F1 to move to Print Width Select F2 and set with F1 Standard Accept with the button Wybra kilkukrotnie F4 aby powr ci do ekranu wy wietlaj cego mas Sprawdzi poprawno komunikacji za pomoc Po sp...

Страница 15: ...ace connect the scale and the printer to the same Ethernet network The printer will automatically be assigned an IP address thanks to DHCP enabled To obtain a printout with the IP address press the bu...

Страница 16: ...Producer Beijing RuiGong Tech Co Ltd Address Haidian District 100085 Beijing China www radwag com...

Отзывы: