background image

RAOM0413 

 Apollo Bicycle Company Pty. Ltd.  ABN: 60 001 914 469

60

Lubrication

Lightly oil all the pivoting points of the front and rear derailleurs at least every month.  
Any excess oil should be wiped off to prevent dirt entering into the mechanisms.  
Clean and apply a thin layer of grease to the shifting cables every six months,  
or whenever new cables are fitted.

Adjustment – Rear Derailleur

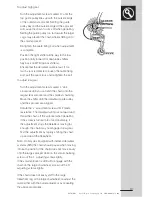
If your bicycle is fitted with a SIS derailleur 
system, fine turning of the SIS mechanism 
will be the most common rear derailleur 
adjustment you will need to make.

To fine tune the SIS rear derailleur:

-  Raise the back wheel of your bicycle off 

the ground (to enable you to rotate the 
pedals forward) and set the shift lever on 
SIS mode.

 -  Change the gears from top to second top gear and observe the chain’s response.  

If the chain will not move to second gear, turn the cable adjusting barrel anti-clockwise 
to increase the cable tension. Turn the adjuster clockwise to decrease the tension if the 
chain moves past the second gear. 

-  Spin the pedals and with the chain still in second gear, turn the adjuster anti-clockwise 

until just before the chain makes noise against the third gear. This adjustment increases 
the tension of the inner cable.

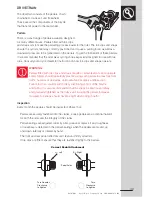
If after completing the above process further adjustment is still required, stand behind the 
bike. Shift the chain to the smallest rear cog and the largest front chainwheel, and loosen 
the cable fixing bolt.

Also, check whether your SIS derailleur system is fitted with an additional adjustment 
screw to set the guide pulley as close as possible to the sprocket. If so, shift the chain 
onto the small cog and adjust until there is no sound of rubbing or fouling when the pedals 
are turned backwards.

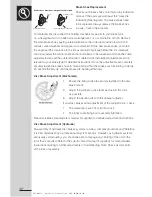
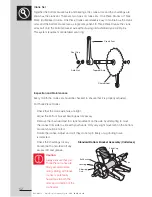
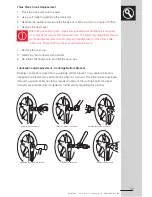
Whatever type of derailleur 
system is fitted to your bicycle, 
the alignment of the chain, the 
rear sprockets, and the derailleur 
pulleys need to be inspected 
whilst standing behind the 
bicycle. Based on your findings, 
adjustments to high or low gear 
may be necessary. 

H

L

H

L

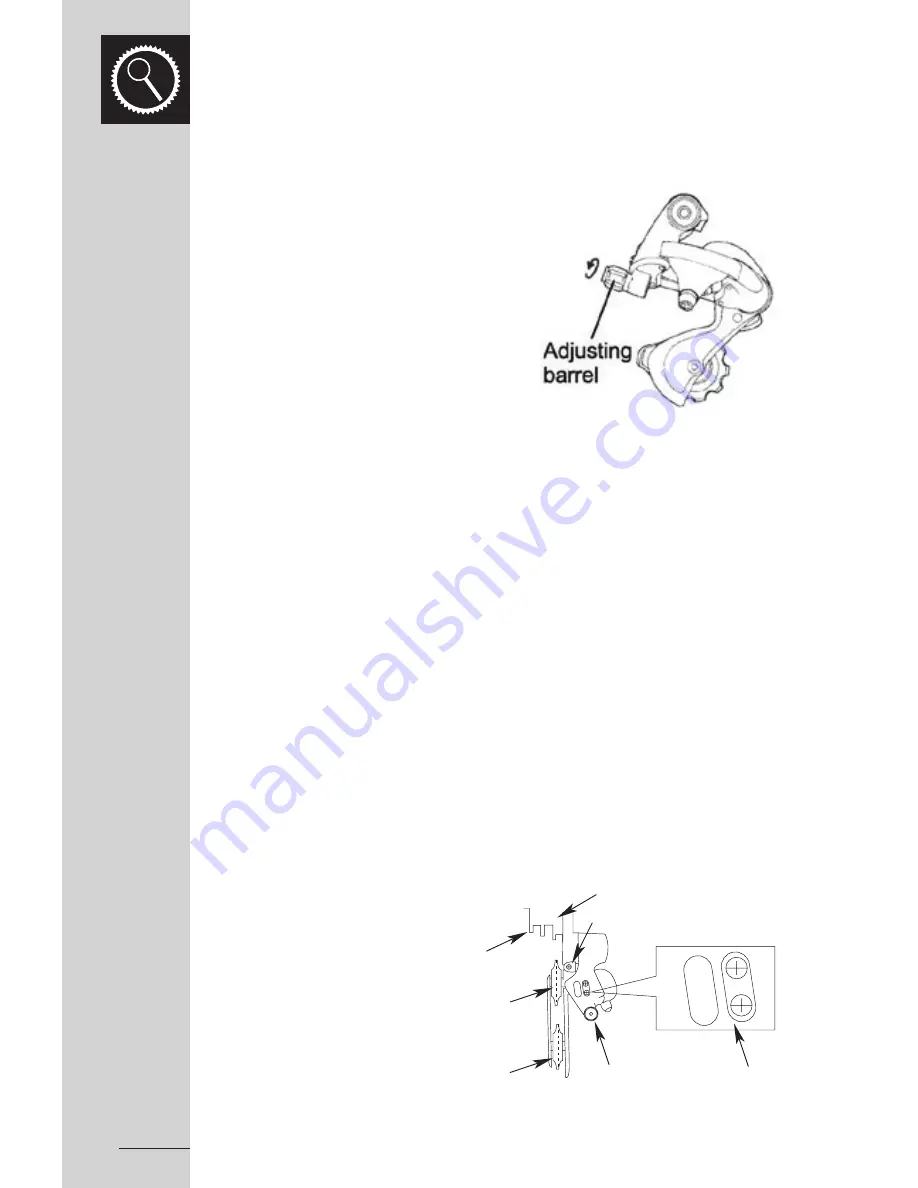
SIS Cable Barrel Adjuster

Adjustment Screws

Pulley Adjustment Screw

Tension Pulley

Outer side of Top Gear

Guide Pulley

Freewheel

Rear Derailleur Rear View

Содержание Bicycle

Страница 1: ...Bicycle Owner s Manual 2014 IMPORTANT Please read this manual before using your new bicycle ...

Страница 2: ...this warranty Item 8 Warranty coverage on electrical parts for Electric Pedal Assist bikes shall be as listed below Motor 2 years Battery Controller Sensor Battery Charger 1 year The above warranty coverage periods are subject to all the limitations described below This limited warranty is not transferable and shall only apply to normal and ordinary use of this product To obtain service under this...

Страница 3: ...ND YOU ALSO REGISTER YOUR BIKE ONLINE WITH APOLLO AT www apollobikes com register 10 0 70 69 20 1 37 138 30 2 07 207 40 2 76 276 50 3 45 345 60 4 14 414 70 4 83 482 80 5 52 551 90 6 21 620 100 8 89 689 110 7 58 758 120 8 27 827 130 8 96 896 140 9 65 965 150 10 34 1032 160 11 03 1103 PSI BAR kPa PSI BAR kPa PURCHASE RECORD TYRE PRESSURE CONVERSION CHART SERIAL NUMBER LOCATION SERIAL NUMBER LOCATED ...

Страница 4: ...ject is not covered in this manual the subject matter seems beyond your level of experience or ability you have any further questions General Warning It is your responsibility to correctly maintain your bicycle Failure to maintain or inspect your bicycle may have severe consequences such as losing control when riding and falling which may ultimately result in injury or death The risk of injury or ...

Страница 5: ... Cover PART 2 Parts Classification Pages 4 7 PART 3 Before You Ride Pages 8 21 PART 4 Bicycle Care Servicing Pages 22 26 PART 6 Purchase Details Page 68 PART 7 Contact Addresses Back Cover PART 5 Comprehensive Maintenance Page 27 67 Warning Important take notice of this symbol throughout this manual ...

Страница 6: ...tenance 22 storage 22 security 23 Schedule 1 Lubrication 24 Schedule 2 Service Checklist 25 Torque Requirements Tools Required 26 INDEX 5 COMPREHENSIVE MAINTENANCE 27 Wheels and Tyres 27 wheel inspection 27 tyre inspection 28 recommended tyre pressures 28 front wheel removal replacement 29 rear wheel removal replacement 30 correct Quick Release axle setting 31 hub bearing adjustment lubrication 32...

Страница 7: ...Manoeuvring is made easier by the wider handlebars and convenient shift lever position The Crossbike or hybrid blends features of the mountain and racing bicycles Its frame is lighter than a mountain bike but heavier than a racing bicycle providing stability and comfort with increased speed PART 2 PARTS IDENTIFICATION Top Tube Seat Seat Post Seat Post Binder Bolt Seat Stay Rear Reflector Rear Brak...

Страница 8: ...asic components are similar in all models such as wide rims and tyres for increased traction and comfort Seat Seat Post Seat Tube Seat Post Binder Bolt Rear Reflector Brake Control Cable Gear Conrol Cable Rear Suspension Damper Rear Brake Wheel Reflector Gear Control Cable Freewheel Rear Derailleur Pedal Crank Arm Bottom Bracket Axle Chainwheel Chainstay Drive Chain Tyre Valve Rim Tyre Shift Lever...

Страница 9: ... and loop frames may also be used for other varieties of children s bicycles Top Tube Seat Seat Post Seat Post Binder Bolt Seat Stay Rear Reflector Wheel Reflector Rear Sprocket Training Wheel Crash Pad Handlebar Stem Head Set Head Tube Chainwheel Chainstay Chain Tyre Valve Rim Tyre Handlebar Grip Brake Lever Handlebar Brake Control Cable Reflector Front Brake Brake Pad Front Fork Wheel Reflector ...

Страница 10: ...p Tube Seat Seat Post Seat Post Binder Bolt Seat Stay Rear Reflector Rear Brake Wheel Reflector Spoke Protector Disc Rear Derailleur Freewheel Rear Dropout Handlebar Stem Head Set Head Tube Seat Tube Down Tube Front Derailleur Bottom Bracket Axle Toe Strap Toe Clip Pedal Crank Arm Chainwheel Chainstay Chain Tyre Valve Rim Tyre Brake Control Cable Front Reflector Brake Shift Lever Handlebar Front B...

Страница 11: ... and gents bicycles are also available in a variety of frame sizes Sizing is based on the distance between the centre of the bottom bracket and the top of the frame seat tube Female riders should take into account the slope of the top tube to determine frame size suitability WARNING For safe riding your bicycle should match your size correctly otherwise you may loose control and fall Ideally there...

Страница 12: ...es Wheel Size kid s models Suggested Frame Size for Road Bikes Suggested Frame Size for Mountain or Hybrid Bikes 4 6 30cm 12 46cm min 5 10 40cm 16 55cm min 6 14 50cm 20 61cm min 12 16 61cm 24 61 69cm 12 plus 37cm 14 5 66 76cm 12 plus 43cm 17 71 79cm 12 plus 50cm 19 5 45cm 18 12 plus 55cm 21 5 50cm 19 5 79 86cm 12 plus 57cm 22 5 52cm 20 5 81 89cm 12 plus 60cm 23 5 53cm 21 56cm 22 12 plus 63cm 25 58...

Страница 13: ...ht The leg should be practically straight when the heel of that foot is placed on the pedal Caution Ensure the seat pillar post does not extend beyond the minimum insertion mark Refer to Page 42 on how to adjust the seat height Take special note if your bicycle is fitted with a suspension type seat post 2 Reach When riding it is important not to overextend one s reach To determine the ideal positi...

Страница 14: ...5 on how to adjust Handlebars WARNING The steering action may be compromised if the stem binder bolt the handlebar binder bolt or the bar end extension clamping bolts are not sufficiently tightened This could result in the rider losing control and falling To check try to twist the handlebar stem assembly whilst the front wheel of the bike is positioned between your legs If the stem twists in relat...

Страница 15: ...rk Prior to every ride please complete the following safety checks 1 Brakes Check front and rear brakes are working correctly Check brake control cables for wear and ensure they are oiled and properly adjusted Check brake control levers are lubricated and securely fastened to the handlebar Check brake shoe pads for wear and their positioning in relation to the rims 2 Wheels and Tyres Check tyre pr...

Страница 16: ...n smoothly and show no signs of excess movement grinding or rattling 7 Cranks and Pedals Check cranks are securely fastened to the axle and are straight Check pedals are properly and firmly attached to the crank 8 Derailleurs Check the front and rear mechanisms are operating appropriately Check control levers are securely anchored Check derailleurs control cables and shift levers are sufficiently ...

Страница 17: ...ycle rider and any passenger in a child seat are wearing helmets HELMETS When riding your bicycle it is recommended that you always wear an appropriately fitting Australian Standards Approved bicycle helmet This also applies to any passengers you may carry in a child safety seat A bicycle helmet must carry the Australia New Zealand Standards approved mark AS NZS 2063 label fit properly The helmet ...

Страница 18: ...nd drain grates Be alert Watch for such things as motorists opening doors or backing out of concealed driveways Sound your bell for a warning when required Train and tram tracks should be crossed at a 90 degree and preferably walk your bicycle over Know how your bicycle operates Practice braking gear shifts and if fitted using toe clips and straps Always apply the rear brake first then the front w...

Страница 19: ...e dark should never be undertaken without fully operational front and rear bicycle lights The use of bicycle lights is mandatory for night riding in most Australian States Attach a fully operational lighting set Lights should have a white front lamp and a red rear lamp Use a flashing rear light to improve visibility Charge batteries if battery powered lights are to be used Check wiring connections...

Страница 20: ...ition and the inside knee angled slightly in the direction you are turning The other leg should be kept straight Avoid pedalling through fast or tight corners Rules for Children Any child bicycle rider needs to be taught correct riding skills and behaviour particularly addressing safety before they take to the streets Hopefully by doing so accidents can be avoided 1 Always wear a correct fitting h...

Страница 21: ...oss the chainwheel at the front of the bike if fitted Multispeed bicycles today can range form 5 6 gears to as many as 30 Rear derailleurs are fitted to all multispeed bicycles while front derailleurs are only present on those bicycles with the higher number of gears Gears enable the cyclist to select the most appropriate pedalling resistance best suited for the riding conditions The more gears fi...

Страница 22: ...ul gear change either moving up or down in gears the pedalling pressure must be relaxed Failure to ease the pressure when changing gears may result in bicycle damage or could even cause the rider to lose control If a rubbing sound is detected after attempting to alter gears adjust the shifter until the sound ceases Generally the lower gears are for ascending hills and the higher gears are for desc...

Страница 23: ...e Bar Shifters The majority of mountain style bicycles use below bar shifters These shifters are mounted on the underside of the handlebars usually between the grips and the handlebars It is a two finger operating system which uses the thumb and index finger to make the gear selection By pushing the lower larger right shifter with your thumb a lower gear is selected as a larger rear cog is engaged...

Страница 24: ...end of the handlebars or on the brake lever hoods in the drops Pulling the shifter towards the bar activates the brakes while shifting the dual control lever in towards the front wheel engages the gears To select a higher gear the small right lever is pushed to engage a smaller rear cog Pushing the large lever inwards activates the large front chainwheel To select a lower gear shift the large righ...

Страница 25: ... of alloy components and B E D black electronic deposit treated steel rims To avoid rapid bearing deterioration the hub and bottom bracket bearings need to be removed and re greased if the bicycle has been submerged in water Avoid cycling in the rain or exposure to corrosive materials such as the salt from riding on the beach as much as possible If unavoidable wash and dry your bicycle often and w...

Страница 26: ...ycle serial number generally located underneath the bottom bracket of the frame 2 Register the bicycle with the manufacturer distributor and local police 3 If your bicycle is left unattended always secure it to an immovable object such as a lamp post Use a high quality bicycle lock that will resist hack saws and bolt cutters Solid Post Bicycle Frame U Lock Rear Wheel High Security using a U Lock ...

Страница 27: ...h on or squirt Derailleurs oil oil can Brake callipers oil 3 drops form oil can Brake levers oil 2 drops from oil can Monthly Shift levers lithium based grease disassemble Brake cable ends oil 1 drop from oil can 6 monthly Hubs lithium based grease disassemble Bottom bracket lithium based grease disassemble Pedals lithium based grease disassemble Freewheel oil 2 squirts form oil can Brake cables l...

Страница 28: ... crank bearings for looseness 32 38 52 Check pedals are tight 51 Check handlebars are tight 36 Check seat and seat post are tight and comfortably adjusted 41 Check all nuts and bolts are tight 26 6 monthly Lubrication as per schedule 1 24 Check all points as per monthly service 25 Check and replace brake pads if required 48 Check chain for excess play or wear 56 Yearly Lubrication as per schedule ...

Страница 29: ... Rear axle nuts 24 29 Nm Handlebar clamp nut 17 19 Nm Head stem expander bolt 17 19 Nm Seat clamp nuts 12 17 Nm Seat post binder nut 15 19 Nm Brake cable fixing nut 7 11 Nm Brake calliper centre bolt nut 1 2 17 Nm Cotterless crank nut 27 Nm Tools needed for making adjustments 1 Adjustable wrench 2 Flathead screwdriver 3 Allen key wrenches 2mm 3mm 4mm 5mm 6mm 8mm 4 Tyre pump 5 Standard multi grip p...

Страница 30: ...t will be necessary We recommend any adjustments should be completed by a professional bicycle mechanic as it is quite a complex task In the case of buckled wheels that use rim brakes braking is adversely effected Broken or loose spokes Caution Damaged spokes can create severe instability and have the potential to cause an accident for the rider Before riding ensure that all spokes are present int...

Страница 31: ...t surfaces and in varying weather conditions Recommended tyre pressure is given either as maximum pressure or as a pressure range For riding on smooth slick terrain such as hard packed clay and on deep loose surfaces such as deep dry sand tyres should be inflated to lower pressures at the bottom of the recommended pressure range This helps to cushion the rider against the impact Using high pressur...

Страница 32: ...k Release tension and close the lever when adequate tension is achieved When closed the lever should be parallel to the fork to prevent accidental opening when riding 3 When secondary retention devices are present ensure they are properly lodged in the fork ends 4 If fitted firmly fasten both axle nuts 5 Re set the brake quick release and inspect the brake pad clearance If able adjust the brake ca...

Страница 33: ...replacement virtually follows the reverse process to rear wheel removal 2 For derailleur geared bicycles hold the rear derailleur spring fully back and feed the top part of the smallest hub cog into the top part of the chain Fit the wheel into the frame 3 For single geared bicycles lift the chain over the axle and onto the cog and fit the wheel onto the frame 4 Ensure the wheel is centred correctl...

Страница 34: ...rrect process for removing and installing Quick Release wheels 2 Prior to riding your bicycle ensure that the wheel lever is firmly clamped To correctly clamp your quick release wheels in place refer to the following 1 To set open the lever so that the curved part faces away from the bicycle 2 While holding the lever in one hand spin the adjusting nut manually until it is tight 3 Spin the lever ha...

Страница 35: ...ycle mechanic perform the disassembly However if you feel capable the process is listed below 1 Take the wheel out of the frame 2 Remove the axle nut cone lock nut and the bearing cone from one side of the hub axle 3 Remove the axle complete with the cone and lock nut from the other side of the hub 4 If your bicycle is fitted with dust caps carefully remove them from both sides of the hub to expos...

Страница 36: ...e rim for other potential causes such as protruding spokes Replace the rim tape covering the spoke ends if damaged 9 Remount the side of the tyre onto the rim 10 Partially inflate the tube with a hand pump until it starts to take shape 11 Taking care not to twist the valve stem place it through the hole in the rim and work the tube into the tyre 12 Starting either side of the valve use your hands ...

Страница 37: ...ted The Presta valve is also referred to as the French or high pressure valve In order to inflate tyres equipped with this valve the pump needs to have a special fitting attached to accommodate the valve s narrower profile The service station pump can be used if an adapter is screwed onto the valve stem Inflation involves removing the dust cap unscrewing the valve stem locknut freeing the valve st...

Страница 38: ... These same adjusting principles cannot be applied to the Ahead Set headstem system Etched on the stem is a mark about 65mm up from the bottom with the words max height or minimum insertion Never ride a bicycle if the stem has been raised so that the minimum insertion max height line can be seen The front brake cable is routed through a hole in the front of the stem on some MTB bikes Adjusting the...

Страница 39: ...t the bar should be almost horizontal with the ends pointing back and slightly down The drop style handlebars of racing bicycles should have the ends angled toward the rear wheel hub A single Allen key or hexagonal bolt is used to secure the handlebar into the stem on MTB and Racing style bicycles BMX bicycles may have four clamping bolts These should be tightened to 18Nm Ensure that the curved ra...

Страница 40: ...quipped with a suspension system and you require further information refer to the separate leaflet included with your bike where supplied or seek assistance from your specialist dealer WARNING Failure to inspect and correctly adjust the suspension system may result in suspension malfunction potentially causing you to lose control and fall Keep all exposed moving portions of the suspension system c...

Страница 41: ...he headset is properly adjusted and that the headset locknut is securely fastened Ahead Set Type Assemblies When assembling a new bike with this type of fitting the dust cap covering the Allen head bolt needs to be removed and the bolt holding the top plug undone Remove the cardboard cover Slip the handlebar stem over the exposed fork steerer and replace the top plug The handlebars and the forks n...

Страница 42: ...lower ball retainer 6 Thoroughly clean and check each part of the headset for damage Replace if necessary See your dealer to replace the headset 7 Grease both the head set cups To work grease into the lower head cup re fit a ball retainer into it Re attach the forks 8 Install a bearing retainer into the bearing race and pack it with grease Push the screw cup down onto the fork steerer and into pos...

Страница 43: ...k neck The original lock washer is now redundant Place lock nut D onto fork neck and alter the head set as usual Connect the upper cable to the left brake lever Discard cable ferrule provided on the upper cable if your lever is already equipped with a cable adjuster Hook the two cable ends 1 to the top hooks B1 of the rotor bearing unit Screw the adjusting barrels into the upper cable stop Pull ro...

Страница 44: ...DDLE AND SEAT POST Inspection Part of your monthly maintenance tasks needs to include inspection and adjustment of the seat post binder bolt and the seat fixing bolt ensuring both are firmly secured When the seat post is removed from the frame a mark about 65mm up from the bottom can be observed with the words max height or minimum insertion At all times a minimum of 65mm of seat tube must always ...

Страница 45: ...imum insertion max height mark Bicycles are most commonly fitted with two types of seat clamps The majority use a steel clamp with hexagonal nuts on either side to tightened The second type a micro adjustable clamp uses a single vertically mounted Allen head fixing bolt which is tighten A quick release mechanism may also be used The operation of a Quick Release seat post mechanism is the same as f...

Страница 46: ... BMX bikes with out gear mechanisms The brake is activated by pushing backwards on the pedal This activates a brake in the rear hub and allows the rider to slow or stop Inspection The brake levers and the brake pads are the two main components that need to be checked to ensure your brakes are functioning effectively Positioning of the brake levers should be checked to ensure they can be easily rea...

Страница 47: ...imately 1 5mm 2mm clearance between the brake pad and the rim 3 Re fasten the lock nut If the clearance between the brake pad and the rim cannot be set to 2mm or less using the above process the cable length may need to be altered To do this 1 Screw the barrel adjuster in completely 2 Press the pads against the rim 3 Un fasten the cable anchor bolt and use pliers to pull the cable through 4 Re fas...

Страница 48: ...k fixing bolt to fasten the brake body to the frame 2 Hold the shoe against the rim and swap the position of the 6mm and 3mm B washer so that A is maintained at 39mm or more Refer to the following diagram for clarification 5mm Allen Key Spring hole Stopper pin 39mm or more A Washer Link fixing bolt 3mm washer B 6mm washer B Washer A Washer B Washer Shoe Fixing Link Shoe Fixing Nut 5mm Allen Key er...

Страница 49: ...e cable fixing bolt 5 Alter the spring tension adjustment screws to correct the balance 6 Check the brake operation and shoe clearance by fully squeezing the brake lever repeatedly about 10 times Loosen and then re fasten the cable fixing bolt as per Step 4 until adjustment is correct Make any fine alterations via the adjusting screw at the brake lever 5mm Allen Key 5mm Allen Key 5mm Allen Key 5mm...

Страница 50: ... the nut with a 10mm wrench to a torque of 7 Nm to 9 Nm See Fig 3 To connect the braking cables refer to the following steps and Fig 1 1 Attach the braking cable to the straddle cable bridge 2 Set the straddle cable as in Fig 1 and alter the shoe rim until a clearance of 1 5mm on both sides is achieved 3 Fasten the straddle cable with the cable fixing nut to a tightening torque of 5 Nm to 7 Nm 4 T...

Страница 51: ... in place and test that the brakes are functioning correctly Do not ride the bicycle until the brakes are working effectively Disc Brake Adjustment Mechanical 1 Ensure the fixing bolts are securely fastened to the disc brake mount 2 Adjust the callipers active lever as close to the rotor as possible 3 Adjust the neutral side with the relevant adjuster If your disc brakes allow adjustment of the ca...

Страница 52: ...ely Riders should repeatedly practice using such pedals in areas free from traffic hazards or obstacles until operation becomes a reflex action Failure to do so could result in the cyclist losing control of the bicycle and falling It is also recommended that the straps be kept loose initially and gradually tightened as the rider s skill in using the pedals increases However toe straps should never...

Страница 53: ...equired to clip the foot in an out of the pedal can be adjusted on many clipless pedals For further instruction on how to do this consult your dealer WARNING Clipless pedals should only be used with shoes specifically made to fit the make and model of the pedal being used WARNING Clipless pedals require a certain level of skill to operate safely Riders should repeatedly practice using such pedals ...

Страница 54: ...stamped on the end of the axle screws into the crank on the chainwheel side of the bicycle in a clockwise direction The left pedal is marked with an L on the axle and it is attached to the other side in an anti clockwise direction To attach place the pedals into the correct crank arm and wind on by hand as tightly as possible in the appropriate direction Use a 15mm wrench to fasten more securely R...

Страница 55: ...is properly adjusted For Three Piece Cranks Check that the crank axle nuts are tight Adjust the bottom bracket bearings as necessary Remove the chain and test for crank movement on the axle by attempting to move the cranks from side to side with your hands Only very slight movement in the bottom bracket should be noted Rotate the cranks Adjust and oil if they do not spin freely or a grinding noise...

Страница 56: ...ide locknut clockwise and remove as well as the keyed lock washer 4 Use a screwdriver to turn the adjusting cone clockwise and remove 5 Remove the left ball retainer slide the crank assembly out of the frame to the right and remove the right ball retainer Once the crank is dismantled clean all bearing surfaces and the ball retainers and check for wear Replace any damaged parts and pack grease into...

Страница 57: ... all bearing surfaces and the ball retainers and check for wear Replace any damaged parts and pack grease into the ball bearing retainers Re assemble the crank in the reverse order of the procedure listed above Three Piece Crank Removal To remove Cotterless cranks you will need to use a specific removing tool Follow the outline below to guide you through the process 1 Use a coin or a screwdriver t...

Страница 58: ...se There after the cranks should remain secure 1 Remove the dust cap 2 Gently tap the crank arm with a mallet 3 Re tighten the flange nuts and refit the dust caps Lubrication and Replacement Cartridge Bottom Bracket Freeplay cannot be removed from a cartridge bottom bracket It is a sealed unit and is designed to be replaced as an entire unit when it is worn out Once the cranks have been removed a ...

Страница 59: ...eared bicycles 1 Loosen the rear axle nuts and coaster brake arm clip if fitted 2 Move the wheel in the frame until the chain has approximately 10mm of vertical movement when checked in the centre between the chainwheel and the rear sprocket Moving the wheel forward loosens the chain and backward movement will make it tighter 3 Centre the wheel in the frame and re tighten the axle nuts To remove a...

Страница 60: ...the bicycle Bring the two ends together within the special tool and punch the rivet into place Take care not to push rivet too far through the side plate Derailleur geared bicycles can now be fitted with some new types of chains that do not require special tools to remove or replace Instead a new special disposable connecting link is used every time you disassemble the chain For further details on...

Страница 61: ... pressure to activate The rider can then coast without pedalling if desired Coaster hub brakes come in several different models Regardless of which style is fitted to your bicycle only minimal maintenance is required by the rider The coaster hub sprocket should be kept clean and lubricated whenever the chain is oiled Any adjustments or replacements are best handled by a professional bicycle mechan...

Страница 62: ...lever mechanisms form an integrated unit with the derailleur system For further information relating to your derailleur system refer to the separate specific manual supplied with your bicycle otherwise consult your professional bicycle mechanic Inspection Review the overall functioning of the derailleur system at least monthly Begin by testing the rear derailleur Check that it moves the chain easi...

Страница 63: ...if the chain moves past the second gear Spin the pedals and with the chain still in second gear turn the adjuster anti clockwise until just before the chain makes noise against the third gear This adjustment increases the tension of the inner cable If after completing the above process further adjustment is still required stand behind the bike Shift the chain to the smallest rear cog and the large...

Страница 64: ...hift the chain onto the largest rear sprocket and the smallest chainring Move the shifter until the derailleur guide pulley and the sprocket are aligned Rotate the L adjustment screw until it meets resistance The derailleur will move outward and throw the chain off the sprocket when pedalling if the screw is turned in too far Conversely if the adjustment stops the derailleur moving far enough the ...

Страница 65: ...the derailleur just clears the chain For triple systems altering the cable tension adjuster on the shifter levers enables the positioning to be fine tuned to a lower or higher location Increasing tension moves the derailleur to a higher position and lessening the tension moves it to a lower position After making any adjustments it is important to test the gears in all possible front and rear chain...

Страница 66: ... fitted As a part of your bicycle maintenance ensure that all reflectors are clean intact and securely fastened The front and rear reflectors should be vertically aligned and the wheel reflectors should be secured opposite the valve within 75mm of the rim When riding at night in addition to the reflectors the bicycle should also be equipped with powered lights Reflective tape on the rider s clothi...

Страница 67: ...movable object to help minimise the risk of theft Take care when choosing a lock for the range available is considerable but not all are necessarily effective anti theft devices 4 Lights For safety it is recommended your bicycle should always be fitted with lights when riding at night or in other low light conditions These should be used in conjunction to your bicycle s fitted reflectors Although ...

Страница 68: ... keep it dry 10 Saddle Bags As the name implies they attach under the seat for discreet storage for all your essentials such as tools a spare tube or a puncture kit Other small bags are also available to fit on the handlebars or in the corner of the main frame 11 Bar Ends Fitted to the ends of Mountain Bicycle handlebars bar ends increase the rider s hand positioning options especially when climbi...

Страница 69: ... any sharp objects from tyre Tyre pressure too low Inflate tyre to correct pressure Spoke protruding into rim File down spoke When the brakes are applied Brake blocks worn Replace brake blocks they squeal squeak Brake blocks rim greasy wet or dirty Clean blocks and rim Brake block toe in incorrect Correct block toe in Brake arms loose Secure mounting bolts Wobbling wheel Axle broken Replace axle W...

Страница 70: ...not freewheel Freewheel internal pawl pins are jammed Lubricate If problem persists replace freewheel Incorrect gear shifting Derailleur cables sticking stretched damaged Lubricate tighten replace cables Front or rear derailleur not adjusted properly Alter derailleurs Indexed shifting not adjusted properly Alter indexing Steering not accurate Wheels not aligned in frame Align wheels correctly Head...

Страница 71: ...RAOM0413 Apollo Bicycle Company Pty Ltd ABN 60 001 914 469 68 NOTES PART 6 PURCHASE DETAILS ...

Страница 72: ...apollobikes com VISIT US ONLINE radiusbikes com au Radius is Distributed by Apollo Bicycle Co PTY LTD ABN 60001 914 469 PO Box 5125 Studfield Victoria 3152 Ph 03 9881 6600 Fax 03 9881 6666 ...

Отзывы: